No collaboration hop is complete without a giveaway! To be entered to win the giveaway, all you need to do is comment at each stop along the Blog Hop! Trinity Stamps and Inkon3 will be giving away a $25 gift card to their respective stores! Be sure to comment before 11:59 PM PST on August 26, 2021 to be entered to win! Each company will post their random winner by September 1, 2021 at 10AM PST! Make sure to check the Trinity Stamps blog and Inkon3 blog to see if you’re a winner!
- 12 piece collection of double sided 6x9 papers - two sheets of 6 double-sided designs
- Summer Sparkles - Kit Exclusive mix of rhinestones in Trinity Stamps Signature storage box
- InkOn3 Mini Ink Cubes - Fadeout no-line coloring ink, Sweet Petunia Pink, Marigold Orange, and Goddess Green
This exclusive kit is available only while supplies last. If purchased separately, these items total $72.50. That's a savings of $32.50! The cost of the kit will be $39.99.
I stamped the corner floral cluster from the stamp set in the Summer Blooms Kit and colored it with Copic Markers then used the coordinating dies ( also included in the kit ) to cut out the image. I die cut a sentiment from the Trinity Stamps A-7 Envelope Builder Die Set from white cardstock and layered it onto vellum and popped up my items onto my card with foam tape. I used Liquid Pixie Dust to add a healthy layer of shimmer to my elements.
Thanks for joining me for this quick and colorful project! Remember to hop on through the links below for more inspiration using the Summer Blooms Kit!
I went bold with the new Wonky Lines Stencil from InkOn3! I did a bit of easy masking and Copic coloring and you can catch it all on YouTube!
I stamped the large floral cluster from the Lilac Dreams Stamp Set onto the middle of a piece of white cardstock and did some quick Copic coloring. I have white lilacs in my backyard, so I colored the image like them - white with pale purple centers! Once the image was colored I stamped the same image onto masking paper and trimmed it out and placed the mask over the stamped and colored image.
I placed the new Wonky Lines Stencil over the card and used Blackout Hybrid Detail Ink over the stencil. I went back and forth between purple and black, but I am SO happy I went with black! It's so bold and beautiful! When I peeled off my mask I had a nice white border around my stamped image which makes it pop off the background!
I wanted to keep the card simple, so I die cut a sentiment from white and black cardstock and offset them and covered them and the lilac with Liquid Pixie Dust for shine. That's it! Thanks for stopping by!
Hi! I *almost* made a one layer card using InkOn3 Atelier Inks as watercolors ... and then I couldn't help myself and added a layer! *face palm* Maybe one of these days!
I used Sweet Petunia Pink and Marylin Red Atelier Inks to watercolor the flower, Goddess Green for the stem, and Trinity Teal for the pitcher. I needed ground my "scene" so I watered down some Twiggy Brown Atelier Ink and added a line of ink under the pitcher. Once the ink was dry I went over everything with Liquid Pixie Dust. I trimmed down the panel just a bit and popped it up onto a white card base. And that's it! See you soon!
I die cut the kisses word die from the Bad & Boujee Die Set and added some color to the bottom with Trinity Teal Atelier Ink. I used a blender brush and kept the color concentrated towards the bottom and lighter at the middle, fading to white at the top of the die cut sentiment. I arranged all three elements onto my cascading lips card front.
No boujee card is complete without some Liquid Pixie Dust! I covered the perfume bottle as well as the sentiment with a coating of the magical shimmer to finish the card. Thanks for peeking at my card! I hope this inspires you to be a bit boujee today!
Hey, there! It's hard to believe that Valentine's Day is in just 6 weeks, isn't it!? Here's a simple card with traditional colors that's perfect for using up scraps of cardstock. And the cute little raccoon from InkOn3 is just the cutest!
I always keep my scraps of cardstock ( and patterned paper ) to use on future projects - but I never actually get around to those "future projects"! This is one of my go to techniques for using up scraps. I cut four colors of cardstock into strips a quarter of an inch thick, but you could cut to any width you like - the technique works with just about anything! I covered a piece of A2 sized cardstock with my favorite liquid adhesive and adhered the strips in a diagonal pattern.
Once my background was covered in pretty strips of pink cardstock I used a circle die to cut a hill for my critter to sit on. I cut down a piece of cardstock and then hung a large circle die off the bottom to create a perfectly even hill shape. I added the hill to the bottom of my card using fun foam for dimension.
I wanted to finish the card with some glam so I added Liquid Pixie Dust to the raccoon and balloon as well as Glossy Accents to make the balloon shine. Thanks for joining me! I'll see you soon!
Hooray for new Atelier Inks from InkOn3! We are celebrating with an Instagram hop and giveaways, so be sure to head to Instagram for all the details. I made a quick video to go along with the hop so you can see the new Atelier Inks in action!
These inks are gorgeous colors on their own, but I love the look you can get when you blend and mix them together!
There are so many ways to use white pigment ink, but stamping over ink blending is one of my favorites! I love how it softens back into the background for a subtle look!
I just love the new colors of Atelier Ink! I wanted to show both of them off since they pair so well. I masked off the top portion of my card and blended on Sweet Petunia Pink Atelier Ink onto the bottom portion of my card. These Atelier Inks blend so smoothly! They're just gorgeous. I moved my masking tape to cover the bottom of my card and started working on the top portion. I blended the Trinity Teal Atelier Ink in quarter of an inch strips with half an inch of white space separating them. This is such a simple masked design, but I just love it! I kept the masking tape in place over the pink bottom and added some black ink spatters to the top for more texture.
I used Blackout Hybrid Detail Ink to stamp the cute little peeking kitty and party hat from the Purr-ific Kitty Cats Stamp Set and colored them with Copic Markers. I trimmed around the outside of the images with my scissors leaving a small white border. I adhered them onto my card with foam tape so that he would be peeking over the pink "edge" of my card and added a stamped sentiment below the image.
I thought I had a bit too much Sweet Petunia Pink blended at the bottom of my card and the balance was off, so I trimmed down my panel and added it onto a white card base. A bit of Liquid Pixie Dust on my little kitty finishes the card! Thanks for joining me!
GET EXCITED! There's a new collaboration between InkOn3 and ThermOWeb! I just adore both of these companies and I'm so excited to mix together their products to create a card. I used some Atelier Ink Reinkers from InkOn3 and Glitz Glitter Gel from ThermOWeb and made a custom color of Glitz for my stenciled background!
My images for this card are the GORGEOUS florals from the BeYOUtiful Stamp Set from InkOn3. I stamped them with my favorite black ink - Blackout Hybrid Detail Ink - and colored them with Copic Markers. I thought the yellow flower would really compliment the orange background! I trimmed them out and added them to the card with iCraft 3D Foam Squares. The background glitters so much that I thought the flowers needed some glitter, too! I keep some Liquid Pixie Dust in a Small Watercolor Brush so all I have to do is shake it up and brush it over the images and BOOM! They're sparkly, and glitter, and amazing!
I hope you've enjoyed this fun collaboration tutorial and that you'll use your Atelier Ink Reinkers to color your own custom color of Glitz Glitter Gel!
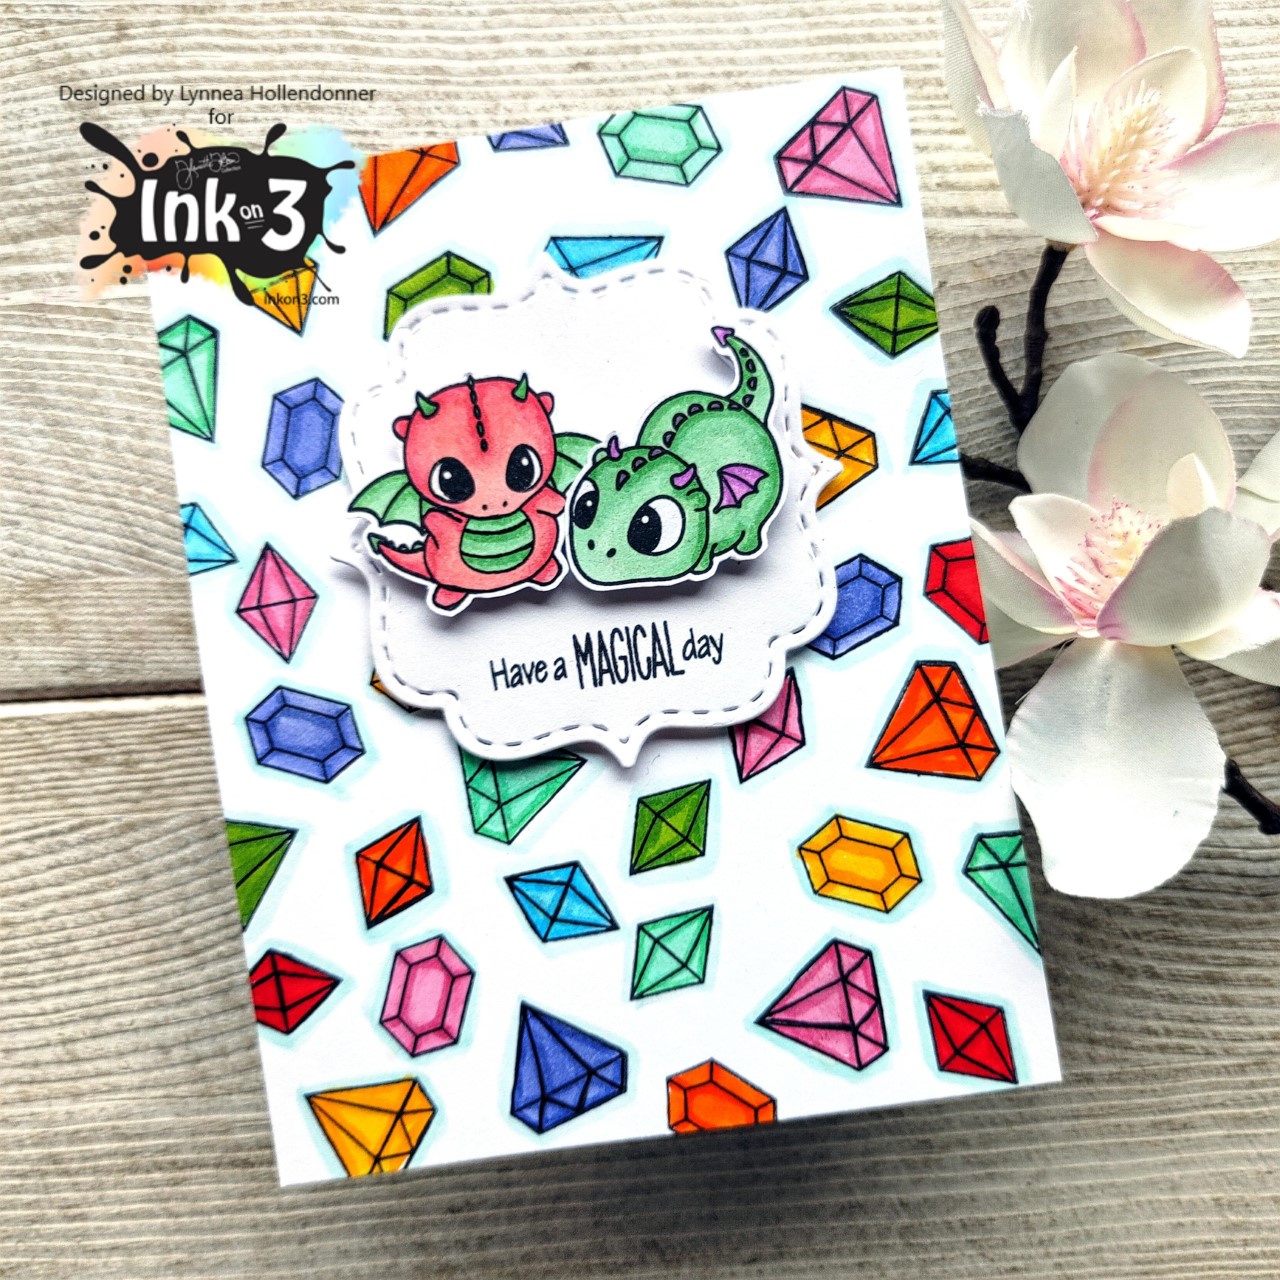
Hi there! Today I'm sharing a bunch of my favorite Copic color combinations and coloring up a bunch of gems and dragons from the InkOn3Magical Dragons Stamp Set!
This card is so easy to create. I used my favorite black inks - Blackout Detail Hybrid Ink. This ink is PERFECT for all kinds of coloring mediums from alcohol inks, and pencils, to watercolors!
Let's start with this fun background! I mounted all three gems from the Magical Dragons Stamp Set onto an acrylic block and used my Blackout Hybrid Detail Ink to stamp them all over a piece of Neenah cardstock. When stamping a bunch of small images I find it easier to use an acrylic block rather than a stamping platform. I can quickly rotate my acrylic block without cleaning my stamps in between inking until my background is full. Speaking of cleaning my stamps! - I like to use the Ink Off Stamp Cleaning Pad and an Ink Off Cloth to remove ink and clean my stamps. Hybrid Inks naturally stick to photopolymer stamps and stain them, but the Ink Off Stamp Cleaner magically cleans the ink away!
I also stamped out a couple of the dragons from the Magical Dragons Stamp Set and die cut them with the coordinating Magical Dragons Die Set. Then I set to coloring! I chose to use Copic Markers, but because I stamped with the Blackout Detail Ink I could have chosen essentially any coloring medium my little heart desired! I used a whole rainbow of colors for my background of gems. These are some of my favorite Copic color combos! I color simply and usually only use two markers per color. You can see all of them in the video, but I thought I would list them here for you as well!
Pink - R83, R85
Red - R27, R29
Orange - YR04, YR07
Yellow - Y15, Y17
Mint - G00, G02
Green - YG25, YG17
Blue - B01, B02
Purple - BV02, BV04
Shadow - BG10
I started to assemble my card and realized my little dragons were blending in to the background. I die cut a stitched shape and popped them onto it with foam tape. I added a stamped sentiment from the Magical Dragons Stamp Set below the dragons with Blackout Hybrid Detail Ink and added the shape to my card with more foam tape.
All that's left to do is add some magic with Liquid Pixie Dust! I keep a small amount in a Small Watercolor Brush so that I can easily shake it up and brush it onto my colored images. That's all! I hope you find this video useful!
InkOn3 and Trinity Stamps are collaborating today to bring you some inspiration from both companies! And there's an Instagram Hop with lots of inspiration and prizes to celebrate! Be sure to head over to my Instagram account for all the details!
I love mixing and matching products from different companies! Let's start with the lovely inky background! The Catching Some Rays Stencils from Trinity Stamps give a pretty starburst effect. And since it's a set of 2 layering stencils you can get creative with how you use them! I started with the thicker of the Catching Some Rays Stencils and blended some Bee Sting Atelier Ink over the top. Then I lined up the second stencil and blended Marilyn Red Atelier Ink over that for a two toned starburst background.
I just LOVE cupcakes! The Sweet Surprise Stamp Set from Trinity Stamps is right up my alley! I stamped it with Blackout Hybrid Detail Ink and colored it with Copic Markers. I couldn't pick a single color, so I rainbowed the cupcake liner. Everything is better with a rainbow, right?!
I trimmed out the image and then cut out the center portion of the icing so that I could build my shaker card. I backed it with acetate, made a little "well" with foam tape, and filled it up with sprinkles! I used the Carousel Cupcake Sprinkles from Trinity Stamps. They just seemed so perfect!
I added everything to the front of my card with foam tape and added a healthy dose of Liquid Pixie Dust to the rays in the background and to the cupcake. That's it! Thanks for joining me! And remember to head over to Instagram for the hop and prizes!
Rainbows just make me so happy! Especially when they're bright and vibrant and mixed with beautiful white flowers! I used Atelier Ink Re-Inkers from InkOn3 along with the Posies Stamp Set for today's card - and I have to say - I really like it!
I love using re-inkers to add rich, vibrant color and the Atelier Inks are gorgeously pigmented! I wanted to have some simple chunky stripes, so I decided to just free hand them!
I stamped my image from the Posies Stamp Set with Blackout Hybrid Detail Ink by combining the vase, stem, and flower onto heavy weight white cardstock. I colored the image quickly with Copic Markers and trimmed it out. I snapped a photo of the Copics that I used or you can see the coloring in action in the video above! Of course I needed a bit more shimmer, so I covered the image with Liquid Pixie Dust.
I finished the card by stamping a sentiment from the Posies Stamp Set with Blackout Hybrid Detail Ink and adding the image with foam tape. I hope you like it! There's just something so striking about a vibrant rainbow background with a simple white flower. See you soon!
I have to be honest - I didn't know if today's project would work when I started making my card. In theory ... it should work - but you know how that goes! I'm calling it No Line Resist and it's SO easy! I used InkOn3 Fadeout No Line Ink and an assortment of Atelier Inks for my card!
This technique is so easy and I love the results! And you can replicate this with any stamp set in your stash!
Let's start! I used the tiny little images in the Fox & Bunny Hugs stamp set and the Forever Friends stamp set to create my background. I love using the little images in stamp sets and bringing them to life! I chose a bunch of small images and mounted them all together in a cluster on my acrylic block. I used InkOn3 Fadeout No Line Ink and repeatedly stamped the cluster of stamps until my whole background was covered.
When I use Fadeout No Line Ink for watercoloring I love how the ink grabs and traps my color making no line coloring simple and easy. My idea was to use that property of the Fadeout Ink for an entire background. In theory it should work - and it did! After my background was stamped with the Fadeout Ink I smooshed some Atelier Ink onto my work surface. I didn't want the colors to get too muddy, so I decided to use just Marilyn Red, Bee Sting Yellow, and Peacock Blue and let the colors mix to form the rest of the colors of the rainbow. I used plenty of water to the color would move and blend and look! See how the stamped images are darker! It's a tone on tone look that was so easy to do! The Fadeout Ink grabbed the Atelier Ink as I colored and trapped it leaving a darker concentration of color and the background images just pop!
Once my background was dry I put a little puddle of Liquid Pixie Dust onto my work surface and flicked on some dots of glitter all over the background.
It's so crazy that it's the end of April already! But that means it's time for a new release from Kindred Stamps! Hooray! I'm using the Seas the Day stamp set to create a fun slimline card.
The entire Kindred Stamps April release will be available Friday, April 24 at 8am PST/11am EST. Be sure to subscribe to the Kindred Stamps blog to see a daily line up of sneak peeks from our amazing Design Team and see the full product release on Friday! Come join the Fan Club and release eventto be part of the release fun, and you may just win some Kindred Stamps credit!!
Slimline cards are all the rage right now and I've willingly jumped on the bandwagon! It's so unexpected and really doesn't require any extra work as it's still just a simple single score line card. I know there are many different dimensions for slimline cards floating around out there, but I made my card 3.25 x 8.25".
I wanted to start with a stenciled background ... because it's me! Haha! I feel like I'm always starting with stencils, but come on! You can't go wrong! I used the Mermaid Scales stencil from Kindred Stamps, sprayed the back with Pixie Spray, and positioned it at the bottom of my card (but you could start at the top. It doesn't matter in the least). I blended two colors of ink - Pistachios-A-Plenty all over the stencil and Marina Madness on the edges. This gives me a lot of dimension and adds interest to the background. And I love how the inks layered together! After the bottom portion of my card was inked I removed the Mermaid Scales stencil, shifted it up, and inked the top in the same way. For a touch of shimmer I added some flicks of Liquid Pixie Dust all over my background.
I stamped both seahorses from the Seas the Day stamp set and the sentiment with some Detail Hybrid Ink and colored them with Spectrum Noir Triblend Markers. These images are super easy to cut out and I trimmed them quickly with scissors. I also trimmed in between each word in the sentiment so that I could stack the sentiment to fill my slimline card. I added the seahorses and the sentiment pieces to the center of the card with foam tape and I added a die cut Slimline Scallop Die to finish off the card.