Showing posts with label Penguin Palace. Show all posts

Friday, December 20, 2019

Simple Masked Rainbow Stripes

Hi, there! Sometimes I love the simplicity of just masking and inking some stripes! Especially rainbow stripes!


I used some masking tape and masked off quarter inch sections of my cardstock and blended on bright and happy ink colors. Originally I was going to do the whole rainbow, but when I saw these four colors together I fell in love and decided to stop! I stamped out some images from the Penguin Palace Fun Night Out stamp set and colored them with Copic markers. I colored them to match the stripes in the background! Then I cut them out with the coordinating Fun Night Out die set and added them to the front of my card with foam tape.


I love the simplicity of this card! All the white space makes me happy!

Friday, December 13, 2019

Monochromatic One Layer Card

I never make one layer cards - or monochromatic cards! So I decided to try and push myself and do it! I didn't even add gems! Haha!


I used a piece of masking paper to mask off a circle from the top center of my card and inked up the Rain of Hearts stencil from Penguin Palace with some gray ink. I kept the ink heavier at the top than at the bottom. I stamped the image and sentiment from the Happy Track & Field Chapter 2 stamp set in the center of my masked circle and colored it with Copic markers.


I love this card so much that I might have to do a whole set in a bunch of different colors! See you soon!

Friday, December 6, 2019

Ink Blended Striped Hearts

Hi! I just love rainbows! And hearts! And stripes! So why not mix them! I used the Rain of Hearts stencil from Penguin Palace and the Rabbit Cafe stamp set to make this bright card!


I sprayed the back of the Rain of Hearts stencil with Pixie Spray and tacked it onto my card base. I used strips of Purple Tape to mask off portions of the stencil and blend on a rainbow of Distress Inks.


I stamped out the cute images from the Rabbit Cafe stamp set and colored them with Copics and cut them out with the coordinating Rabbit Cafe dies. I added them on top of an die cut circle and blended the outside edge with yellow ink.


Hope you all love this bright card as much as I do!

Friday, November 29, 2019

A Very Merry Blue and Purple Christmas

Hi! I'm using the Crystal Snowflakes stencil from Penguin Palace again today! I just can't get enough of this stencil! I love all of the different sizes and shapes of snowflakes!


I started by blending some dark blue ink on a piece of cardstock and used the Crystal Snowflakes stencil to add some purple ink on top of the blue background. I decided instead of leaving the whole background with the intense ink blending to chop off the bottom portion of my panel at an angle. I sprayed the background with Silver Glitter Dust to add a bunch of sparkle. No winter card is complete without sparkle, right?!


To bring in some more color I stenciled the Crystal Snowflakes stencil onto my card base with a lighter blue ink and glued the original panel on top. I gave the card a finishing edge by trimming a piece of white glitter cardstock and adding it to the card where the two panels meet. I wanted to add a fun sentiment, so I used some letter dies to die cut "merry" from some purple glitter cardstock and lined up the letters right on the diagonal line.


Check out all of that sparkle!! I just love it!! See you soon!

Friday, November 22, 2019

Penguin Palace Red Snowflake Background

Hey, there! Sometimes I like to mix things up and use unexpected colors for my backgrounds. Who says snowflakes can't be red?


I used a piece of watercolor cardstock and added some Hickory Smoke Distress ink around the edges and then used the Crystal Snowflakes stencil from Penguin Palace to add some red snowflakes to my background. I cut out a hill shape from a second piece of cardstock and added some gray ink to the top of the snow bank for some dimension.


I stamped out some images from the Rabbit Cafe stamp set and colored them with red accents to match my background. I cut them out with the coordinating Rabbit Cafe dies and added them onto the snow bank with foam squares. I stamped a sentiment from the Rabbit Cafe stamp set in the same red ink I used for my snowflakes in the background.


I added a bunch of white gems to the background for some sparkle! See you again soon!

Friday, November 15, 2019

Penguin Palace Crystal Snowflakes Shaker Card

Hi, there! I'm using the Crystal Snowflakes stencil from Penguin Palace to make an easy full shaker that fills the whole front of my card!


I just love to make shaker cards! I started with the Crystal Snowflakes stencil and pressed Versamark ink through the stencil and heat embossed it with white powder. Check out my video above to see how I used Pixie Spray to create a little extra "flurry" in my background! I used Seedless Preserves, Wilted Violet, and Shaded Lilac Distress Oxide Inks to blend over the embossing and give color to my background. Then I sprayed my background with Silver Glitter Dust for extra sparkle.


I filled up an A2 shaker pouch with some of my favorite silver, gold, and white sequins and beads. I love the way these sequins look against the purple background! To finish off the card I added a "Merry" word die cut from glitter cardstock to the top of the shaker pouch.


I just love the way that Crystal Snowflakes stencil looks behind all of those shaker bits! Thanks so much for stopping by!

Friday, November 8, 2019

Penguin Palace Rain of Hearts Stencil

Hi! I just love using stencils, don't you!? Penguin Palace just released a bunch of new stencils and Rain of Hearts is one of my favorites! I use it with some new Silver Glitz Glitter Gel!


I love all of the different mediums that are available in the crafty world to use with stencils, but Glitz Glitter Gel is one of my favorites! It makes any stenciled pattern so fabulously glittery! I took the Rain of Hearts stencil and sprayed the back of it with Pixie Spray and placed it onto a piece of black cardstock. I used a Stencil Pal and spread some new Silver Glitz Glitter Gel over the stencil. When I peeled back the stencil I have perfectly glittery silver hearts all over my black cardstock background! So pretty! 


I needed the perfect image to go on top of my stenciled Glitz Glitter Gel background so I stamped out the cute unicorn from the Birthday Unicorn stamp set and colored him with my alcohol markers. I cut out the image and stamped a sentiment on a strip of white cardstock and added both to the side of my card with foam tape. 


All of these hearts look so fabulous! Thanks for joining me! 

Friday, November 1, 2019

Penguin Palace Lucky Break - Jackpot!! Shaker Card

Hi, there! I'm using the super fun Lucky Break stamp set from Penguin Palace to create a slot machine shaker card! The best part is - it's super easy! The coordinating die set for this stamp set cuts out the windows for you!


I stamped and colored the cute little images from the Lucky Break stamp set and die cut them with the coordinating dies. The die set does all the hard work for me and cuts out each of the little windows! Fabulous, right?!


I created a simple shaker card element with the slot machine and added a bit of ink blending behind the images for a pop of color. The stamped sentiment at the bottom is just perfect!


Check out the video at the beginning of this post to see how easy it was to create this shaker! See you soon!

Friday, October 25, 2019

Spinning Cheerleader Card

Hi, there! I created a fun spinner card using the new Penguin Palace Happy Track & Field Chapter 2 stamp set!


This card is really fun! The cheerleader in the middle both slides and spins! Almost like she's doing flips across the grass!


All of my colored images are from the Happy Track & Field Chapter 2 stamp set. I colored them with Spectrum Noir Triblend markers and die cut them with the coordinating die cuts.


A few extra bits and bobs is all it took to create this perfect slider spinner card! Thanks for stopping by!

Saturday, October 19, 2019

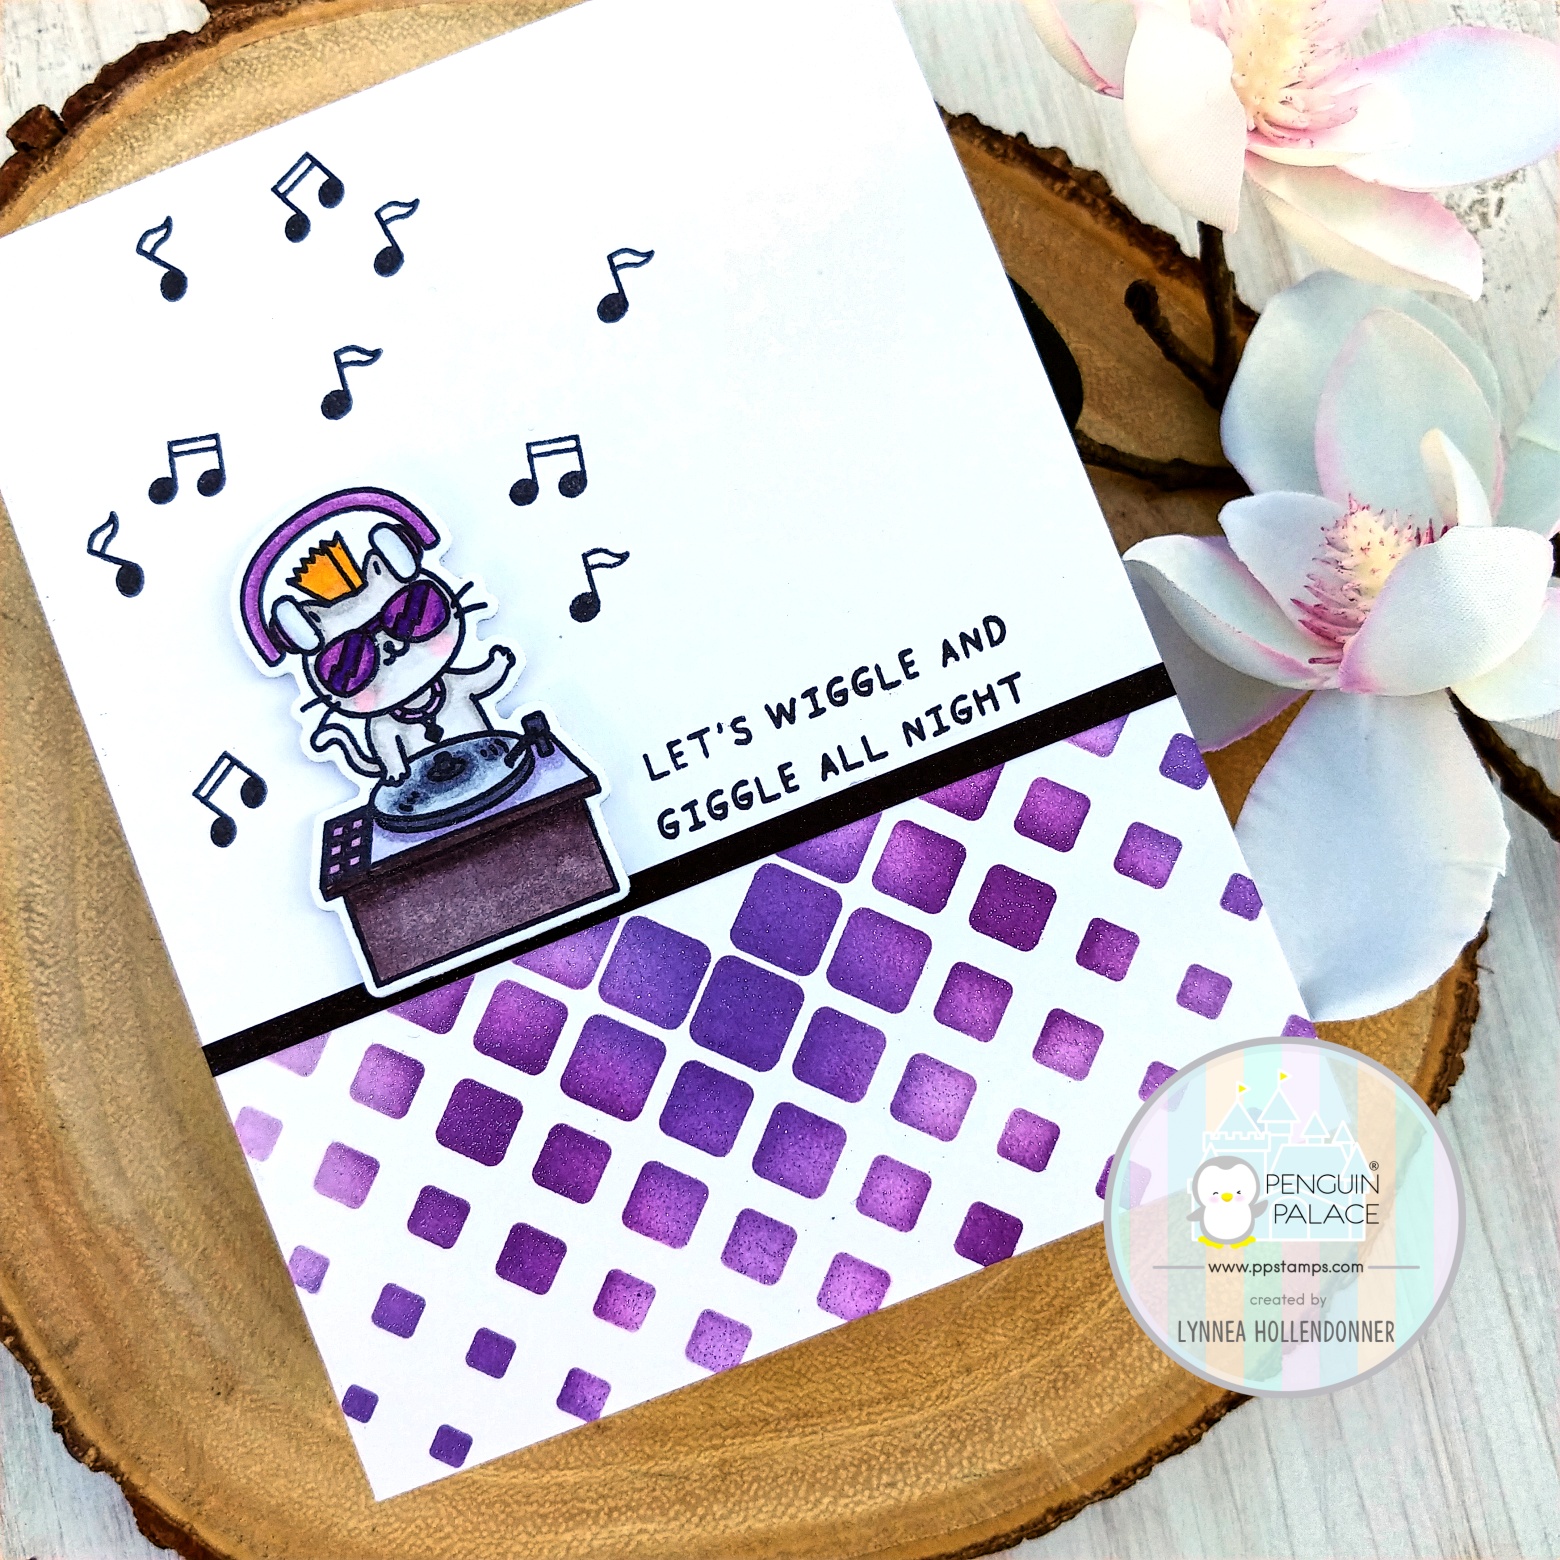
Penguin Palace Cyber Wallpaper Stencil

I have another project for you featuring the Penguin Palace fall and winter release! This time I'm featuring the Cyber Wallpaper stencil and mixing it with the Fun Night Out stamp set!


This card is a simple design, but I added a few bits and bobs to step it up a notch!


I used three colors of purple Distress Inks and blended them over the Cyber Wallpaper stencil that I masked off with Purple Tape. Before removing the stencil I sprayed it with Silver Glitter Dust Spray for sparkle! I also added a thin strip of black cardstock to finish the edge of the stenciling.


I colored the cat DJ from the Fun Night Out stamp set and cut him out with the coordinating dies and added him with foam squares. I stamped a sentiment and some music notes to fill in the background! Thanks for joining me!

Friday, October 18, 2019

Penguin Palace Vintage Basket Stencil

I hope you're loving the new release from Penguin Palace! I LOVE that they have added stencils to their shop! Stencils are so versatile! Today I'll show you one way that I like to step up my stencil game!


I love to add multiple colors to one stencil to create a multicolored background and the Vintage Basket stencil is a really easy design to add two colors to a background! I used small ink blending brushes to add Twisted Citron and Squeezed Lemonade Distress Inks to add color to the background and die cut the panel with the largest die from the Cross Stitched and Dots Large Rectangle die set.


I needed a cute little image to add to the front of my card so I stamped and colored the cute little relaying turtles from the new Happy Track & Field Chapter 1 stamp set and die cut the image with the coordinating dies. I added the image and the sentiment to the front of my card with foam tape. And that's all! See you soon!

Wednesday, October 16, 2019

Shake, Shake, Shake it Off!

The Fun Night Out stamp set from Penguin Palace is just that - FUN! The images and sentiments make me want to get up and dance!


I created a simple card, but it's so fun because these little critters actually shake, rattle, and roll on the dance floor!


I stamped out both of the dancing critters and the dance floor from the Fun Night Out stamp set and colored them with Copic markers. Check out the video above to see the color combos I used! I even gave selective tiles on the dance floor some pops of color! Then I cut out the images with the Fun Night Out coordinating dies.


I added the dance floor to the card with glue and stamped the sentiment above my mini scene and filled in some of the white space with the music notes.


Instead of just gluing the dancing critters onto the dance floor I adhered them both on action wobblers so that they can shake around! And that's it!

Monday, October 14, 2019

Penguin Palace Happy Track and Field Chapter 1

It's time for the new release from Penguin Palace! I'm kicking it off with a clean and simple card featuring the Happy Track and Field Chapter 1 stamp set!


This card is so super cute - but so so super easy to recreate! I stamped the little jumping frog from the Happy Track & Field Chapter 1 stamp set and colored him with Copic markers and then die cut the image with the coordinating dies. I love the look of ink blended die cuts, so I die cut a few stars - one frame and one to sit in the center of the frame - and colored them with Distress Inks.


I adhered all of my pieces together, stamped a sentiment, and added some Ebony Nuvo Crystal Drops here and there around my card. Thanks for joining me!

Friday, October 4, 2019

Penguin Palace Birthday Unicorn House

It's my son's 4th birthday in a few weeks and I wanted to make him a special card to celebrate! He'll love this little unicorn birthday card!


I love that the Home Sweet Home dies from Penguin Palace has in interactive opening door. It's perfect for hiding little images behind it for a sweet surprise! And I altered the roof just a tad so that it would be a flat house instead of having dimension. This card is for my son and he's a typical boy - awfully rough on things - but he's also very sentimental and I know he would be crushed if the roof on his card caved in haha!


I used images from the Birthday Unicorn stamp set to make this card super special along with some ink blending to make the house look like my parent's house! Check out the video above for all the details! See you soon!

Friday, September 20, 2019

Colorful Stamped Background

Hey, everyone! I created a colorful stamped background using the Penguin Palace Fun Adventure stamp set! This is a super easy technique that I love to use!


I picked out three of the smaller images from the Fun Adventure stamp set - the camera, suitcase, and airplane - and stamped them randomly across my card base using four different colors of ink.


I stamped, colored, and die cut the dog and girl image from the Fun Adventure stamp set as well as a sentiment strip. I thought they got lost against the background, so I used the Pink & Main Stitched Star dies to die cut a vellum star as well as a white star frame and added them to the card with the die cut elements on top.


I hope you've enjoyed this short card tutorial! See you soon!

Friday, September 13, 2019

Penguins All Lined Up

Hi, there! I created a clean and simple stenciled card today using the Penguin Agenda stamp set from Penguin Palace!


I stamped and colored 6 little penguins from the Penguin Agenda stamp set. To keep things simple and cohesive I only used two color combos and colored three penguins for each color. I used the Penguin Agenda Penguin Perfect Cuts and die cut each of the little cuties.


They needed a background, so I stenciled on some ink over a striped stencil and added the penguins in a line with foam squares so that it looked like they are holding hands. So cute, right?! I stamped a happy birthday sentiment from the An Amazing Friend stamp set to finish the card!

Friday, September 6, 2019

Distress Oxide Stencil Lifting

Hi, everyone! I have an easy technique to share with you today! It's one I've done in the past and I love to revisit good techniques!


I used a piece of watercolor cardstock and covered it completely with Black Soot Distress Oxide ink. I grabbed one of my favorite stencils and spritzed it with water and laid it on top of my inked panel and lifted the excess water with a towel. It created a bleaching effect that I just love!


For some extra texture I used three of the Cross Stitched and Dots Large Rectangle die set and die cut the inked panel. I puzzle pieced them back together and glued them to an A2 card.


I stamped, cut, and colored the movie penguin from the Penguin Agenda stamp set and heat embossed a sentiment onto the card. I love this technique especially for guy cards! It looks so cool!


Thanks for joining me!

Friday, August 30, 2019

A Little Piece of Sunshine

Hi, there! Summer is coming to an end and the air is getting a chill that I love so much! I decided to create one last summer beach card using happy bright colors and the Summer Sunshine stamp set from Penguin Palace!


I stamped out a bunch of images from the Summer Sunshine stamp set, colored them, and cut them out with the coordinating Penguin Perfect cuts.


I used a stitched cover die to die cut watercolor cardstock and added Worn Lipstick, Fossilized Amber, Tumbled Glass, and Twisted Citron inks to the four "scene" rectangles. I kept the concentration of color darkest at the bottom and spritzed on some water for texture.


I added all of my images onto the little rectangles and a sentiment banner to the center of the card. I made a process video for this card! You can watch it below!


Thanks for watching!