Christmas will be here before you know it! I’ve got two card ideas using the LDRS Creative Snow Days Puzzle Scenes Stamps - one you can make in minutes, and one that’s a little more stepped up. Quick, easy, and oh-so-snowy! ❄️
I made the same card two different ways - one with quick colored stamping, and the other with a bit of Copic coloring. Pick which one fits your style and make a cute card for Christmas!
There’s something timeless and charming about vintage postcards, and today’s card captures that feel perfectly! I used the LDRS Creative Post Card 3x4 Stamps as the focal point of my design and added extra interest with layered cardstock and subtle stamped accents from the Texturize It I & II Stamps. The mix of textures and postmark details makes this simple card feel like a treasured piece of old mail.
This card is simple, with just a few layers of cardstock and some stamping! I cut a piece of white cardstock to 3x4" and stamped the Post Card Stamps using a bit of masking and some red and blue inks. I stamped the sentiment with black ink towards the top.
I used both of the Texturize It Stamps to add distressed postage elements to the background using a mix of blue and black inks. I layered everything on some shades of light blue cardstock, and that's it! Thanks for joining me!
Make your holiday gifting extra magical! In this tutorial, I'll show you how to create matching tags and a gift card envelope straight from the North Pole using the North Pole Collage 4x6 Stamps, Mixed Tag Dies, and the Gift Card Scallop Envelope Die. Watch this Stack & Collage technique in action and see just how easy it is to make Santa’s special delivery part of your holiday crafting!
Aren't these tags just the most adorable things you've ever seen?! I just LOVE how the North Pole Collage 4x6 Stamps let you customize tags (and more!) with sentiments that you can check off naughty or nice, sleeping or awake, etc. It's so much fun!
While I had my supplies out, I decided to make a gift card envelope that matches the tags so that I could have a full set of gift giving goodies ready for the holidays! So perfect, right?! Make sure you check out my video at the top of this post to see how quickly and easily everything came together!
Looking for a quick and colorful way to bring summer vibes to your cardmaking? This easy stamped card is packed with feel-good sunshine - no coloring required! I used the Vacation Puzzle Scenes from LDRS Creative to create a playful rainbow of stamped images that show all the best parts of summer. Grab your inks and let’s dip our toes in the water with this fun and effortless tutorial!
I stamped the main grid from the Puzzle Frames 6x8 Stamps with Alloy Hybrid Ink and added two half circles to two of the rectangles so that I could use some of the curved scenes on my card. From here it's just about having fun stamping the scenes from the Vacation Puzzle Scenes 6x8 Stamps! I chose to fill the center of the puzzle grid with four images in gray so that the sentiment would stand out. The images around the outer edge however, RAINBOW! I stamped Tickled Pink, In Your Face Orange, Dan-D-Lion, Key Lime Pie, Marina Madness, La La Lavender, and Boysenberry Blast Inks - so pretty!
I trimmed down the panel and added it onto an aqua card base. My sentiment comes from the Lighthouse 4x6 Stamps and I stamped it onto a small die-cut piece from the Mixed Postage Rectangle Dies. I popped it up in the center of my stamped panel, and that's it!
These inlay stamps are my new favorite style of stamps! It is SO incredibly easy to create beautiful scenes with minimal effort - just my style of papercrafting! I cut one of the Hand Torn Ovals and placed it into my stamping platform and built a scene with the Cozy Days Inlay 6x8 Stamps. I like to start with what I call the "base" of inlay stamping. Simply find the largest image in your scene and stamp that onto your card. In this instance, it's the trees. Then I moved on to the deer, and finished with the stars. Look at the detail! And I didn't have to do anything fancy! I added another oval and popped them up onto a red card base for a pop of color.
Even though I only made one card in today's video, you could easily create a whole bunch of this design at once! I would create an "assembly line" - die cut all of your ovals at once, stamp all of the trees, then stamp all of the deer, etc. This makes it quick and easy so you don't have to reposition your stamps a bunch of times. Happy crafting!
I combined all of the most wonderful things about Christmas on this card! Trees, Santa, reindeer, and the sleigh, and super cute sentiments! See how this card came together on the LDRS Creative YouTube Channel!
Have you tried Stack and Collage stamping? It's so fun! Just grab your inks and stamps and start having fun! I used the 'Tis the Season Collage 4x6 Stamps and a few LDRS Creative Hybrid Inks to create a quick and easy collaged card. I like to start with the Ledger II 3x4 Stamp so that I have a guide to know where to to build my stamping, but you could go totally crazy and stamp wherever you like!
I hope you love this wintery Christmas card and that it inspires you to start collage stamping! I'll see you soon!
I started my card by layering my tree from the Holiday Floral 6x8 Stamps with Raven, Olive Branch, Kiss Me Red, and Scarlet Rose Hybrid Inks. I used the largest die in the Holiday Floral Coordinating Dies to cut out the image as well as the smallest die to cut a triangle from the center of the layered image. I cut a bunch of extra small triangles from black cardstock as well as a large tree from white cardstock. I adhered the largest trees together and then stacked the smaller triangles with liquid adhesive and puzzled them into the center of the tree. This creates an eclipse effect that is easy and super fun!
I chose a piece of pink snowflake paper from the MacKenna Christmas 12x12 Paper Pack and cut it to 3 1/2" x 4 1/2". I added a black mat measuring 3 5/8" x 4 5/8" with liquid adhesive and adhered them to an A2 card base.
I added my Holiday Floral stamped tree to the card with foam tape and added my sentiment strip across the center of the tree. That's it! I hope you enjoyed this tutorial! See you soon!
This card is truly a clean and simple, 5 minute card! It's a great design to mass produce and give as a gift. School is starting soon and I plan to make a set of 10 to give to my son's teacher. Let's jump in to the making of the card. I took the flower border stamp from the Doodle Borders II Stamp Set and lined it up in my stamping platform so that I could create a border stretching across the top center of my card. I stamped the image with Raven Hybrid Ink onto an A2 card and then flipped the card 180 degrees and stamped again.
I used a few alcohol markers to color in my images - a light and dark shade of pink, aqua, and yellow - as well as a green marker for the leaves. I wanted to add a finished border, so I used a T-square ruler and a black felt tipped pen to add a single line under each of the flower borders.
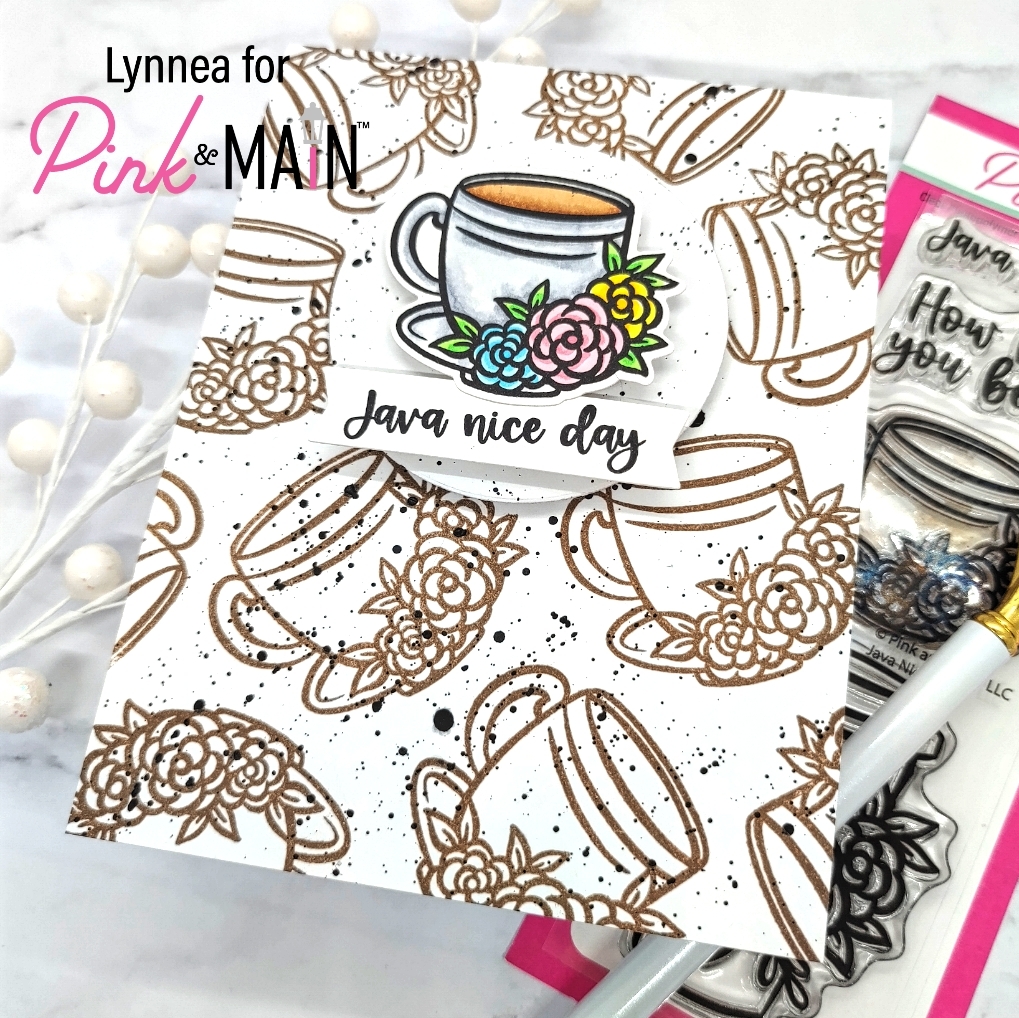
I'm hoping everyone is having a java nice day! Here's a cute and simple card using Pink & Main stamps!
I love a nice and easy stamped background. It's such a great way to utilize your stamps! The small cup and saucer in the Java Nice Day Stamp Set is absolutely adorable! And it doesn't have to be coffee - I think it would be perfect for tea party invitations! I stamped it all over my card base using a medium brown ink making sure to twist and rotate my stamp for a random look. I added some texture with black watercolor spatter.
I stamped the same image on a separate piece of cardstock and colored it with Copics and used the Java Nice Day Dies to cut it out. I also stamped a sentiment and used a die from the Large Sentiment Strip Dies to cut it out with a perfect ribbon edge.
I cut a circle from white cardstock using a Layered Circle Die and added some black ink spatters to match my background. I added all of my elements to the front of my card with foam tape to finish off the card. Thanks for joining me!
My son started kindergarten a few weeks ago and I decided to spoil his teacher with a set of cards stamped with InkOn3 Atelier Inks!
Teachers work so hard and I wanted to show my son's teacher how much I appreciate her! I thought a long time about what style of card to make, but when I saw these apples I knew they were perfect!
I made one card to give to her and then a set of five cards to give as a gift. I used the Taylored Expressions I Pick You Cling & Clear Combo for all of the cards. This was the perfect set because it gave me an excuse to bust out my Atelier Inks and do some solid stamping!
Once all of my apples were stamped I used the I Pick You Stencil to add more detail to the backgrounds. This stencil perfectly masks off the apples in the background and creates some fun horizontal stripes. I used Peacock Blue, Paint It Black, and Twiggy Brown Atelier Inks to add ink blending to the backgrounds.
Even thought all the backgrounds are different I decided to keep things consistent by using the same sentiment on each card. I die cut using the My Favorite Things Sweet Hello Die Set and popped the sentiments up onto my card. I stamped a coordinating sentiment from the I Pick You Stamp Set with Blackout Hybrid Detail Ink to complete the look.
I hope this project inspires you! Thanks so much for watching!
Who says pine trees stay green? Oh, everyone? I've taken some creative liberties with today's card and given the LDRS Creative Pine Tree Forest Stamp Set some Autumn color!
This card was so easy to to make and can be easily mass produced. And if you don't love the look of Autumn colored evergreens you can always re-create this design with traditional colors for a holiday card!
I used three colors of LDRS Creative Hybrid Inks and created a gradient of color from red to yellow - traditional Autumn colors - and stamped the Pine Tree Forest Stamp repeatedly across the card.
I added a sentiment from the Harvest Wishes Stamp Set and some ink spatters to finish the card. Come back tomorrow for some easy Halloween inspiration!
Have you tried the Atelier Inks from InkOn3? You neeeeed to! They are perfect for ink blending, and watercoloring - and even just to stamp! I've played around with a bunch of techniques, but today I decided to do some simple stamping with all the rainbow colors of Atelier Ink!
The Atelier Ink stamps so crisp and beautiful without repeat stamping! Each of the little lips was stamped only once! And they're PERFECT!
I made four cards using the Bad & Boujee Stamp Set - two of them are rainbow ( ooooh my favorite! ), one has the first half of the rainbow, and the last has the second half of the rainbow.
Let's make some sparkly die cut sentiments! I love my Liquid Pixie Dust for added sparkle on die cuts, but this time I cheated a bit! I took a piece of black cardstock and mixed a bit of water with Liquid Pixie Dust and used a flat paintbrush to paint my piece of cardstock. Boom! Magically glittery cardstock! Then I used the coordinating Bad & Boujee Die Set to cut out the sentiment and added it to each card.
I added flicks of black to each background and embellished with some gray or black pearls! And that's all! I hope you'll grab your Atelier Inks for some simple stamping! The results are gorgeous! See you soon!
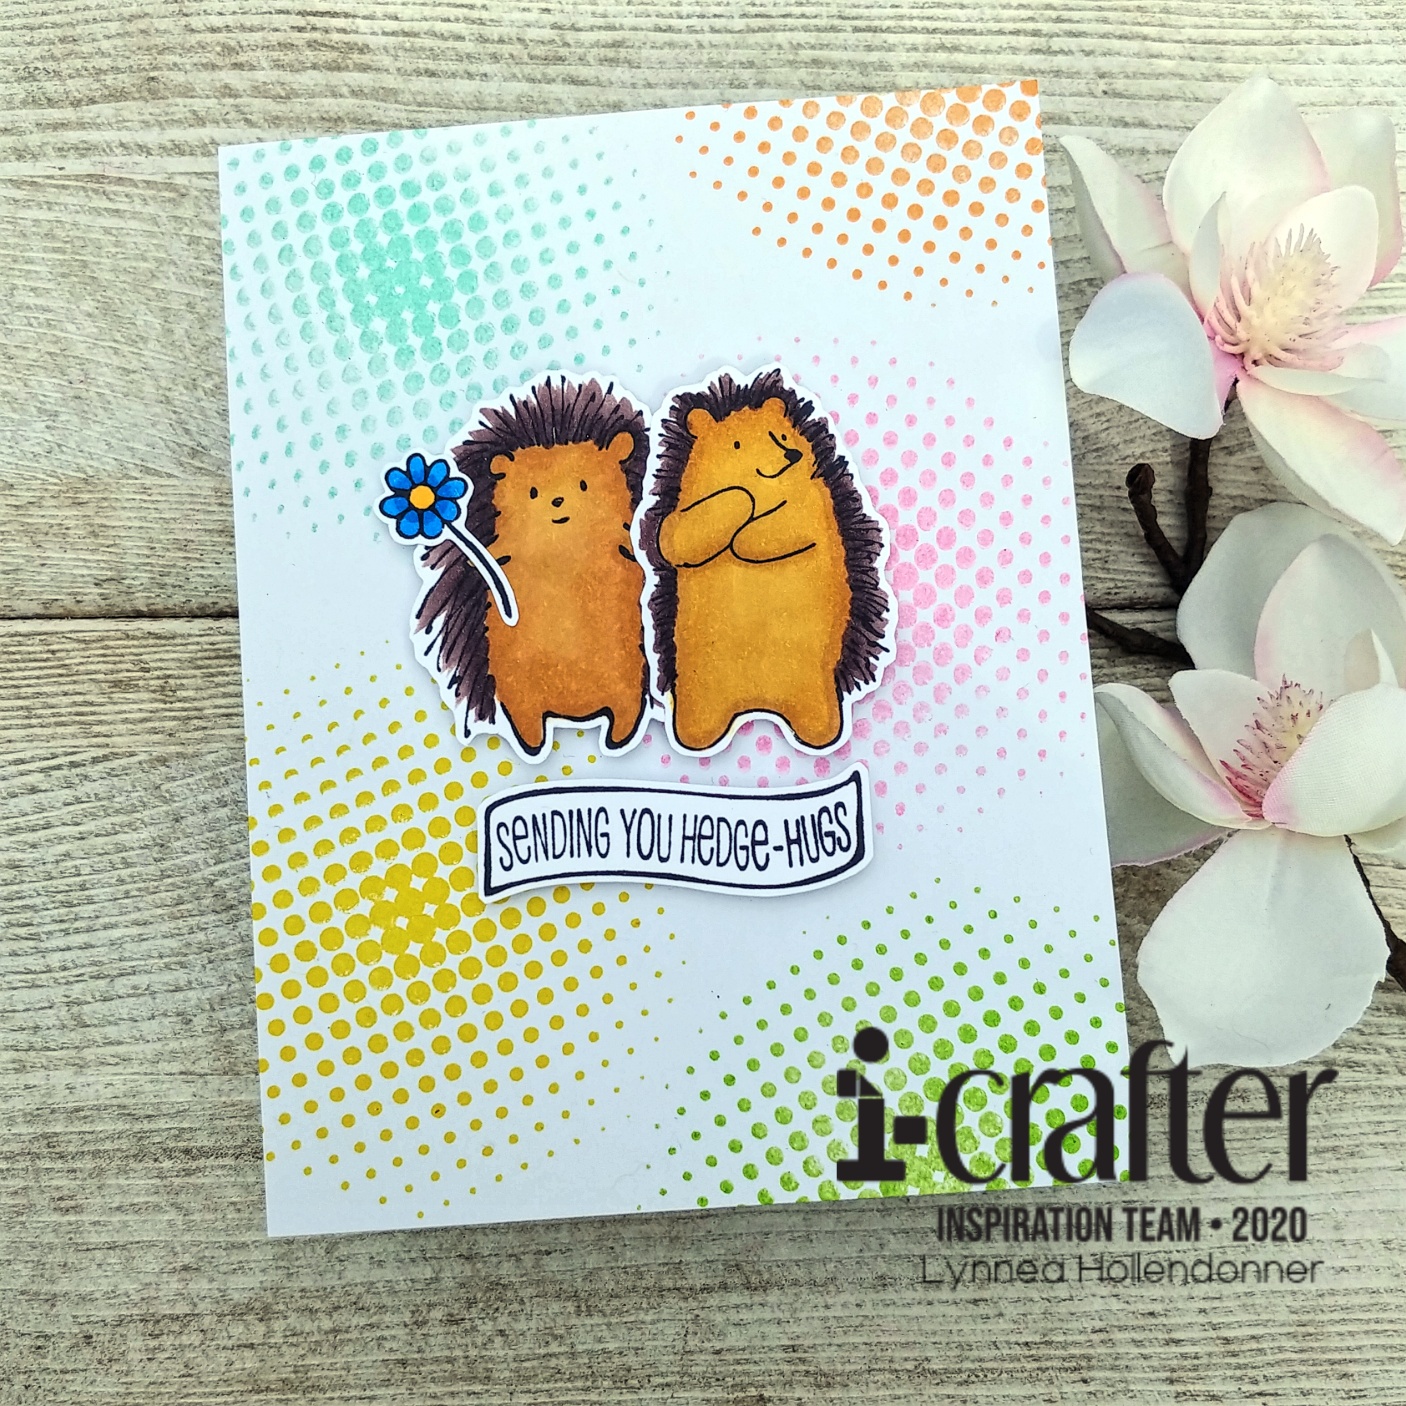
I used my stamping tool to make stamping the background with the Comic Half Tone Dots Stamp Set quick and easy! I stamped out both of the hedgehogs, a little flower, and a sentiment from the Hedgehugs Stamp Set and colored them with Copic Markers.
I trimmed out my little critters and added them to the card with foam tape. And that's all! Thanks for stopping by!
Hi, there! I love building backgrounds from one image - especially geometric images! The Oh Em Gee stamp set from Erin Lee Creative has an image that really caught my attention, so I used it to build my whole card!
I have an obsession with triangles, so maybe that's why I love this single image so much! I started in the middle of my card and stamped the geometric image from the Oh Em Gee stamp set with a yellow/orange ink. once I had my starting image stamped I continued stamping left and right of the image to fill up the line of stamping across the middle of my card. Then I stamped in rainbow order above and below the middle line to fill up the front of my card.
I had intended to stamp the entire front of my card and include purples, but after I finished stamping three rows I liked the white space at the top and at the bottom. I stamped and white heat embossed a simple "thank you" sentiment on black cardstock from the Oh Em Gee stamp set and added it to the card with foam tape.
I hope this rainbow geometric background makes you as happy as it makes me! See you soon!
Hi! Stamping with dies is one of my favorite techniques! I'll be creating some flowery backgrounds with the i-crafterFloral Garden die set!
I love the Floral Garden dies from i-crafter, but honestly all that die cutting is intimidating. I'm much more of a stamper than a die cutter. That's why I'm so happy there are so many simple ideas to do with dies! And my favorite is stamping with dies!
I chose a couple of flowers, a leaf, and some centers from the Floral Garden die set and die cut them once from fun foam. I added some tape runner adhesive to the back of the foam die cut stamps and adhered them onto acrylic blocks. Now they'll work just like stamps!
You can stamp the foam die cut stamps with any kind of ink - dye, hybrid, even Versamark with embossing powder - but I like to use hybrid inks because they are thick and opaque. For my first card I used Wild Honey and Fossilized Amber for the flowers and Peeled Paint for the leaf.
I only intended to make one card, but since I had pieces die cut I decided to make a couple more! I just cleaned off the fun foam stamps with stamp cleaner and stamped again! This second card is with Shaded lilac and Wilted Violet.
I did one last card with Tattered Rose and Abandoned Coral. I kept the Peeled Paint for the leaves on all three cards and Black Soot for the centers of all the flowers. I finished off each of the cards with a simple die cut sentiment. I die cut the "thanks" sentiment from the Pop Up Wiper Insert die set three times for each card and stacked up the sentiments for dimension. I covered each of the sentiments with clear shimmer and Glossy Accents.
I hope you've enjoyed this look at stamping with dies! It's such a fun technique and the possibilities are endless with the Floral Garden die set! See you soon!


.jpg)