It's safe to say that I am obsessed with plaid this Holiday season! I have an easy way to add a pop of foil and create a plaid background with an LDRS Creative stencil!
When I want to create multi toned plaid backgrounds I reach for striped stencils! I started with the Peppermint Stick Stencil and used an LDRS Creative Blender Brush to ink a white panel with Dan-D-Lion Hybrid Ink. The Peppermint Stick pattern is pretty on its own, but it's SUPER fun to rotate the stencil and then add a second layer to create a plaid! You could add the same or a different color ink, but I decided to use some Transfer Gel so that I could add some glittery gold foil to make this a festive Holiday background!
Ilina Crouse has done some AMAZING blue/teal projects with the Layered Poinsettia Die Set and I wanted to try my hand at it! I know why she loves it so much! I wasn't so sure how my colored cardstocks would piece together, but my jaw dropped to the floor! Blue poinsettias for the win! I cut two blue color combos as I wasn't sure if I wanted to go with a more teal or blue leaning poinsettia and in the end I used them both! The back of the packaging for the Layered Poinsettia Die Set has a fabulous layering guide showing all the pieces in their proper positions, so if you ever get stuck turn the package over to the back!
I adhered my die-cuts to my plaid foiled background and added a sentiment from the Potted Poinsettia Stamp Set stamped with Iced Tea Hybrid Ink to coordinate with the golden background. Thanks for joining me! I'll see you soon!
I love how easy it is to make holiday cards with the Ornamental Pines Bundle! This one incorporates a non traditional color scheme and shows off all the pieces of the bundle!
I used the Ornamental Pines Background Stamp both with and without the coordinating stencil in this project. The background of the card is stamped in a mint green ink and I used a tiny dots stencil from my stash with some White Glitz Glitter Gel for a snowy effect.
You'll have to join me live on the ThermOWeb YouTube Channel on Wednesday November 3rd at 11am CT / 12pm ET for the full tutorial complete with tips and tricks! I'll see you then!
The products in this bundle pair perfectly together! I love that you can use the A2 background stamp on its own or pair it with the coordinating layering stencil to step up your backgrounds!
I wanted to create a traditional colored Christmas card on kraft cardstock, so I used a cheat to make sure my inks would stand out against the darker background. I lined up my cardstock piece with the Ornamental Pines rubber stamp and stamped first with white pigment ink and then with a green ink. The white pigment ink helps the colored ink look more vibrant. I layered some brown ink at the bottom of each stamped tree for a bit of dimension as well.
I wanted to add something to my background to help fill in the space between the trees, so I spattered on some red shimmer watercolor all over my panel and heat set the watercolor along with the inks so that my panel was completely dry.
I die cut the word "merry" nine times from white cardstock using the Ornamental Pines Coordinating Dies and adhered three words together with an iCraft Ultra Bond Liquid Adhesive Pen so that the dainty sentiments would have dimension and adhered them in a column down the center of my card. That's it! I hope you love the Ornamental Pines Bundle as much as I do! It's gorgeous and a FABULOUS way to mass produce some incredible cards this Holiday season!
As always, the LDRS Creative Exclusive Craft Kits are limited edition and once they sell out you won't be able to get all of the items together for the special kit price - so shop fast!
I brought in some extra goodies from LDRS Creative to make these cards, but you can alter and edit these designs to use just the items from the craft kit if you want!
I decided to start out with the Circles Layering Stencils from the kit and create a simple background. I blended Key Lime Pie, Tropical Sea, and Banana Cream Pie over each of the tree stencils and just like that I had a fun and whimsical background! I die cut a label shape die from the Elegant Stitched Frames Slimline Die Set (not included) and blended a bit of Banana Cream Pie Hybrid Ink onto the bottom fading out to white at the top. I stamped a sentiment from the Pastry Pals Stamp Set and colored it in with alcohol markers. I stamped the cute donut and donut hole image with Raven Hybrid Ink and colored them and then die cut them with the coordinating dies and popped them onto my label to finish off the first card!
This card is super cute and so simple to make! I started by die cutting a piece of white cardstock with the largest die from the A2 Stitched Layered Card Toppers Die Set and then I cut the pieces down using a border die from the Offset Slimline Stack-ables Die Set (from the kit). I thought this particular border reminded me of icing on a cake! I lightly blended Soft Kisses Hybrid Ink over the border edge and faded out to white on the opposite edges. I picked a piece of patterned paper from the Sweet Sensations 6x6 Paper Pack and added it to a 4.25" square card. I popped up the stitched border pieces on top of the patterned paper and added the cute little singing cupcake and sentiment to my card. A sprinkling of pastel colored baubles from my stash completes the card!
Here's the simplest card of the bunch! I die cut the large polka dot patterned paper from the Sweet Sensations 6x6 Paper Pack with one of the border dies from the Offset Slimline Stack-ables Die Set and popped it up with foam on top of the red polka dot patterned paper. I stamped and colored the muffin and cinnamon roll from the Pastry Pals Stamp Set and used the coordinating die set to cut them out. I stamped the matching sentiment and fussy cut it with my scissors and added my elements to the card with foam tape.
I decided to really glam up my fourth card and show you a different way to use the Circle Layering Stencils from the kit! I used Grape Ape Hybrid Ink over one of the stencils and then added spatters of gold shimmer watercolor. You could choose a different stencil, but I decided to take the same stencil I used with the purple ink, rotate it twice, shift it slightly and place it down on my card once again. I used Deco Foil Transfer Gel DUO from ThermOWeb and added the gel over the stencil and let the panel dry. Once it was dry I used my die cutting machine to transfer green foil over the gel. Now I have a pretty background with ink, shimmer, and foil! I colored a green and purple pastry treat from the Pastry Pals Stamp Set to match my background and popped them up on the card. I love all the shine!
I decided to go bold and bright for my last card! I grabbed a piece of Watercolor Slimline 4x9 Paper and used my neon watercolors to paint diagonal stripes across the paper. I added some flicks of black watercolor for texture. I die cut the scallop frame using the Slimline Scallop Die Set (sold separately) and added foam tape behind the frame. I cut away the overhang of the watercolor background and added the piece onto a slimline card. I stamped and colored a bunch of the Pastry Pal images and arranged them across the middle of my card. I added a hand cut birthday sentiment to finish the card.
I share a couple of techniques in today's video that you can apply to any themed project! And they all include some easy texture from Glitz Glitter Gel and Flock Transfer Sheets!
I wanted to do something a bit special with this card and create a dipped Glitz Glitter Gel look. I started by spraying the back of the Newton's Nook Pumpkin Patch Stencil with Pixie Spray and spreading Deco Foil Transfer Gel DUO over the stencil with a Stencil Pal. I set this background aside to dry for a few hours. You'll know the panel is dry when the back of the cardstock no longer feels cool and the DUO Gel is clear, shiny, and only slightly tacky. I cut a piece of an Orange Glow Deco Foil Flock Transfer Sheet to be slightly larger than my background and placed the Flock fuzzy side DOWN into the DUO Gel and ran it through my die cutting machine. The pressure transfers the Flock into the DUO Gel without having to get out my laminator! A win win!
I peeled back the Orange Glow Deco Foil Flock backer and I'm left with a fun and fuzzy background! Don't throw that backer piece away! We'll use that for our third card! You could definitely complete the card with just the Flocked background, but I decided to go a step further and add some glam! I replaced the Newton's Nook Pumpkin Patch Stencil over my design and used a Stencil Pal to spread some Gold Glitz Glitter Gel over the bottom portion of my background.
I finished off this card the same way I did my first using images from the My Favorite Things Autumn Blessings Stamp Set. I love the look! I didn't line up my stencil quite perfectly, so I actually have an offset look!
My last card uses a the leftover piece from my second card. Many people would throw away this piece, but not me! Nothing goes to waste in my craft room! The negative piece has such a FUN texture and it's totally different from my other two cards - and it was easy to make since I used leftovers!
I finished this card just like I did the others using images from the My Favorite Things Autumn Blessings Stamp Set. When creating a set of cards it's easiest for me to create one design and replicate it. These cards all came together quickly and I love how they are each the same and different from each other!
I hope you'll use some of these techniques! "Dipping" in Glitz Glitter Gel is one of my favorite ways to add extra texture and I love when I can use my leftover pieces to create an extra card! Thanks for joining me and I'll see you soon!
You'll know when the Deco Foil Transfer Gel DUO is dry because it will turn clear and slightly tacky. I like to use the DUO Gel because you can transfer mediums without heat! I cut down a piece of Enchanted Rose Deco Foil to be slightly larger than my card front and placed it on top of the DUO Gel with the pretty side up and passed it through my die cutting machine. The pressure from the machine transferred the Foil onto the DUO Gel and I love the tone on tone look!
Things are bright and fuzzy in my craft room today! I used Deco Foil Flock Transfer Sheets to make this happy little birthday card! Join me for a quick tutorial!
Let's start with the fun textured Deco Foil Flock background! Whenever I am making a card with a "wet medium" that needs some drying time I like to start there. I cut a white card front to 4.25" x 5.5" and placed the polka dotted stencil from the Simon Says Stamp Simple Patterns Trio stencil set over the top. The stencil is exactly the size of an A2 card front, so no need to measure to get the perfect pattern in the center of a card! I used Purple Tape to temporarily adhere my stencil to my card front. I scooped out some Deco Foil Transfer Gel DUO and used my Stencil Pal to smooth it out over my stencil.
You'll know when the Deco Foil Transfer Gel DUO is dry because it will change from a milky white color to clear, shiny, and slightly tacky. The great thing about the Deco Foil Transfer Gel DUO is that it can be used with or without heat! My die cutting machine has a permanent place on my desk while my laminator does not, so the DUO Gel is SO convenient! I cut a piece of Teal Waters Deco Foil Flock to be slightly larger than my stenciled design and placed it Flock side down into the DUO Gel and ran it through my die cutting machine in my regular sandwich. I slowly peeled off the backer and I have a BEAUTIFUL (and fuzzy!) textured background!
My images are from the My Favorite Things All the Cupcakes Stamp Set. What's cuter than a rainbow of cupcakes on a birthday card?! I stamped them with black ink and then colored them with Copic Markers. I added white gel pen highlights for extra fun! I stamped a cute sentiment from the same stamp set as well.
Now let's assemble the card! I added iCraft 3D Foam Squares behind my sentiment as well as my cupcakes. These are my go to foam squares when I want a good bit of lift behind my elements. Because I'm adhering to a textured surface I added just a dot of iCraft Ultra Bond Liquid Adhesive to each foam square so that I am sure they will hold on tight.
I hope this sweet birthday card inspires you to pull out your Deco Foil Flock and give your projects an extra sprinkle of texture! See you soon!
ThermOWeb and Sassy & Crafty are celebrating their collaboration week with an Instagram hop! How exciting! Head to my Instagram HERE to participate and see lots of inspiration!
The magic of foiling never fades for me! I LOVE the results every single time! I grabbed the Sassy & Crafty Butterfly Wings Stencil and went to work! I sprayed the back of the stencil with Pixie Spray so that none of those little details would shift while I worked. I decided to show off my favorite Deco Foil of all time - Rainbow Shattered Glass! - on both black and white cardstock. I pressed the Butterfly Wings Stencil down onto a piece of cardstock and used my Stencil Pal to spread Deco Foil Transfer Gel DUO over the stencil in an even layer. I removed my stencil and placed it over my second piece of cardstock and repeated the process. These pieces take a few hours to dry, but I prefer to let them sit overnight to make sure they are fully dried.
You'll know the Deco Foil Transfer Gel DUO is dry when it turns clear (instead of white) and is only slightly tacky. Let's add some foil! Because I used the DUO Gel I have the choice of transferring foil with the heat and pressure from my laminator or just using pressure from my die cutting machine. I LOVE that! I chose to use my die cutting machine simply because it's easier for me. I cut a piece of Rainbow Shattered Glass Deco Foil to be slightly larger than my background and placed it pretty side up onto my background. You want to make sure that the silver back side of the foil makes contact with your medium (whether thats gel, toner, or adhesive). I placed my foil and background into a typing paper carrier sheet and ran it through my die cutting machine. I slowly peeled back the foil backer and I had GORGEOUS foiled butterfly backgrounds!
All that's left is to put the cards together! I added the sentiment strips with iCraft 3D Foam Strips and the butterflies with iCraft 3D Foam Squares. These cards have gorgeous shine, but are pretty simple. I like to use the iCraft Foam Adhesives when I have a simple card so there is a lot of dimension to my elements.
I hope you enjoy these cards combining my favorite ThermOWeb and Sassy & Crafty goodies! See you soon!
There's a new ThermOWeb and Gina K Designs Stamp n Stencil that's just been released! This adorable Gnome for the Holidays Stamp n Stencil is sold as a stamp, stencil, and die set all in one craft kit. You can use all of these products together with ThermOWeb goodies to make cute wintery cards!
The stamp set in the Gnome for the Holidays Stamp n Stencil Craft Kit pairs PERFECTLY with the dies and with the stencil! The dies allow you to cut all the pieces you need to build cute little gnomes and then you can stamp or stencil details onto the pieces to customize your little cuties! I die cut all the pieces I needed to build two gnomes, including two different styles of hats. I sprayed the back of the Gnome for the Holidays Stencil with a bit of Pixie Spray, lined up the corresponding patterns onto the die cut hats, and spread some Deco Foil Transfer Gel DUO over the stencil with a Stencil Pal.
The Transfer Gel DUO only needed to dry for an hour or two - the stenciled details use very little product. Once the Transfer Gel DUO changed from white to completely clear it's time to add some fun to the details! You can use Enamels, Flock, or Foil and I went for the shininess of Gold Deco Foil Transfer Sheets. I simply cut a piece of the Gold Foil and placed it "pretty side" up into the Transfer Gel DUO and ran the little hats through my die cutting machine. The pressure of the machine transfers the foil into the gel and I have pretty gold foiled dots and stripes for my gnome hats!
I stamped the mountain range from the Gnome for the Holidays Stamp Set a bit more than half way up my card using gray ink. I wanted to create some snowy hills in the foreground, so I used both sides of the bottom of the Gnome for the Holidays Stamp Set and blended on gray ink. I love flipping my stencil over on the back - you get so much more use out of the stencil! You can flip over your die cuts and have the hats pointing the other way, too!
I put together the gnomes using some iCraft Ultra Bond Liquid Adhesive. This gives me just enough time to wiggle the pieces around before it holds on tight! I added the gnomes to the background with iCraft 3D Foam Squares for dimension and stamped a sentiment in the corner from the Gnome for the Holidays Stamp Set to finish this card. See you soon!
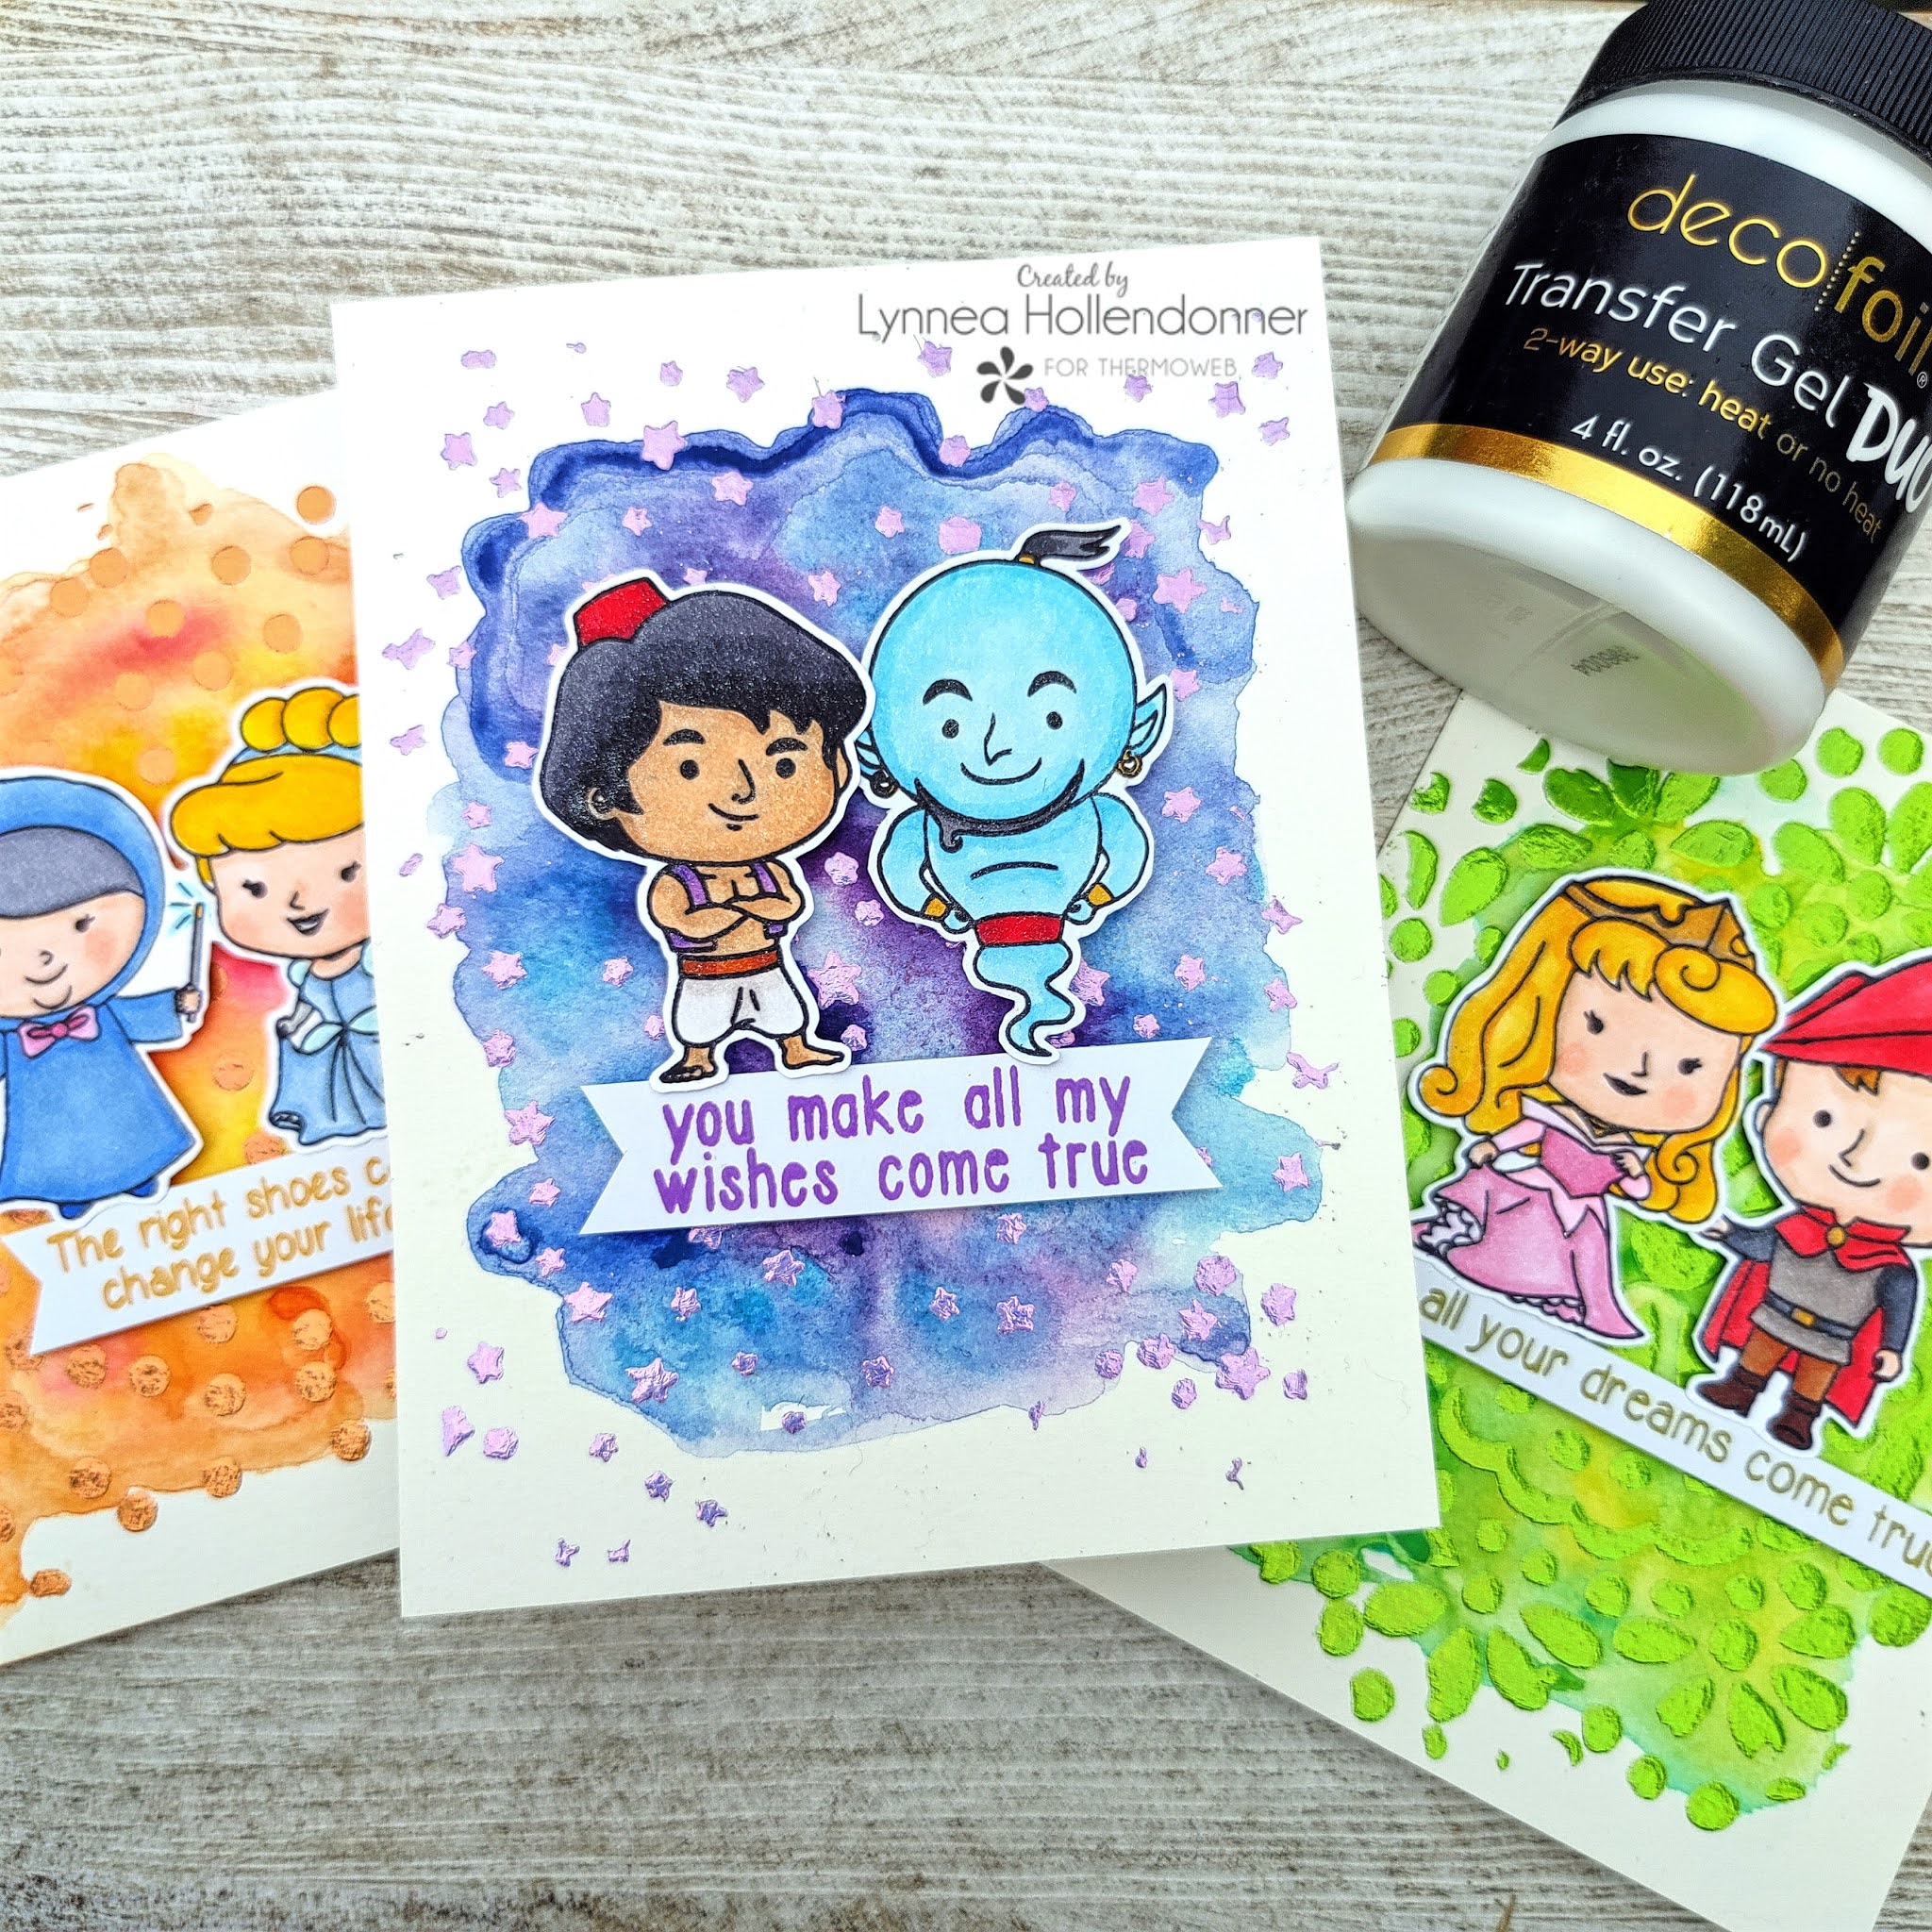
I made three cards with three different stencils and Deco Foil Transfer Gel DUO. I even color coordinated the Fairy Tale Foils to my watercolored backgrounds! These were easy to make and didn't require any heat from a laminator! Let's start!
I began by watercoloring three backgrounds that I thought would match a few colors of the Fairy Tale Deco Foil colors. My watercoloring process is simple and easy - I brushed some clean water onto my background and dropped in colors and let them blend. Each background is made up of multiple colors to give it dimension. I made three backgrounds because I had three stencils that I wanted to use - How can you possibly choose just one?! I chose the Honey Bee Stamps Twinkle, Twinkle Stencil and the Doily and Confetti Stencils from Kindred Stamps. Once my watercolored backgrounds were dry I sprayed the back of each stencil with a light application of Pixie Spray and placed a stencil onto each of my backgrounds. I used a Stencil Pal to spread a thin and even layer of Deco Foil Transfer Gel DUO over each stencil and set them aside to dry for a few hours.
You'll know the Transfer Gel DUO is dry when it is completely clear. Don't worry about it being tacky - the extra "stick" is what lets you use it with just the pressure from your die cutting machine. You can still use your laminator to apply Enamels, Foils, and Fock - but I find it VERY easy to just use my die cutting machine! I cut down a few sheets of the Fairy Tale Foils to be slightly larger than my card front and placed them pretty side UP on top of the DUO Gel. I use a piece of typing paper folded in half as a carrier sheet when putting the backgrounds through my machine. This makes it so that the cut marks from my cutting plates don't press into the foils. Another tip is to place your foil side down onto your "clean" plate. That way the cut marks don't actually come in contact with the foil! Then run the sandwich through the machine and slowly peel back the release paper - and you'll have a pretty pretty foiled background! I used three colors of Fairy Tale Foils for my backgrounds - Peach Princess, Lily Pad, and Prince Periwinkle. I thought they matched the watercolored backgrounds perfectly!
All of my images and sentiments come from some of my favorite stamp sets from Kindred Stamps! I used the Rags to Riches Stamp Set, Once Upon a Nap Stamp Set, and the Arabian Nights Stamp Set. I colored each image with Copic Markers and trimmed them out with scissors. I stamped a sentiment with a coordinating ink color to keep everything matching and added them to my cards with iCraft 3D Foam Squares. These are my favorite foam squares when I want images to really POP off the page!