Showing posts with label Ink Blending. Show all posts

Wednesday, September 2, 2026

LDRS Creative | How to Add Dimension Without Adding Layers

I’ll be the first to admit that a one-layer card is a little outside my comfort zone! I usually love creating cards with lots of layers and dimension, but sometimes you want something that’s simple to create and easy to mail. This card was all about creating the look of layers and dimension without actually adding any bulk - and there are so many little tricks you can use to make a one-layer design feel anything but flat!


I started by adding 1/2" strips of masking paper around each edge of my card panel, then blended pink and orange inks through the largest moon stencil from the Land & Sky Masks and Stencils. I intentionally let the stencil hang off the top right and bottom left edges so the ink blending would be cut off by the edge of the card. Next, I stamped the large floral image from the Floral Sketch 5x7 Stamps, positioning it so parts of the image overlapped the ink blending. A few black ink spatters added even more texture and interest before I removed the masking paper.


To finish the card, I used a fine-tip black pen to outline the edges of the card panel, which really emphasized the areas where the ink blending was cut off and gave the design the look of an additional layer. I also added Glossy Accents to the flowers that overlap the ink blending for a little bit of shine and dimension. Between the masking, cropped ink blending, overlapping imagery, ink spatters, hand-drawn border, and glossy accents, there are lots of ways to create visual depth without adding physical layers.

I had so much fun stepping outside my usual style with this card! If you love the look of layered cards but want something that's easier to mail, I hope these ideas inspire you to try creating dimension without the bulk. Sometimes a few simple techniques can make a single layer of cardstock feel like so much more!

Monday, August 10, 2026

LDRS Creative | Moonlit Forest Scene Card

There's something so peaceful about a quiet forest under the moonlight, and that's exactly the inspiration behind today's card!


Products used - 


The Land & Sky Masks and Stencils make it easy to build a glowing moonlit sky. I started with the hill, then placed the mask for the moon, and blended the navy sky. Once my ink blending was complete, I used the Trees 5x7 Stamps to add some trees and shadows to the scene. The deer from the Forest Animals 4x4 Stamps are perfectly adorable. I colored them quickly with Copic Markers and added some white details to their spots with a gel pen.


To finish my card, I framed the ink blended panel with a Pinpoint Rectangle Frame before adding everything onto a deep navy card base for a darker, nighttime look. Thanks for joining me! I'll see you next time! 

Monday, July 20, 2026

LDRS Creative | Easy Ink Blended Sunrise Card

Sometimes simple is all you need! For today's card, I created an easy abstract sunrise scene using the LDRS Creative Land & Sky Stencils and Masks. By layering just a few colors, it's amazing how quickly a beautiful landscape comes together.


Products used - 


I started by blending a bright yellow sun before using the curved hill stencils to create soft layers of orange and pink across the background. Those warm colors blend together beautifully and create a fun, modern take on a sunrise. To add contrast, I stamped a few black silhouette trees from the Trees 5x7 Stamps, then finished the design with the "wonderful you" sentiment from the Naturally Sweet Collage 4x6 Stamps.


To complete the card, I trimmed the finished panel and mounted it onto a black mat before adhering it to my card base. The black border ties in perfectly with the trees and sentiment while making all those vibrant colors pop!

Monday, July 13, 2026

LDRS Creative | Easy Summer Floral Card

There's something about blue and yellow flowers that just feels like summer to me! They're bright, cheerful, and always make me smile, so I couldn't resist using that color combination for today's clean and simple card.


Products used - 


I started by stamping one of the gorgeous images from the Floral Sketch 5x7 Stamps onto the right side of a white cardstock panel. Using the coordinating Layering Stencils, I ink blended the flower with soft blue petals and a sunny yellow center. The layered stenciling makes it so easy to add beautiful shading and dimension!


To add a little extra interest, I used the Stepped Edge Die just to the right of the flower, letting it slightly cut into the stamped image for a fun, modern detail. Of course, I couldn't resist finishing everything off with a few black ink splatters - one of my favorite ways to add texture and a little personality to a card!

After trimming the panel down, I layered it onto a piece of yellow cardstock before adhering everything to a white card base. It's a design that's easy to recreate with your favorite color combinations, but I have to admit...blue and yellow will always have my heart! Thanks for joining me! I'll see you soon!

Monday, January 19, 2026

LDRS Creative | Alpha Stencils Shaped Card

Hey there! I’m playing with the Alpha Stencils and A to Z Sentiment Stamps from LDRS Creative to create an easy shaped card that’s full of sweet little details. I’ll show you how I built up the design with dual-toned ink blending, a stenciled background, and lots of tiny touches that make a big difference - like mini die-cut flowers and little butterflies flitting around the card. Ready? Let's go! 


Products used - 

I LOVE that the Alpha Stencils are perfectly sized to fit on an A2 card front. They're great for mass producing A2 cards in a flash, but you can also cut the panels down with a trimmer or shape die. I stenciled the "A" with a couple of inks in the center of a panel and then cut it down with one of the Star Octagon Frame Dies. I cut a mat as well as a shaped card using the same set of dies. I added some additional ink blending over one of the Pattern Background Stencils on the mat to create some extra texture and layered these panels onto the shape card. The "always" sentiment from the A to Z Sentiments 5x7 Stamps is so versatile. This card can be used for anniversaries, weddings, or just to say "I'll always be there" to a friend. 


From there, I just wanted to add some simple elements to pull everything together. I added a stem and some flowers from the Petite Petals Dies and some butterflies from the aLined Geos 4x6 Stamps to finish everything. That's it! Thanks so much for joining me!

Monday, December 1, 2025

LDRS Creative | Postage-Themed Christmas Card

Looking for festive Christmas card inspiration? I've got you covered! In today’s tutorial, I’m taking an all-occasion card design I previously shared and giving it a holiday makeover with a fun postage-themed Christmas card!

I mixed together several LDRS Creative holiday products to create a layered card filled with postage rectangle die-cuts, subtle texture, and plenty of cozy Christmas charm. The star of the card is the most adorable ink-blended gingerbread man!


Products used - 


The inspiration for this card came from one that I created a few months back. It has a similar layout, but with different background elements, and is all-occasion themed. I loved it so much, I wanted to give it a twist! I'll walk you through how I created today's card, but check out the end of my post to see the original card. 

I used a singular image - the gingerbread man - from the Season's Greetings Postage Collage Layering Stencils as the focal point for my card. I blended him with inks and then cut out the image with the Postage Collage Dies. I stamped my favorite envelope from the Envelope & Postage Collage 4x6 Stamps, added some simple shading, and cut it out with scissors. I stamped one of the images from the Sealed With Christmas Wishes 4x6 Stamps with red ink and put it to the side with my other elements. 


I pulled the card together with a gray background I stamped with the Distress Background 5x7 Stamp and some layers from the Mixed Postage Rectangle Dies. I finished off the card with one of my most-used sentiments of the year from the Me to You Holiday Sentiments 4x6 Stamps. That's it! Here's the card I drew inspiration from - 


I hope this inspires you to look at your previously made cards and see how you can twist them into Christmas designs! Thanks for being here! See you soon! 

Friday, October 31, 2025

LDRS Creative | Halloween Postage Collage Stamps and Layering Stencils

Boo! 👻 It’s Halloween, and I couldn’t resist sneaking in one more spooky project! I grabbed my LDRS Creative Halloween Postage Collage Stamps and Stencils, added in the Postage Collage Masks, and got to work creating a fun and colorful card packed with Halloween spirit.


Products used - 


I wanted to mix the Halloween Postage Collage 4x6 Stamps and Layering Stencils in a different way, so I did some creative masking, and and only stenciled the top right, middle left, and bottom right scenes. Then I grabbed the  Postage Collage Mask Stencils and did some ink blending onto the top left, middle right, and bottom left portions. I used icons from the Halloween Postage Collage 4x6 Stamps to fill in the stenciled areas and make them look like spooky Halloween scenes. 


I stamped some sentiments and icons from the Halloween Postage Collage 4x6 Stamps and cut them out with the Postage Collage Dies and also used the largest die to cut out my panel. I layered it onto some pink and orange cardstock, and this card is done! Wishing everyone a safe and happy Halloween!

Wednesday, October 29, 2025

LDRS Creative | French Patisserie meets Braided Edge

Craving something quick and sweet? This card hits the spot! I combined the LDRS Creative French Patisserie Bundle with the Braided Edge Die for a beautifully delicious design. A dash of stamping, a sprinkle of die cutting, and a swirl of ink blending - voilà! A card that’s as fun to make as it is pretty to look at.


Products used - 


I stamped my image and used LDRS Creative Hybrid Ink Pads along with the French Patisserie Layering Stencils to give it some quick and easy color. I LOVE when there are layering stencils to color an image. It really saves some time! I wanted a soft and pretty card base that would make my image shine, so I used the Braided Edge Die along the edge of a white card base and added some soft ink blending over the decorative edge.


I brought in some gold watercolor ink spatter for shine and texture, and added my image and sentiment towards the bottom of the card. That's it! Thanks so much for stopping by. I'll see you soon! 

Friday, June 6, 2025

LDRS Creative | Clean & Simple Lighthouse Card with a Rustic Coastal Vibe

Today I’m sharing a clean and simple card that captures the quiet magic of an underwater lighthouse scene. I used the Lighthouse Stamps and Layering Stencils to bring the focal image to life, then added a subtle textured background with the Postage Collage Dies for just the right amount of depth. A soft wash of light blue watercolor frames the scene and adds that dreamy, rustic feel. Let’s dive in and take a closer look at how this card came together!


Products used - 


I started my design by stamping the image from the Lighthouse 4x6 Stamps onto an A2 Cotton Watercolor Panel with black ink. I knew I wanted to add some watercoloring to the background and inks blend VERY well on watercolor paper. If you haven't tried it, I encourage you to give it a go and see how you like it! I used the Lighthouse Layering Stencils to color the image with a variety of LDRS Creative Hybrid Inks. You could definitely watercolor the image, but I tend to reach for the layering stencils. They're fast and I don't have to think as much.

Once my stenciling was done, I added a light wash of blue color, keeping the color darker towards the outline of the image and letting it fade out to the background. This technique is done by adding clean water around the image, going right up to the outline, and then dropping in blue watercolor close to the image. I used my brush to help move the color a bit, and then let it whisk out to the edges and dry naturally. 


When the panel was dry, I cut it with the Postage Collage Dies to give it some texture. I cut a red mat slightly larger than my panel and added both layers to a white card base. I finished the card by stamping a sentiment, cutting it out, and adding it to the card with foam tape. That's it! Thanks for joining me!

Monday, May 19, 2025

LDRS Creative | Rainbow Stenciled Eucalyptus

Who says eucalyptus has to be green? Today, I'm sharing a vibrant and unexpected take on the beautiful Eucalyptus 4x6 Stamps. I stepped outside the traditional palette and gave each stem a burst of rainbow color - and I love how cheerful and fresh it turned out! Crisp white layers provide the perfect backdrop, letting those bold hues shine. I hope this project inspires you to look at your stamps in a whole new light!


Products used - 


This card is really quite easy to make, and I love how it packs a punch with simple colors! I stamped each of the stems from the Eucalyptus 4x6 Stamps twice with black ink and used the Eucalyptus Layering Stencils to quickly color them. Each stem has two layers to color, but I kept it simple and only used one ink pad for each stem. I went blended heavy color over the first layer and then didn't re-ink my brush and used the leftover ink with a lighter hand for the second layer. This gives me easy two-toned ink blended color. 


I wanted to have some stems shadowed in the background, so I stamped a bunch on a piece of white cardstock with a gray ink and then added a sentiment in black so that it would stand out. I added the rainbow of stems to the bottom and popped each of them up with foam tape. I cut some layers of white cardstock using the Mixed Postage Rectangle Dies and added everything onto a gray card base. That's it!

Monday, March 31, 2025

One Layer Ink Blended Flower Bouquet Card

Today, I'm stepping outside of my layered and dimensional comfort zone and created a one layer card! I used the Grand Bouquet 5x7 Stamps along with masking techniques, a background stencil, and color layering stencils for depth and one-layer dimension.


Products used - 


I started with an A2 panel of white cardstock and used strips of masking paper to mask off 1/4" on each side of the panel. Having a defined edge is one of the tricks I like to use when creating a one layer card. It creates instant dimension when the panel is completely flat. I stamped the image from the Grand Bouquet 5x7 Stamps so that it hangs off the bottom left side of the panel using Raven Hybrid Ink and heat set the image with clear embossing powder. The embossing powder will trap the black ink so that I can add color over the top and it also adds some shine. I used the Grand Bouquet Layering Stencils along with Bali BlueLa La LavenderMrs. Periwinkle, Dark Wash Jeans, and Tropical Sea Hybrid Ink Pads to add color to the image. 


I wanted to add something to the background so that it wasn't so plain. I stamped the image onto a piece of masking paper and used my scissors to fussy cut the image and placed it onto my stamped and ink blended panel. I chose my favorite of the Pattern Background Stencils and blended Bali Blue Hybrid Ink through the stencil. I finished the card by stamping a sentiment in the top right corner and that's it! 

Friday, February 28, 2025

LDRS Creative Daybreak Collection Reveal Day 2 | Grand Bouquet Cut Away Card

The stunning Grand Bouquet florals from LDRS Creative are perfect for big projects, but I highlighted just a portion of the flowers. With quick stamping, ink blending, and fussy cutting, this card came together effortlessly!


Products used - 


I stamped the image from the Grand Bouquet 5x7 Stamps onto the left side of a piece of cardstock using Raven Hybrid Ink, then I clear heat embossed the image to trap the ink so it didn't smear while ink blending. I used the Grand Bouquet Layering Stencils to quickly color the image. I used La La LavenderMrs. Periwinkle, and Boysenberry Blast for the flowers and Key Lime Pie and Four Leaf for the leaves. I had this image colored in no time! 


I decided to trim around the right edge of the flowers with my scissors. It's easy to fussy cut since the lines are simple and the design is large. I stamped a sentiment onto a rectangle cut with the Pinpoint Rectangles Dies and tucked them behind the flowers. I added everything to a mustard yellow card and this project is finished!

Thursday, February 27, 2025

LDRS Creative Daybreak Collection Reveal Day 1 | Rainbow Silhouettes Collage Card

Ask anyone ... rainbow is my favorite color! I love having a colorful background with simple black elements. I used a handful of new Postage Collage products from the LDRS Creative Daybreak Collection to make this easy masked card. 


I cut a panel of white cardstock with the largest Postage Collage Die and lined up the Postage Collage Mask Stencil with the stitching and blended my rainbow of color. I like to use just three colors of ink - FandangoDan-D-Lion, and Bali Blue - and make sure they overlap to create the full rainbow of color. I kept the mask stencil in place and stamped a bunch of wildflowers and foliage from the Silhouettes Collage 4x6 Stamps using Raven Hybrid Ink. Don't forget to pop in the negative mask pieces to make sure the silhouettes stay in their proper cubbies!


I added a sentiment I stamped and cut using the Eucalyptus 4x6 Stamps and Coordinating Dies and added it to the bottom right of my panel. I cut a black layer using the largest of the Pinpoint Rectangles Dies and added everything to a white card base. And that's it! So much color packed into one little card! 

Monday, February 17, 2025

LDRS Creative | Easy Floral Gatefold Card

Want to learn an easy gatefold card technique? I used the Delicate Stems 6x6 Stamps along with the coordinating layering stencils to create a stunning floral focal point that opens in the center for a simple yet elegant fun fold design!


Products used - 


I started by stamping the flower from the Delicate Stems 6x6 Stamps onto a white panel and coloring it using the Delicate Stems Layering Stencils. I trimmed the panel down to 4" x 5 1/4", making sure to keep the image in the center of the panel. Once my panel was cut to size, I cut the panel in half at 2" so that I had to strips of stamped cardstock. 

Now it's time to create the gatefold card base. Cut a piece of 8 1/2" x 11" black cardstock in half so that you have a base that measure 5 1/2" x 11. Score 1 1/8" from each end and fold the two flaps in towards the center. Easy peasy, right?! Now it's time to add those panels to each of the flaps. I added a white panel stamped with the same floral image to the inside of the card, but you could skip that step if you wanted. 


All that's left is to add a sentiment! I pressed the Thank You Impress-ion Press + Foil Plate into an A2 Cotton Watercolor Panel and used my scissors to fussy cut the sentiment. Be careful when adhering the sentiment to the card. You want to be sure to only add adhesive to one side so that you don't glue the card closed. It doesn't matter which side you choose (I chose the left), but just be sure to only add adhesive to half of the sentiment. That's it! I hope you're inspired by this easy tutorial! 

Monday, January 6, 2025

LDRS Creative | Sympathy Monochromatic Faux Wax Seal Card

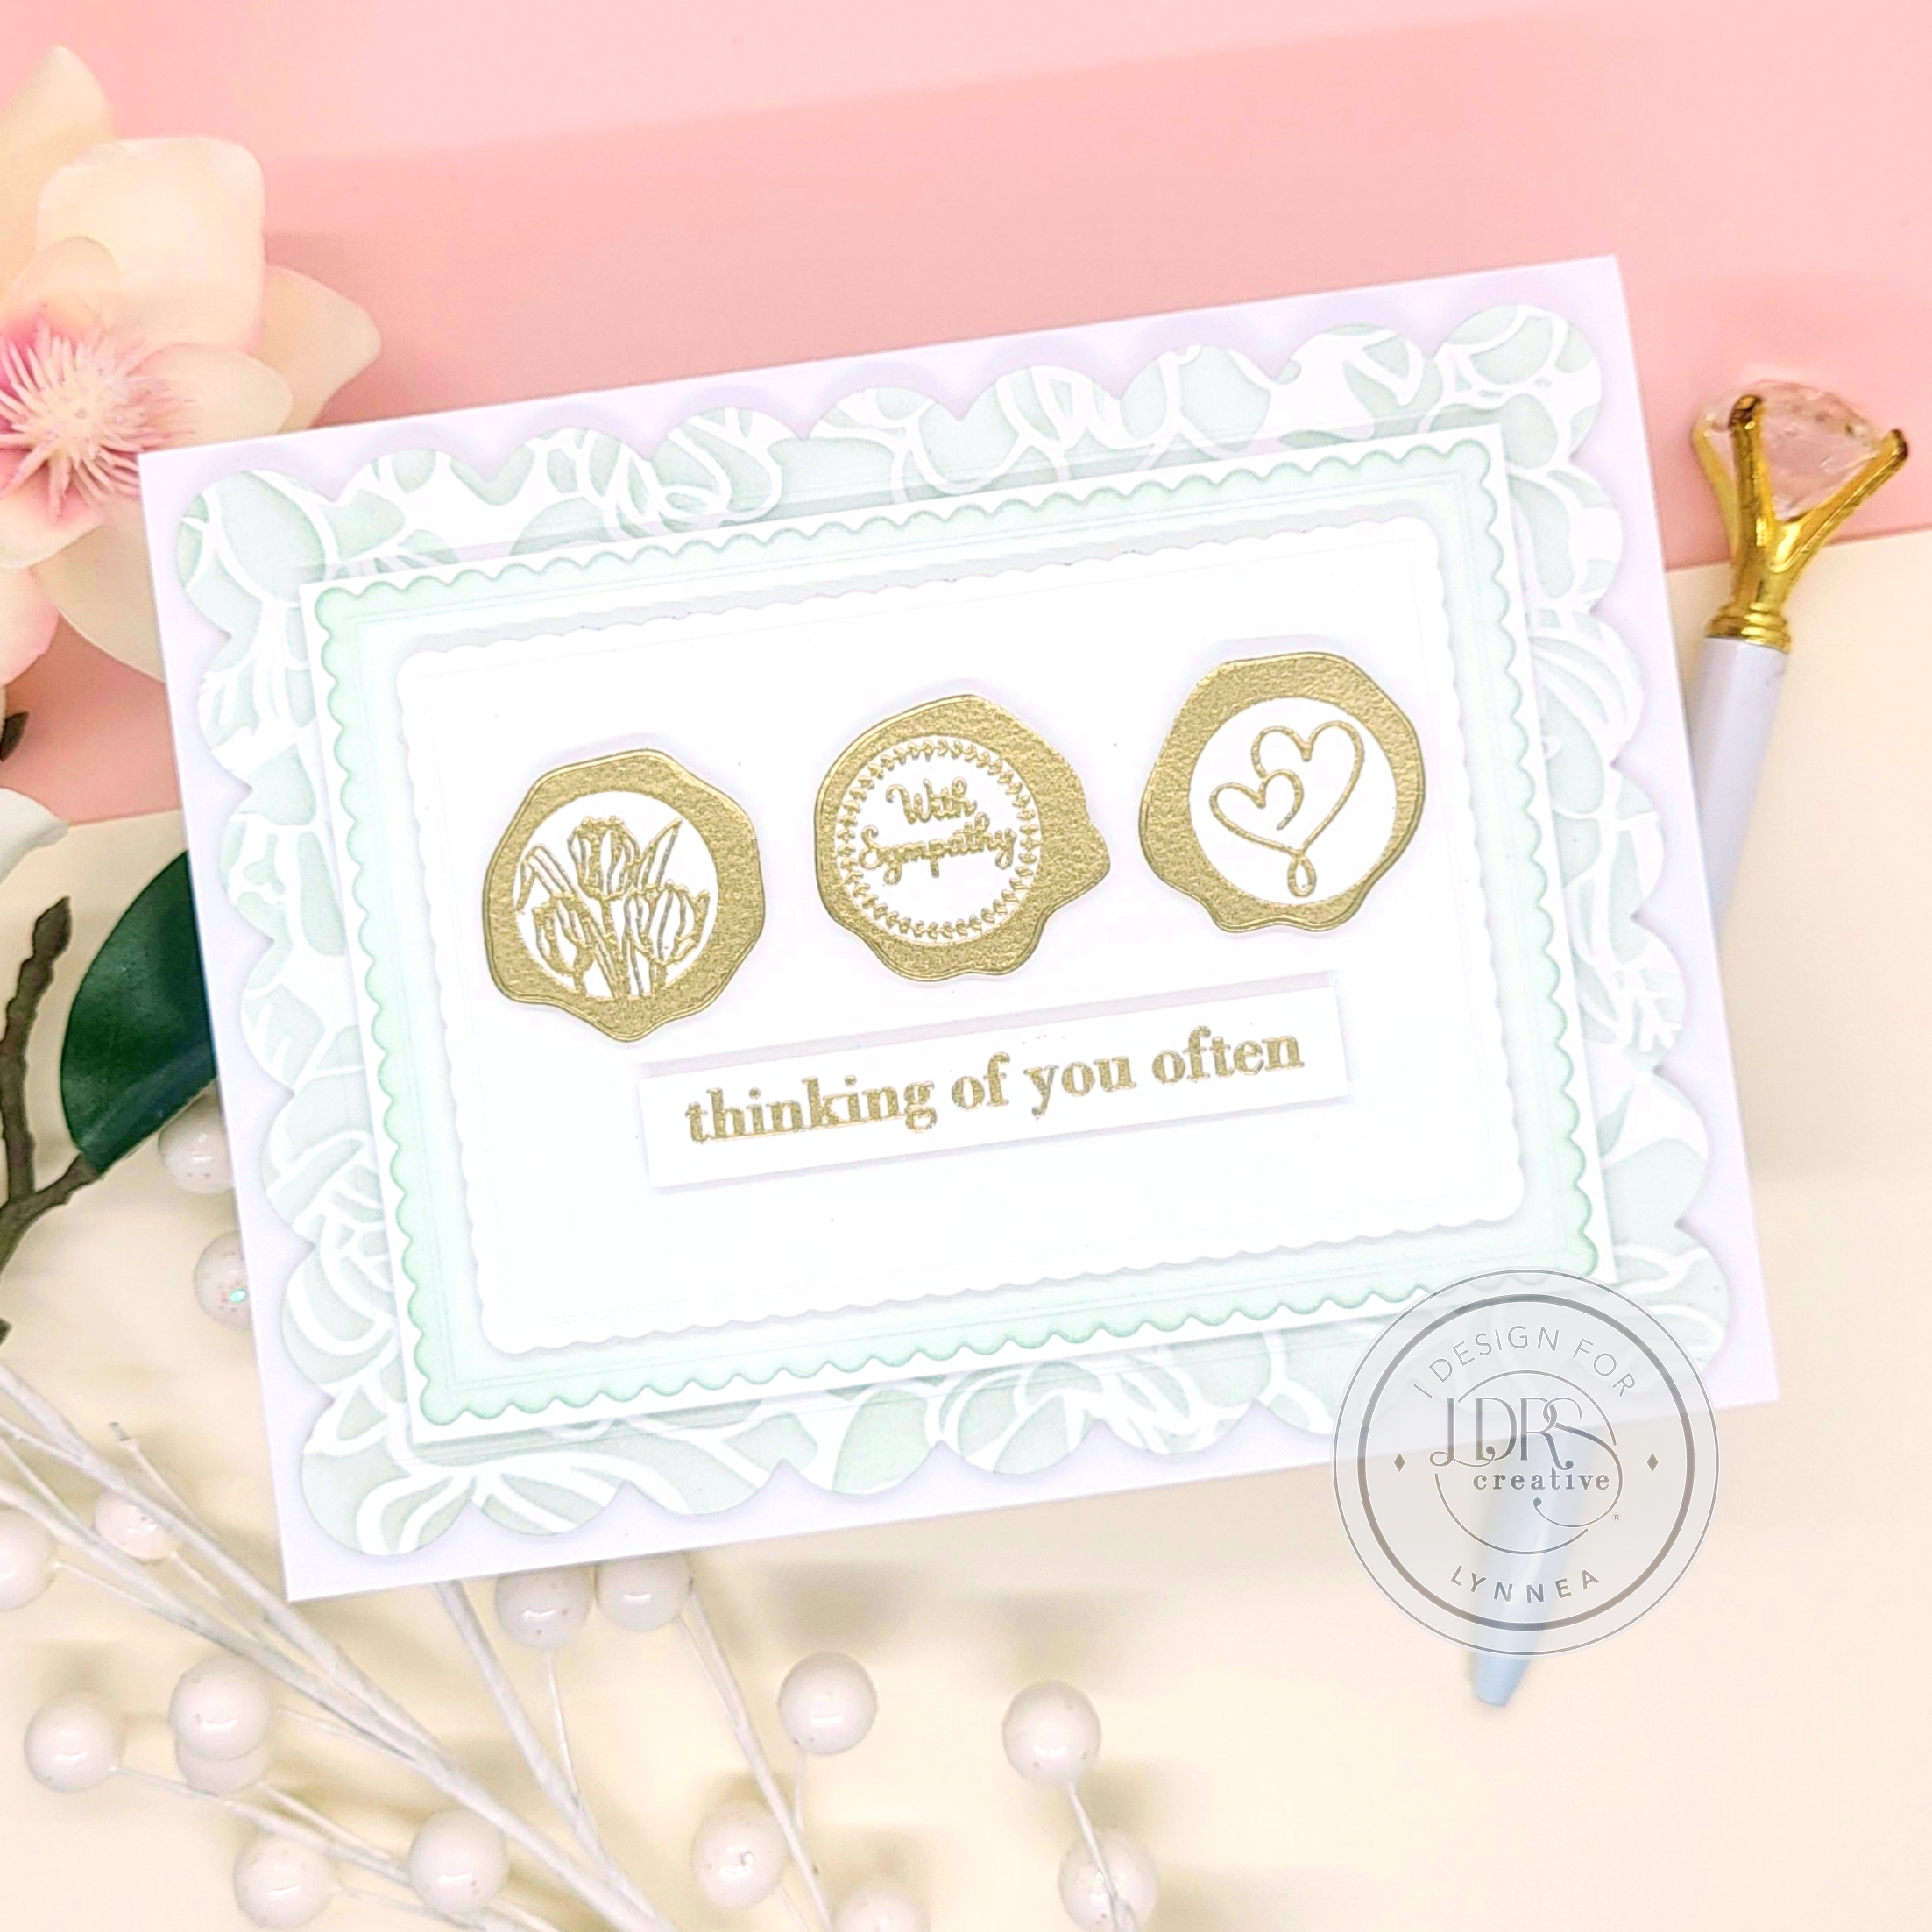
It's never a card you want to make, but a sympathy card is one of the most important cards you can send. I made a few of these cards so that I can have them on hand and send them when it's most needed. The mint and gold color palette is perfect for any occasion. 


Products used - 


Let's start with the background. I like to keep sympathy cards clean, but layered. Striking, but not excessive. I used my Dip-N-Dab Ink Pouncers to blend Pistachios-A-Plenty Hybrid Ink over the Bursting Bouquet 6x6 Stencil onto a white panel. I used the largest die from the Mixed Scallop Rectangle Dies to cut out the stenciled background and then also cut out two additional rectangles with smaller dies so that I could stack them together. I blended Pistachios-A-Plenty Hybrid Ink over the middle sized rectangle to create a custom colored cardstock to perfectly match my ink blending. 


The great thing about the Sealed With Comforting Wishes 4x6 Stamps is that you can stamp multiple seals at once. The die cuts out an entire row of 3 seals at once, too! I stamped a row of seals along with a sentiment with embossing ink, heat embossed with gold powder, and then cut them out with the Sealed With Good Wishes Coordinating Dies. I trimmed down the sentiment into a strip and used foam tape to add the seals and sentiment to the middle of the smallest rectangle. I stacked and layered all of the pieces together with a mix of foam tape and liquid adhesive, and this card is done! 

Tuesday, December 31, 2024

LDRS Creative | Floral Color Blocking Spotlight Card

This color blocking spotlight technique is so easy you'll want to do it again and again! Sit back, relax, and watch the magic happen!


Products used - 


I die cut two white panels using the middle die from the Hand Torn Rectangles Dies and stamped the flower from the Delicate Stems 6x6 Stamps in the center of each panel. I colored one of the images using the Delicate Stems Layering Stencils and LDRS Creative Hybrid Ink Pads. 


Now for the fun part! I cut out various parts of the ink blended panel with the two smallest dies from the Hand Torn Squares Dies. Alone, they don't look like much - but when you puzzle them over the black and white panel and line up the lines ... you get magic! I love how the color pops off the page! I used foam tape to add all of the squares to the black and white image and then spattered the panel with black paint. I cut a black layer and added both panels to an A2 card.


I cut the word "thanks" using the Simply Word Dies three times from white cardstock and twice from black cardstock. I layered them together to create a chipboard-type die cut and offset the white on top of the black to create a shadow. That's it! This technique can be applied to any large image and I hope you try it out! 

Tuesday, December 17, 2024

LDRS Creative | Arch Shaped Card with the Heart Balloon Bouquet Press Plates

Check out this sweet arch-shaped card featuring the Heart Balloon Bouquet Impress-ion Press + Foil Plates. A touch of ink blending, die cutting, and patterned paper were all it took to create this versatile all-occasions card!


Products used - 


I love how those heart balloons look like they're floating in a night sky! I pressed the sentiment and image from the Heart Balloon Bouquet Impress-ion Press + Foil Plates into a Cotton Watercolor Panel and then used the Heart Balloon Bouquet Layering Stencils to quickly (and easily!) color the image. I cut out the sentiment and balloons with the Heart Balloon Bouquet Coordinating Dies and set them aside while I worked on the base of my card.


I created a shaped card using the largest die from the Hand Torn Arches Dies and cut a piece of paper from the Favorite Things 6x6 Paper Pack using the Arches Dies to use as my background. I added the heart balloons right in the center of my card and offset the sentiment to help balance the design. That's it!

Tuesday, August 27, 2024

LDRS Creative | Stained Glass Window Technique

Ready for an easy way to make your projects SHINE with an easy faux stained glass window effect? I mixed the Puzzle Frames and Sweet Magnolias Stamps with ink blending and heat embossing to create a vibrant card!


Products used - 


This technique is SO easy and you most likely already have these products in your stash! I started with by stamping the large grid from the Puzzle Frames 6x8 Stamps with Raven Hybrid Ink onto a piece of white cardstock. Next, I grabbed the Sweet Magnolias 6x8 Stamps and stamped both of the floral images over the puzzle. You can use whatever medium you like to color the flowers, but I like quick and easy coloring. I grabbed the Sweet Magnolias Layering Stencils, some blending brushes, and my inks and blended color over the flowers. 

Now comes the fun part! Grab your clear embossing ink and press, press, press the pad all over your panel. I recommend that you don't twist your ink pad since you may smear your colored images. Just press straight down and lift straight up. Repeat until the whole panel has a good, thick layer of embossing ink. Add clear embossing powder, heat set, and admire the shine! You can repeat the process with a second layer of powder if you want, but I left the powder a bit spotty in areas. I think it lends itself to the stained glass look. 


I cut down my stained glass piece and added it to a white card base, stamped and die cut a sentiment, and that's it! I didn't add much because I wanted the stained glass technique to be the star. Thanks so much for joining me!

Monday, July 22, 2024

Blue to Purple Gradient Ink Blended Flowers

These blue to purple gradient letterpressed flowers make me so happy! I took the Delicate Stems Impress-ion Press + Foil Plate and turned the focal point flowers into a background design. It's easy, peasy and a great way to make my supplies go even further! 


I pressed the sentiment from the Delicate Stems Impress-ion Press + Foil Plates into the center of my A2 Cotton Watercolor Panel with Raven Hybrid Ink and then pressed the flowers into the bottom left and top right corners. I used the Delicate Stems Layering Stencils to add quick and easy ink blended color the images.


A black frame and some ink spatters are all I used to complete this card. Thanks for joining me!