Showing posts with label Die Cutting. Show all posts

Monday, July 13, 2026

LDRS Creative | Easy Summer Floral Card

There's something about blue and yellow flowers that just feels like summer to me! They're bright, cheerful, and always make me smile, so I couldn't resist using that color combination for today's clean and simple card.


Products used - 


I started by stamping one of the gorgeous images from the Floral Sketch 5x7 Stamps onto the right side of a white cardstock panel. Using the coordinating Layering Stencils, I ink blended the flower with soft blue petals and a sunny yellow center. The layered stenciling makes it so easy to add beautiful shading and dimension!


To add a little extra interest, I used the Stepped Edge Die just to the right of the flower, letting it slightly cut into the stamped image for a fun, modern detail. Of course, I couldn't resist finishing everything off with a few black ink splatters - one of my favorite ways to add texture and a little personality to a card!

After trimming the panel down, I layered it onto a piece of yellow cardstock before adhering everything to a white card base. It's a design that's easy to recreate with your favorite color combinations, but I have to admit...blue and yellow will always have my heart! Thanks for joining me! I'll see you soon!

Thursday, June 4, 2026

LDRS Creative | AquaInk Transfer Sheets - Tranquility

Today's project combines beautiful scenery, rich color, and a fun interactive die-cutting technique! For this card, I paired the new LDRS Creative AquaInk Transfer Sheets - Tranquility with the Window To A View Eclipse Dies to create a design that's both elegant and eye-catching.


Products used - 


The AquaInk Transfer Sheets - Tranquility include six breathtaking scenic images, and any of them would work beautifully with this design. I chose a tropical poolside scene filled with gorgeous shades of blue and green. One of my favorite details is the soft, hand-torn edge effect around the artwork, which gives the image an organic, artistic feel.

After transferring the image onto watercolor cardstock (be sure to watch the video tutorial to see the process in action!), I used the Window To A View Eclipse Dies to create an inlaid eclipse design. The eclipse technique adds dimension and interest while allowing the beautiful scenery to remain the star of the show.


To complement the image without overwhelming it, I kept the rest of the card simple and focused on texture. A panel of green cardstock embossed with the Perfect Petals 3D Embossing Folder creates a beautiful backdrop with lots of depth and detail. That's it! Thanks for joining me! 

Monday, May 25, 2026

LDRS Creative | 5 Minute Anniversary Card Idea

Tomorrow is my 14th wedding anniversary, so I wanted to create a special handmade card for my partner - something heartfelt, modern, and quick to make. I reached for the LDRS Creative About LOVE Collage 4x6 Stamps and paired them with the Stepped Edge Die to create this easy freeform collage-style design.


Products used - 


Instead of using the Stepped Edge Die along the edge of a card like usual, I die cut it down the right side of a white panel to create an unexpected layered detail. From there, I started building my collage design on the left side of the panel using several sentiments from the About LOVE Collage 4x6 Stamps.

One of my favorite tips when creating collage-style cards is to keep your color palette simple. Limiting your colors helps all of the stamped elements work together. You can easily swap these shades to match your own style or occasion. I went with light purple, aqua, and raspberry ink colors. I began with the large “LOVE” sentiment and layered in smaller phrases like “XOXO” and “you’re my person.” I also added a few tiny black hearts for contrast and finished the collage with the sentiment, “I’d fall for you again and again and again and again…” which perfectly echoes the stair-step pattern created by the die.


To finish the card, I added foam tape behind the stamped panel and adhered it to a aqua/mint card base. I love the shadows and dimension from the foam tape. And that's it! An easy 5 minute anniversary card!

Monday, April 6, 2026

LDRS Creative | Fun in the Sunny Woods Card Kit

Let’s create with the Fun In the Sunny Woods Card Kit! In today’s video, I’m sharing 6 cards using this adorable “just add adhesive” kit - perfect for quick and easy cardmaking! If you follow the kit as intended, you can create 12 complete cards with everything included. But I wanted to take it a step further and show you how to stretch your supplies even more!


I start by creating 2 cards exactly as the kit is designed - perfect for when you want something fast and stress-free. Then, I create 4 additional cards by mixing, altering, and reimagining the kit elements to get even more variety and value from your kit.


For each of my first two cards, I used a card base, A2 topper, matching die cut scene, coordinating die-cut characters, and a sentiment. I used foam tape behind each of the pieces to give the cards lots of dimension. Easy peasy and I created both cards in about 5 minutes!


My third card uses the same kit elements as the first two - a topper, frame, ephemera and sentiment - but I changed the topper a bit by trimming it down to 4" x 5 1/4". This gives just a little bit of a white border. I brought in some twine from my stash and wrapped it around the left side of the card. Such an easy way to step up the card just a little bit!


Now we're going to start changing things up! The Fun In The Sunny Woods Card Kit is designed to make 12 cards, but you can definitely stretch that! For my fourth card, I decided to leave off the die-cut frame and create a card without it. That reserves the topper for another card. You could easily layer it onto some cardstock or patterned paper and bring in a sentiment from your stash. I wanted to add something special, so I cut the edge with the Stepped Edge Die. I added the die-cut characters and a sentiment and this one is done!


But what if you don't want to use either of the scenic pieces? No problem! Save BOTH of them for one (or two!) additional cards. I cut a piece of patterned paper from the Wildwood 5x7 Paper Pack and added it to the bottom of an A2 card and added one of the character die-cuts and sentiments from the Fun In The Sunny Woods Card Kit to the top. Super easy and so adorable!


My sixth and last card uses some more of the papers from the Wildwood 5x7 Paper Pack as well as die-cut characters, a sentiment, and one of the die-cut scenic frames from the Fun In The Sunny Woods Card Kit. The frame pieces in the card kit are the same size as the largest die from the Rounded Rectangle Frame Dies, so you can easily use that set of dies to create some layers. I used the 2nd largest die to cut the frame piece from the kit and layered it onto a white die-cut panel. I popped up the coordinating die-cut characters, a sentiment, and added it to a background I created with patterned paper strips. 


I hope you enjoyed seeing the Fun In The Sunny Woods Card Kit in action! Take these ideas and run with them - whether you're creating quick and easy cards straight from the kit, or changing the kit to make some additional cards. I'll see you soon!

Wednesday, November 26, 2025

LDRS Creative | Sending Thanks with Autumn Tails

With Thanksgiving almost here, I wanted to create a sweet, thoughtful card that’s perfect for saying thank you to your holiday host. I turned to the absolutely adorable Autumn Tails Stamps and Dies and couldn’t resist featuring the little fox and bunny tucked into a cozy pumpkin patch. This heartfelt “from me to you” is simple, sincere, and just right for sharing gratitude during the season.


Products used - 


I stamped and colored a handful of pumpkins as well as a couple of critters from the Autumn Tails 5x7 Stamps with Copic Markers. I love how pumpkins come in a bunch of different colors, so I made some white, some yellow orange, and some darker orange. While I had my inks out, I stamped a background in gray ink with the Distress Background 5x7 Stamp as well as a sentiment from the Me to You Holiday Sentiments 4x6 Stamps. I used the coordinating dies to cut out the critters, pumpkins, and sentiment. I added the braided detail to the edge of a landscape A2 card with the Braided Edge Die  and cut a strip of green cardstock for the ground.


Now that all of my pieces are stamped, colored, and cut - it's time to put them all together! added the distress background to my die-cut card base, adhered the green strip to the bottom for the ground, and then popped up all of my die-cut pieces with foam tape. That's it! Now I have a special card to take to the Thanksgiving host tomorrow. Hope you all have a great day! 

Friday, April 4, 2025

*RING RING* - Time to Create an Easy Letterpress Card!

Ring ring! I used the Victorian Phone Impress-ion Press + Foil Plates to create a card with an easy letterpress technique. This card features a cheerful yellow background with gray accents, giving it a modern twist on vintage style. I added the playful “ring ring” sentiment to tie everything together, making it perfect for a fun hello or just-because note. Let's check it out! 


Products used - 


This card was quite simple to make and just required some easy letterpress-ing and die cutting. I started by using my BetterPress Platform and Alloy Hybrid Ink to press the image from the Victorian Phone Impress-ion Press + Foil Plates into an A2 Cotton Watercolor Panel. Then, I used the Victorian Phone Coordinating Dies to cut out the image. I cut some pale yellow cardstock using the largest die from the Pinpoint Rectangle Dies as well as the third largest die from the Mixed Postage Rectangle Dies. I also used my paper trimmer to cut a piece of white cardstock to layer between the two yellow panels to create easy dimension. 


I wanted a quick, easy, but super cute sentiment, so I letterpressed "ring ring" from the Victorian Phone Impress-ion Press + Foil Plates into the smaller yellow die-cut panel with Raven Hybrid Ink. I grabbed a white A2 card base and layered all of the die-cut pieces onto the card with a mixture of liquid adhesive and foam tape. And that's it! 

Wednesday, March 5, 2025

LDRS Creative | Yummy Copic Colored Macarons

I have a bright and YUMMY card to share with you featuring the delicious Macarons Stamps from LDRS Creative! I created my card with some stamping, die cutting, and Copic coloring. So simple and sweet!


Products used - 


These macarons make me smile every time I see them! I love that there's a stack of cookies tied up in a bow as well as an individual cookie. I cut a panel of white cardstock with the second largest Mixed Postage Rectangle Die and used Alloy Hybrid Ink to stamp the single cookie from the Macarons 4x6 Stamps all over the panel. I added some black watercolor ink spatters and set the panel aside while I colored 3 cookies with bright Copic Markers. 


I stamped a sentiment onto a small rectangle cut with one of the Pinpoint Rectangles Dies and layered it onto a pink piece cut with the Mixed Postage Rectangle Dies. I used a mix of liquid glue and foam adhesive to layer all of my pieces onto an A2 card and that's it! 

Friday, February 28, 2025

LDRS Creative Daybreak Collection Reveal Day 2 | Grand Bouquet Cut Away Card

The stunning Grand Bouquet florals from LDRS Creative are perfect for big projects, but I highlighted just a portion of the flowers. With quick stamping, ink blending, and fussy cutting, this card came together effortlessly!


Products used - 


I stamped the image from the Grand Bouquet 5x7 Stamps onto the left side of a piece of cardstock using Raven Hybrid Ink, then I clear heat embossed the image to trap the ink so it didn't smear while ink blending. I used the Grand Bouquet Layering Stencils to quickly color the image. I used La La LavenderMrs. Periwinkle, and Boysenberry Blast for the flowers and Key Lime Pie and Four Leaf for the leaves. I had this image colored in no time! 


I decided to trim around the right edge of the flowers with my scissors. It's easy to fussy cut since the lines are simple and the design is large. I stamped a sentiment onto a rectangle cut with the Pinpoint Rectangles Dies and tucked them behind the flowers. I added everything to a mustard yellow card and this project is finished!

Monday, January 6, 2025

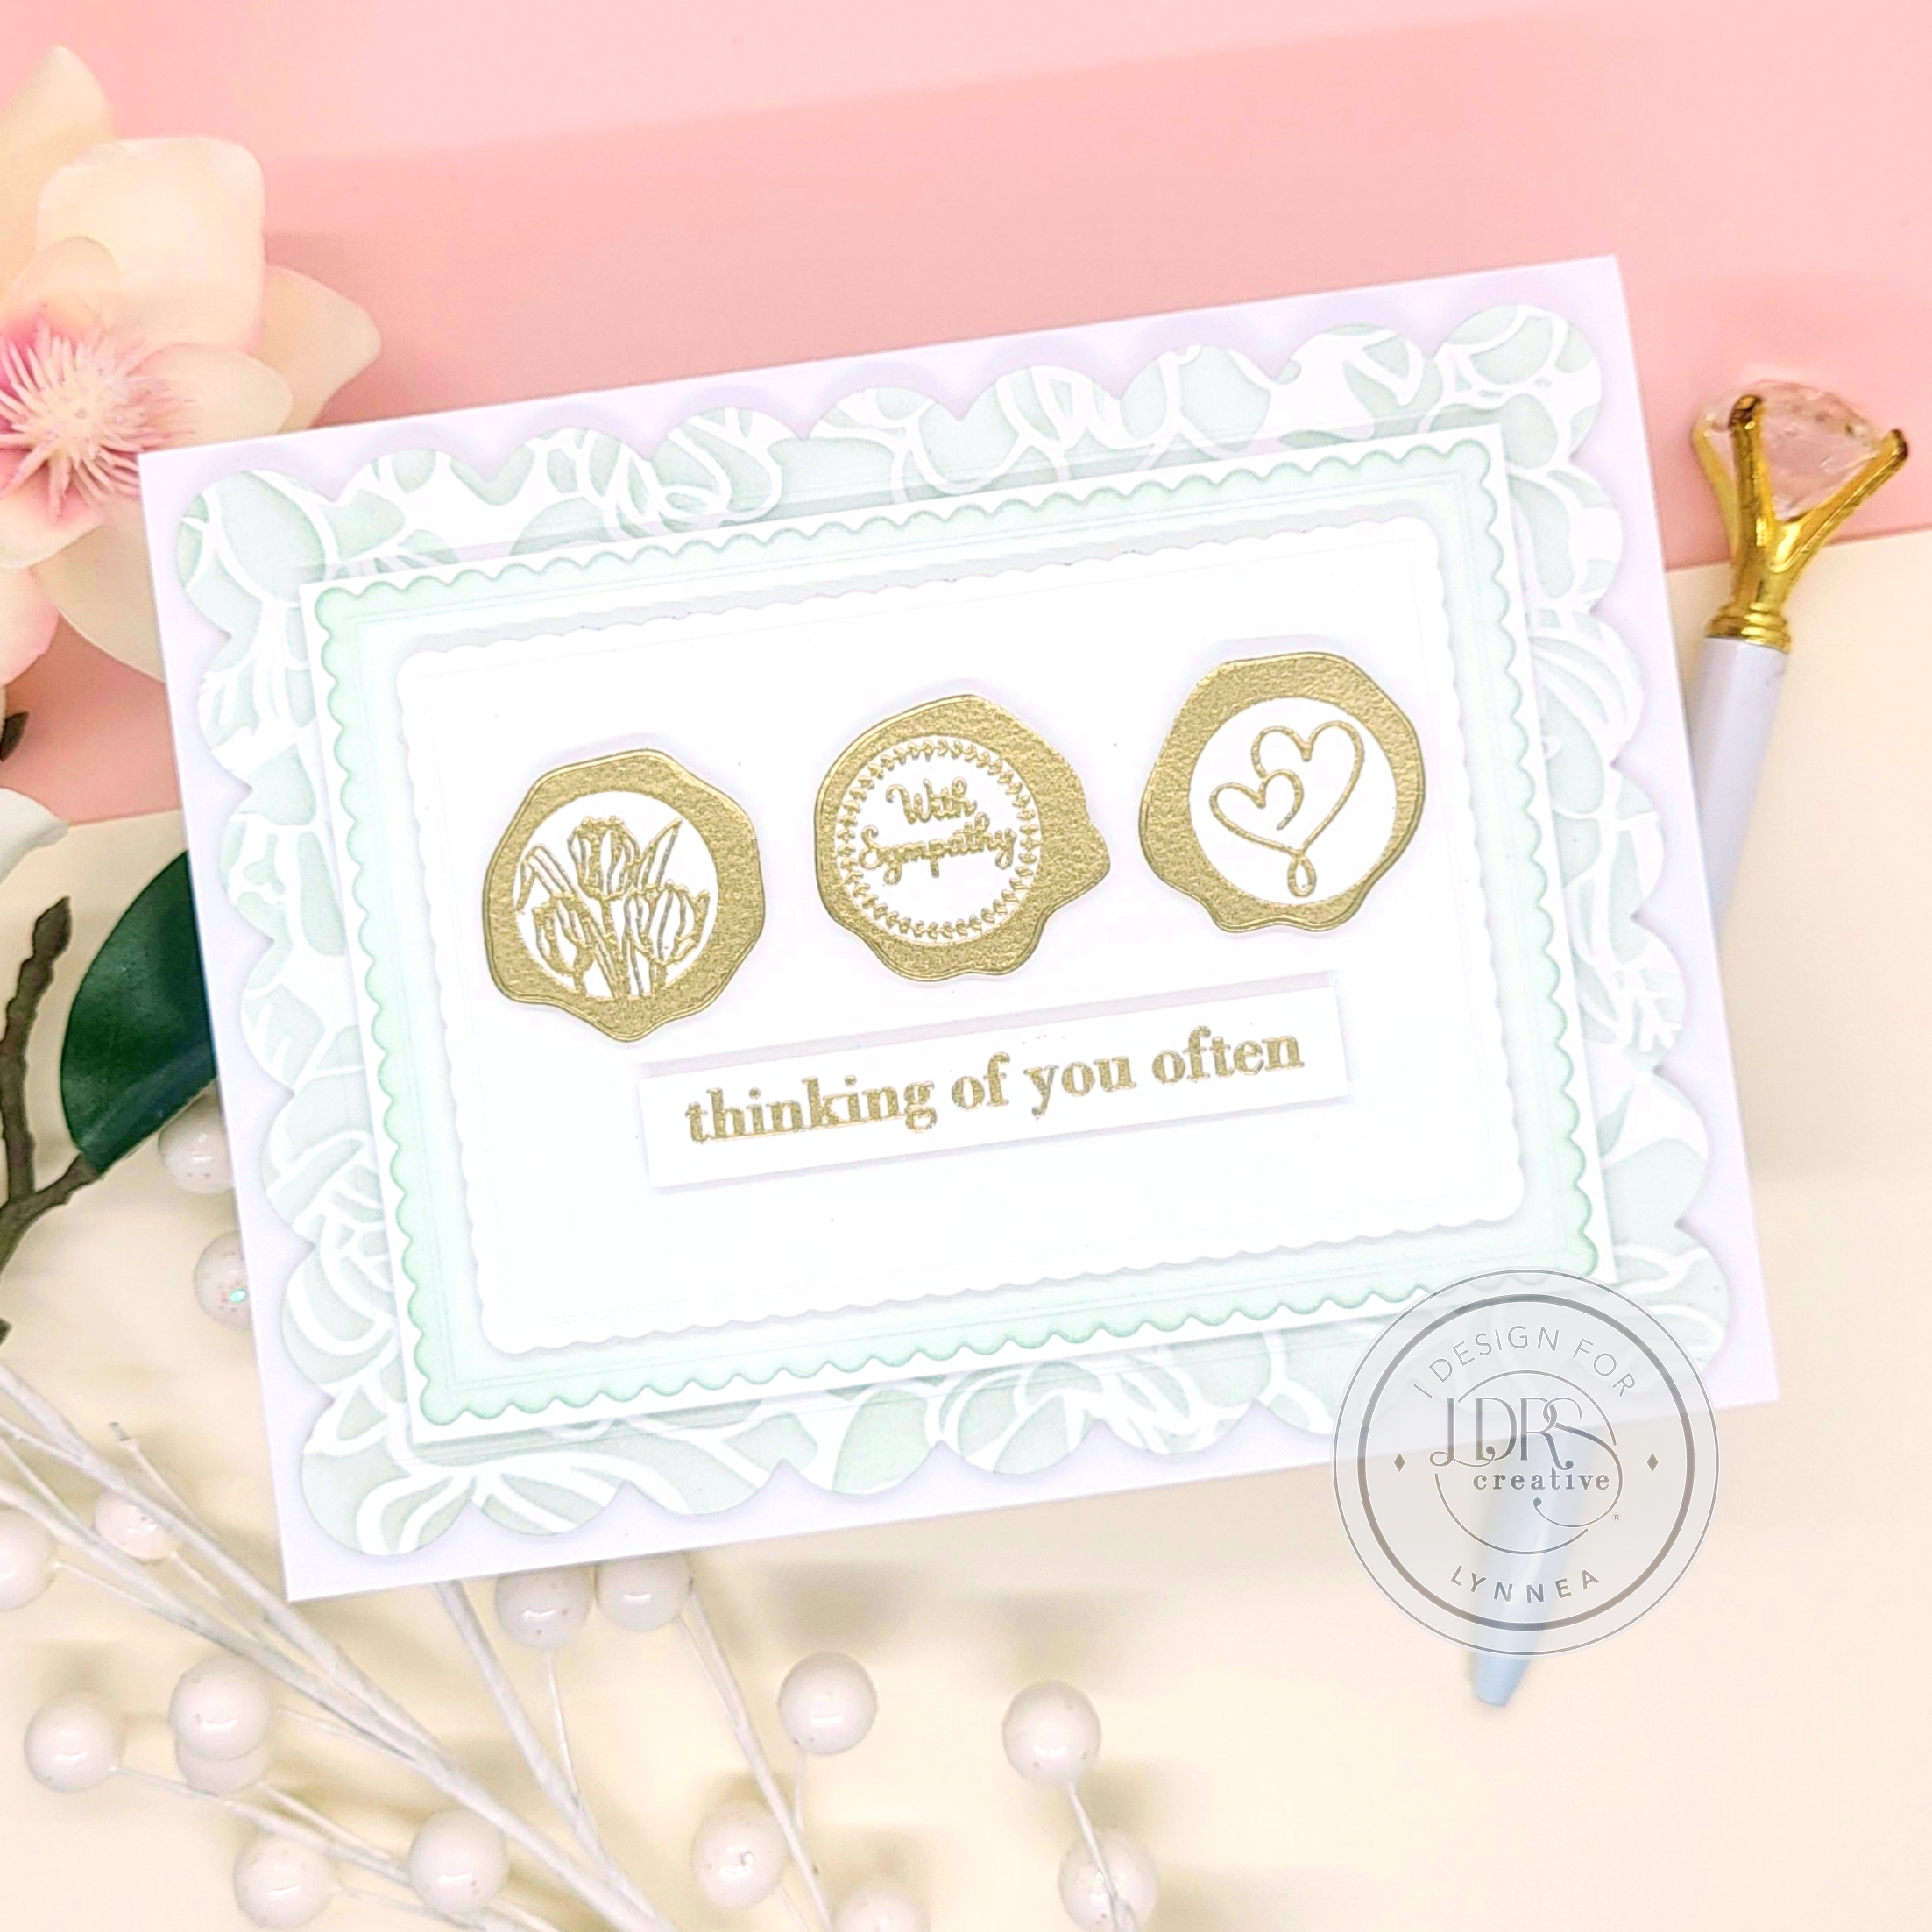
LDRS Creative | Sympathy Monochromatic Faux Wax Seal Card

It's never a card you want to make, but a sympathy card is one of the most important cards you can send. I made a few of these cards so that I can have them on hand and send them when it's most needed. The mint and gold color palette is perfect for any occasion. 


Products used - 


Let's start with the background. I like to keep sympathy cards clean, but layered. Striking, but not excessive. I used my Dip-N-Dab Ink Pouncers to blend Pistachios-A-Plenty Hybrid Ink over the Bursting Bouquet 6x6 Stencil onto a white panel. I used the largest die from the Mixed Scallop Rectangle Dies to cut out the stenciled background and then also cut out two additional rectangles with smaller dies so that I could stack them together. I blended Pistachios-A-Plenty Hybrid Ink over the middle sized rectangle to create a custom colored cardstock to perfectly match my ink blending. 


The great thing about the Sealed With Comforting Wishes 4x6 Stamps is that you can stamp multiple seals at once. The die cuts out an entire row of 3 seals at once, too! I stamped a row of seals along with a sentiment with embossing ink, heat embossed with gold powder, and then cut them out with the Sealed With Good Wishes Coordinating Dies. I trimmed down the sentiment into a strip and used foam tape to add the seals and sentiment to the middle of the smallest rectangle. I stacked and layered all of the pieces together with a mix of foam tape and liquid adhesive, and this card is done! 

Tuesday, December 31, 2024

LDRS Creative | Floral Color Blocking Spotlight Card

This color blocking spotlight technique is so easy you'll want to do it again and again! Sit back, relax, and watch the magic happen!


Products used - 


I die cut two white panels using the middle die from the Hand Torn Rectangles Dies and stamped the flower from the Delicate Stems 6x6 Stamps in the center of each panel. I colored one of the images using the Delicate Stems Layering Stencils and LDRS Creative Hybrid Ink Pads. 


Now for the fun part! I cut out various parts of the ink blended panel with the two smallest dies from the Hand Torn Squares Dies. Alone, they don't look like much - but when you puzzle them over the black and white panel and line up the lines ... you get magic! I love how the color pops off the page! I used foam tape to add all of the squares to the black and white image and then spattered the panel with black paint. I cut a black layer and added both panels to an A2 card.


I cut the word "thanks" using the Simply Word Dies three times from white cardstock and twice from black cardstock. I layered them together to create a chipboard-type die cut and offset the white on top of the black to create a shadow. That's it! This technique can be applied to any large image and I hope you try it out! 

Tuesday, December 17, 2024

LDRS Creative | Arch Shaped Card with the Heart Balloon Bouquet Press Plates

Check out this sweet arch-shaped card featuring the Heart Balloon Bouquet Impress-ion Press + Foil Plates. A touch of ink blending, die cutting, and patterned paper were all it took to create this versatile all-occasions card!


Products used - 


I love how those heart balloons look like they're floating in a night sky! I pressed the sentiment and image from the Heart Balloon Bouquet Impress-ion Press + Foil Plates into a Cotton Watercolor Panel and then used the Heart Balloon Bouquet Layering Stencils to quickly (and easily!) color the image. I cut out the sentiment and balloons with the Heart Balloon Bouquet Coordinating Dies and set them aside while I worked on the base of my card.


I created a shaped card using the largest die from the Hand Torn Arches Dies and cut a piece of paper from the Favorite Things 6x6 Paper Pack using the Arches Dies to use as my background. I added the heart balloons right in the center of my card and offset the sentiment to help balance the design. That's it!

Monday, December 9, 2024

LDRS Creative | Mass Producing Stamped Cards for the Holidays

Christmas is just around the corner, and time is running out to get those holiday cards in the mail! Here's a quick and simple design idea using the LDRS Creative Christmas Inlay Stamps - perfect for creating a stack of festive cards in no time!


Products used -


In this video, I made four cards in about fifteen minutes. That's pretty quick! If you need a bunch of cards and don't have a lot of time on your hands, this is definitely the way to go. I chose to stamp the deer and trees from the Christmas Inlay 6x8 Stamps, but there are a few different motifs that you could stamp. I stamped my scene and sentiments onto white cardstock and trimmed the panels down with the Hand Torn Squares Dies. I used those same dies to cut out red and green cardstock for layering.


I'm going to be mailing these cards, so I only put foam tape behind the white stamped panel, but if you're hand delivering you cards, you could go crazy and pop up each layer for lots of dimension. That's it! I hope you all have a fabulous day! 

Monday, December 2, 2024

LDRS Creative | Holly Jolly Wreath Letterpress Card

Christmas wreath cards have never been easier! I made a mixed greens letterpress wreath with a simple sentiment on top. Perfect and customizable for the holidays!


Products used - 


This card design is so easy to replicate and it would look fabulous with any color combo. Think how fabulous it would be with pink and teal or shades of purple! I hope this quick tutorial inspires you to take this design and make it your own. Just a reminder! I'm working with Impress-ion Press + Foil Plates. You will need a specialized letterpress platform to achieve this look.

I cut an A2 Cotton Watercolor Panel to 3 7/8" square and taped it to the top plate of my letterpress platform. I lined up a few of the press plates from the Classic Foliage Impress-ion Press + Foil Plates onto my magnetic base. I spaced them out so that I would have an even distribution of color and shape. I inked them with Key Lime Pie Hybrid Ink and pressed them into my panel. I wiped them off, repositioned them, and repeated this process with Four Leaf and Olive Branch Hybrid Inks


I die cut two of the Hand Torn Circles - one larger from red and one smaller from white. I used green and red inks to stamp a sentiment from the Good Cheer Sentiments 6x8 Stamps onto the white circle and used foam tape to pop it up in the center of my letterpress wreath. I trimmed a piece of red cardstock to 4" square and matted the panels onto a 4 1/4" square card base. That's it! Thanks for joining me! 

Tuesday, October 15, 2024

LDRS Creative | Freeform Christmas Puzzle Card

Get ready for the holidays and create a charming and easy Christmas card using a freeform puzzle collage stamping technique! This classic design allows you to mix and match various festive stamps in a playful yet elegant arrangement. See how easy it is in today's video tutorial! 


Products used - 


The Puzzle Frames 6x8 Stamps are definitely one of my favorite products! I love creating puzzle scenes big and small! Today I went small and created a classic Christmas card. I cut a small rectangle using the Mixed Scallop Rectangle Frames Dies and stamped my pattern in the center of the rectangle. I chose some little scenes from the Christmas Puzzle Scenes 6x8 Stamps and filled in each area of the puzzle. You could leave them uncolored, but I added quick color with alcohol markers.


Once my coloring was complete, I cut a few more rectangle panels using the Mixed Scallop Rectangle Frames Dies and layered up my card with red and gold. That's it! Thanks so much for joining me!

Monday, September 30, 2024

LDRS Creative | Clean & Simple Ink Blending

Join me as I create an easy-to-mail card with some simple stamping and ink blending with layering stencils! 


Products used - 


I love the product suites from LDRS! You can mix together 2, 3, or all 4 of the products included in the suite. I decided to keep it simple for today's card. I needed to send a handful of cards overseas. When I'm sending cards long distance, I like to keep them flat so they arrive safely. I die cut a white panel with the A2 Diagonal Stitched Layered Card Toppers and positioned one of the flowers from the Tufted Petals 6x8 Stamps so that it would stamp off the right and bottom sides. Here's a tip! If you plan to add color with stencils, trap your stamping with a bit of clear embossing powder to eliminate smudging.


I added easy color with the Tufted Petals Layering Stencils and added a few more panels to create some depth to my card. That's it! You could mass produce this design to send to lots of friends, or create a whole rainbow of flowers and package them as a gift! Thanks for joining me, I'll see you soon! 

Tuesday, August 20, 2024

LDRS Creative | Merry Christmas Press Plate

IMPRESS your friends and family this holiday season with the stunning winter scene featured in the Merry Christmas Impress-ion Press + Foil Plate! Use it as a complete background, or trim it down and layer it up to create amazing dimension!


Products used -


*links to new products will be live on August 22nd


I love the detail in this Press Plate! The tree-lined, snow covered road reminds me of where I grew up! I pulled this card together in just a few steps - I pressed the image into a piece of watercolor paper and die cut it with the smallest Hand Torn Rectangle Die. Some simple layers is all I needed to complete the card!


I hope this project has you buzzing to see what's next! This collection is full of amazing products. See them all this Thursday, August 22nd! 

Monday, August 19, 2024

LDRS Creative | Down the Chimney Collage Stamps

It's time to start sneaking some peeks of the upcoming Good Cheer Collection! This collection has everything you need for the fall and winter holidays and MORE and will be live on Thursday, August 22nd. Let's get started with this adorable Christmas stack and collage card! 


Products used -


*links to new products will be live on August 22nd


I love holiday card designs that can be easily replicated and duplicated! This one requires just a few die-cuts and some easy stamping! I chose to stick to a traditional red, green, and brown color scheme, but you could switch this up and use pink and teal for a different look if you wanted! 


I hope you enjoyed this quick peek into the Good Cheer Collection! We'll have more coming soon! 

Friday, August 2, 2024

LDRS Creative | Copic Colored Wildflower Background

Hi, everyone! It's Lynnea with a Copic colored card to share with you! The bright and happy flowers in the background pop off the page with a simple black die-cut sentiment. It all comes together so beautifully! 


Products Used - 


I used Raven Hybrid Ink to press the Wall Flower Impress-ion Press + Foil Plate into an A2 Cotton Watercolor Panel with my BetterPress Platform and then colored the background with Copic Markers. I used simple coloring - just two markers for each color blend - and a variety of complimentary colors. Once my panel was colored, I used the largest die from the Delicate Stitches Scalloped Oval Dies to cut the panel. I added it onto a light pink A2 card with foam tape.


Even though the flowers are the background element, I wanted them to shine. I knew I didn't want to cover too much of my colored panel, so I die-cut the "thanks" from black cardstock and the shadow from white cardstock using the Simply Word Dies and paired it with a stamped sentiment from the Simply Sentiments 4x6 Stamps. That's it! Easy peasy, but oh so pretty! 

Monday, July 15, 2024

Golden Letterpress Cards

Check out these golden beauties! I used the Corner Meadow Impress-ion Press + Foil Plates to create two clean and simple cards. Switch up the sentiment to fit any occasion! 


Products Used - 


I wanted to create a frame with the Corner Meadow Impress-ion Press + Foil Plates, so I used gold pigment ink and black watercolor paper and pressed the image into the paper, turned it, and pressed the same image into the cardstock once again. My first time, I created a full rectangle frame with the image overlapping on the edges. I wasn't sure if I liked it, so I tried again after slightly shifting the press plate so that I wouldn't get an overlapped image. 


I completed both cards with a die-cut and stamped sentiment from the Simply Word Dies and Simply Sentiments 4x6 Stamps. I made both of these cards in under 15 minutes. You could easily prep and mass produce this design for any occasion!