Showing posts with label Emboss Resist. Show all posts

Tuesday, May 10, 2022

LDRS Creative | Easy Ink Blended Sunshiny Day Card

The Sunshiny Day Stamp Set from LDRS Creative is one of my favorites! The detailed image makes it great for easy coloring or to create an easy background. I used an emboss resist technique to create this card in no time! 


One of the great things about working with Raven Hybrid Ink is that it's really the only black ink I need! You can even heat emboss with it! I positioned the large image from the Sunshiny Day Stamp Set hanging off the top right of a piece of A2 cardstock and stamped it with Raven Hybrid Ink. I turned my cardstock and repositioned the stamp on the opposite side and stamped again then I heat embossed both images with clear embossing powder. 


I used LDRS Creative Blender Brushes with Dan-D-Lion and Four Leaf Hybrid Inks to add quick color to the heat embossed images. I tried to keep the color in their correct areas as much as possible, but I wasn't concerned about having a 'messy' look on the edges. I used Marina Madness Hybrid Ink in the white space to create a faux sky. I added some gold shimmer watercolor spatters for extra texture. Bonus! Ink spatters help to cover up any mistakes I may have made during the ink blending process!


I finished the card by die cutting a sentiment from the Everyday Sayings 4x9 Toner Sentiments Paper Pack with the Everyday Sayings Coordinating Dies and popping it up in the center of my card. I embellished with a few gold baubles and that's it! 

Monday, May 9, 2022

Pink & Main | Sketched Florals Sneak Peek

Can you believe it's time for the May release sneak peeks from Pink & Main?! I created a shimmer watercolored background with the NEW Sketched Florals Stamp Set! 


Watercoloring is one of my favorite ways to color. And I really love when I can effortlessly add some shimmer to my coloring! I used an easy heat embossed resist technique with some Nuvo Shimmer Powders to create this card. 


I started by prepping my watercolor cardstock panel with the Pink & Main Magic Anti-Static Brush so that my embossing powder would only stick where I wanted it to. I used Pink & Main Watermark Ink to stamp one of the large florals from the new Sketched Florals Stamp Set and sprinkled on Licorice Embossing Powder

I tapped on some yellow, blue, and red Nuvo Shimmer Powders and spritzed my panel with water. I picked up my cardstock and tilted the panel side to side so that the colors would run together and mix to create a nice rainbow background. Once the panel was completely dry I die cut it with the second largest die from the Stitched Rectangles 1 Die Set and cut a plain white panel with the largest die so that I could layer them. 


I stamped a sentiment from the Sketched Florals Stamp Set with Watermark Ink and heat set it with Licorice Embossing Powder and used scissors to fussy cut the sentiment. 


I assembled my card using foam tape for dimension and added a few Silver Glossy Dots to finish the card. I hope you enjoyed this sneak peek! The Sketched Florals Stamp Set and the rest of the May release will be available later this week! 

Saturday, October 16, 2021

InkOn3 | Heat Embossed Poinsettia Card

I have a no coloring required card to share with you using the InkOn3 Poinsettia Stamp Set and coordinating dies! 


I stamped the flowers and leaves from the Poinsettia Stamp Set onto red and green cardstock using Juicy Watermark Embossing Ink and embossed them with Arctic White Fine Detail Embossing Powder. I stamped and heat embossed a bunch so that I would have enough to cover a full background and have some extras left over. I wanted to add a little bit of dimension so I blended a bit of Twiggy Brown Atelier Ink to the centers of the flowers and Trinity Teal on to the bottom of the leaves. I added some gold watercolor ink spatters onto the flowers and leaves and used the Poinsettia Coordinating Die Set to cut out the images. 


I arranged the poinsettias and the leaves all over my card base and adhered them with liquid adhesive. Check out my video for some quick tips for adhering multiple small images at once! 


I die cut a large sentiment from black cardstock and covered it with Liquid Pixie Dust for some super magical sparkle and added it to the card with foam tape. That's it! Have a great day! 

Thursday, August 5, 2021

Trinity Stamps | Partial Die Cutting Technique

I love to show techniques to stretch your supplies! Today I'm taking a stamp and coordinating die set from Trinity Stamps and using partial die cutting to achieve a faux border effect! 


I wanted to create a faux border from the Beautiful Day in the Neighborhood Stamp and Coordinating Die Set and it was SO easy to do! You could do this with just about any stamp and coordinating die set in your stash! I kept it simple with heat embossing and resist ink blending. 


I used the Modern Embossed A-7 Layers Die Set to cut a layer and ink blend using the Slimline Stripes Stencil Set as well as to cut a couple of patterns from the Rainbow Brights Slimline Paper Pad. I love that these dies not only cut but leave a thin detailed embossed edge. Such a fancy touch! 


I added sentiments from the Big & Bold Sentiments 6x8 Stamp Set and the Supporting Script Sentiments 4x8 Stamp Set to the sides of the card and that's it! Thanks for joining me! 

Monday, April 19, 2021

LDRS Creative | Impatiens Emboss Resist Ink Blending

What's your favorite color combo? I just LOVE black and white with a pop of yellow! I used the LDRS Creative Spring release and used my favorite color combo and even threw in my favorite patterns - dots and stripes! 


I stamped the Impatiens 6x6 Background Stamp with Watermark Embossing Ink and sprinkled on White Embossing Powder and heat set the image. Now it's time to add quick color! I started with the leaves and blended on Prickly Pear Perfection Hybrid Ink and then moved on to the flowers. I used Tangerine Dream at the center of each flower and then blended out with Dan-D-Lion Hybrid Ink. My ink blending is far from perfect, but because I chose colors that blend well together they didn't create a muddy brown. 


I LOVE the new floral stamps from LDRS Creative. The script sentiments and matching dies are to die for! Haha! I stamped the sentiment from the Magnolia Stamp Set with Raven Hybrid Ink and die cut it using the matching Magnolia Die Set. I also stamped the striped border with Raven Hybrid Ink and trimmed it down to a strip. 


I decided I needed another simple pattern on my card, so I cut down a piece of polka dotted patterned paper from the Sweet Sensations 6x6 Paper Pack and added it to the top of my card. I cut a portion of my ink blended background about 2" tall and added it at the bottom. I used foam to add the stripes and the sentiment and that completes this card! See you soon! 

Wednesday, February 24, 2021

Simon Hurley create. | Emboss Resist Ink Blending

I am returning to a go to technique and layout for today's card. I find this is the BEST way to jump start creativity when I'm in a rut and emboss resist ink blending with Simon Hurley create. NEVER disappoints! 


I created an easy heat embossed background with the gorgeous Water Marble Background Stamp and blended over it with Prom Queen, Crown Me, and Clear Skies Dye Inks


I stamped the flowers, leaves, and sentiment from the Sentimental Flowers Stamp Set and fussy cut them before adding them to the front of the card with foam tape. And that's all! 

Wednesday, February 17, 2021

LDRS Creative | Heat Embossing Through a Stencil

Helloooo! I am sharing a fun heat embossing through a stencil technique using one of my most favorite stencils from LDRS Creative


I'm always looking for different ways to stretch my supplies and get creative with stencils. Heat embossing is almost magical and I love to use heat embossing over a stencil! I used my anti static powder tool and then placed the School of Fish Stencil over my cardstock and taped it in place. Usually I am a big fan of temporary spray adhesive, but because I used my anti static powder tool the spray wouldn't have stuck, so I went with masking tape for this technique. I have a blending brush that is specifically designated for embossing ink - you definitely need a separate brush for this technique. I blended LDRS Creative Watermark Emboss Ink over the School of Fish Stencil and heat embossed with White Embossing Powder


You'll notice that I don't have "clean" lines - that's because the Watermark Embossing Ink is a thick ink and seeped under the stencil a bit. I recommend using a pouncing method of blending rather than a circular motion. Now let's add some color! I blended Plum Crazy, Tropical Sea, and Key Lime Pie Hybrid Inks onto the background and then used a towel to buff the excess ink off of the embossed stenciling. I love how the colors look just like the ocean! 


I finished off the card with a couple of sentiment strips from the Anytime Sentiment Stack and a scattering of silver gems. I hope you try heat embossing through your LDRS Creative stencils

Thursday, December 10, 2020

Erin Lee Creative | Coffee Lover Kit Blog Hop

You've seen the Coffee Lover Kit from Erin Lee Creative ( you have, right!? ) and now it's time to celebrate the kit with a blog hop! Be sure to leave me a comment ( and everyone else in the hop, too! ) because Erin Lee Creative is giving away TWO Coffee Lover Kits! You have until Thursday, December 17th to leave a comment!


I've been slightly obsessed with both rainbows and emboss resist ink blending ... sooooo you get another taste of that today! Haha! I also used another of my favorite background techniques - repeat stamping. I created this card with just the large 6x8 stamp set in the Coffee Lover Kit, but there are so many other goodies in this kit! 


I used the little coffee cup and repeatedly stamped it all over my background and heat embossed the panel. I blended a rainbow of Distress Oxide Inks over the coffee cups making that heat embossing pop off the page. I just love a good rainbow of ink blending, don't you!? I added some black watercolor spatters for texture as well as some gems for sparkle! I stamped a sentiment and cut it to a rectangle and popped it up with foam at the top center of my card. 


Thanks for stopping by! Grab your Coffee Lover Kit in the Erin Lee Creative shop and hop along for more inspiration! 


Blog Hop 

Erin Lee Creative

Dilay Nacar

Jeannie Lieu

Eva Costigan

Ceal Pritchett

Cheryl Olson Knutti

Michelle McDaniel

Jennifer Rohrer Timko

Lynnea Hollendonner - you are here!

Thursday, November 26, 2020

LDRS Creative November Feature Day 1 | Winter Night Sky Ink Blending

Get ready for some wintery inspiration from LDRS Creative! I have a new video today showing an emboss resist ink blended night scene using old and new products.


I stamped the Pine Tree Forest onto a piece of white cardstock with Watermark Emboss Ink and heat embossed it with White Embossing Powder. I used some masking tape to mask off the bottom of the card and blended on a gradient of LDRS Creative Hybrid Inks. Then I moved the tape up and blended Raven Hybrid Ink onto the bottom. I flicked white and shimmer paints onto the sky for a bit of snow. 


I stamped out some images from the City Streets and City Sidewalks Stamp Sets, colored them with Copic markers, and cut them out with the coordinating City Streets and City Sidewalks Die Sets. While I had my die cutting machine out I used the smallest die in the new new A2 Stitched Layered Card Toppers Die Set to cut my ink blended panel and the second largest die to cut a piece of patterned paper from the Lovebirds 6x6 Paper Pack


I hope you enjoy this wintery scene card! Come back tomorrow for another LDRS Creative winter card! 

Wednesday, November 18, 2020

Simon Hurley create. | Rainbow Tree Farm Card

I'm all about rainbows! They can be used for anything - Even Christmas trees! I used my favorite background stamp from Simon Hurley create. for this fun rainbow card! 


The Tree Farm Peel-Apart Background Stamp is my absolute favorite stamp set in the Simon Hurley create. line. Ever! I've used it in videos featuring the Peel-Apart feature, but not as a whole background. I stamped and white heat embossed the whole Tree Farm stamp onto a piece of Stark White Cardstock so that I could create an emboss resist background. 


I used a whole rainbow of Simon Hurley create. Dye Ink Pads to blend color onto my background. And I mean a whole rainbow! I used just about every color! I added splashes of water and white ink to the card for a snowy texture in the background. 


I white heat embossed a sentiment from the Posh Poinsettias Stamp Set onto a strip of black cardstock and added it to the card with foam tape as well as some clear bubble gems to finish the card. I hope you like this nontraditional Christmas card!

Monday, November 2, 2020

Erin Lee Creative | Stripes and Hearts Release

Hello, hello! Welcome to the Erin Lee Creative Stripes and Hearts release blog hop! Hop along through the links below for a bunch of inspiration and for a chance to win two $50 gift cards! The winners will be chosen on Monday, November 9th! 


I made two cards using the stripes side of the Stripes and Hearts release - and both are very simple, but pack a punch of color! The Stripe Background Stamp is one of my favorite products from this release. I love those big bold stripes. Perfect for an easy background! I heat embossed it in white and blended color over it with the Stripe Stencil for an emboss resist look. 


I brought back ink smooshing for my second card! Where did that technique go? And can we get an official movement to bring it back? Haha! I just love the Stripe Sentiments Stamp Set! It has a bunch of distressed type writer-esqe sentiments and it is amazing white heat embossed on black cardstock! And the Stripe Die cuts out the sentiments perfectly! 


I hope you enjoyed these projects! Remember to hop along for your chance to win prizes! 

Wednesday, October 21, 2020

Simon Hurley create. | Nature Hike Emboss Resist Card

I took advantage of the Simon Hurley create. Nature Hike Peel-Apart Background Stamp and used just my favorite leaf to create an Autumn heat embossed background! 


The Nature Hike Peel-Apart Background Stamp has 5 separate portions of the stamp that pull away so that you can stamp them individually. I LOVE oak leaves, so I stamped just the oak leaf repeatedly over my Stark White card base and heat embossed with white powder. I blended over the embossing with Bee Sting, Traffic Cone, and Slippery When Wet Dye Inks and added spatters of gold watercolor on top. 


I added a die cut sentiment and some enamel dots as finishing touches. Hope you enjoy this simple card! 

Tuesday, September 1, 2020

Miss Ink Stamps | Video Team Introduction Giveaway

Hi, hi everyone! I'm excited to announce that I am part of the new Miss Ink Stamps Video Design Team! Head over to the Miss Ink Stamps YouTube Channel because there is much to be excited about! Today through Friday we will be introducing a new video design team member with a giveaway each day and a grand prize winner at the end!


I used a few of my favorite Miss Ink Stamps products for my cute Alice shaker card! Just a little taste of what you'll see from me as a Miss Ink Stamps Video Design Team Member!


I created my background with the Alice Background Stamp and added my images and sentiment from the Alice Stamp Set and Wonderland Wisdom Stamp Set.


Watch the video to see just how to make this simple shaker and learn more about the giveaways to help welcome the new video design team! And be sure to subscribe to the new Miss Ink Stamps YouTube channel while you're there! 

Wednesday, August 5, 2020

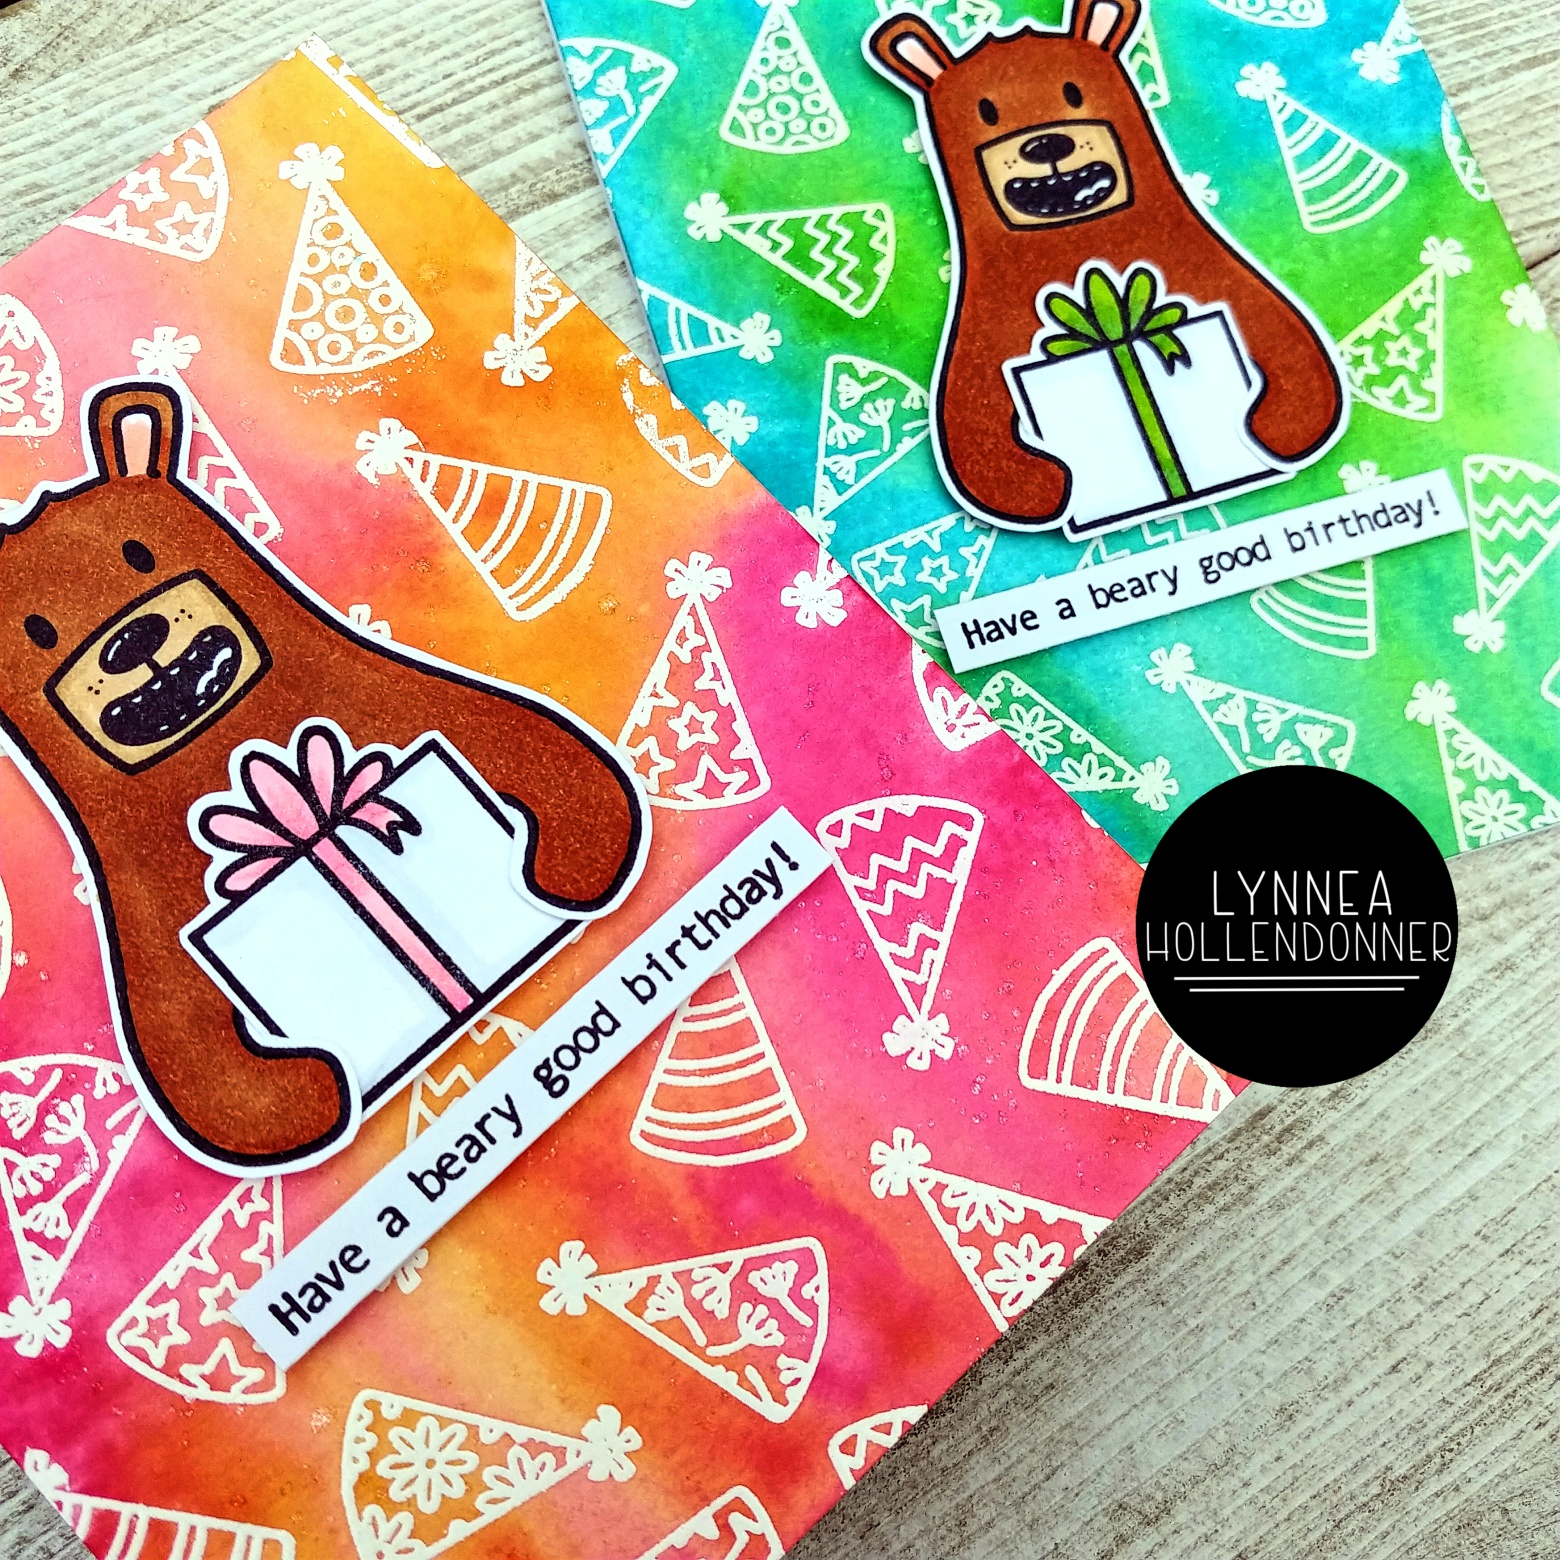
Simon Hurley create. | Easy Watercolored Birthday Cards

I'm all about easy cards that are full of color! Today I turned a bit of ink blending and emboss resist into effortless watercolored backgrounds with Simon Hurley create. products!


This duo of cards was easy to create! I worked on Stark White Cardstock - this is my favorite cardstock! It's bright, it's white, and it's fabulous! I stamped the Party Hats Background Stamp onto two pieces of A2 cardstock and heat embossed them with white embossing powder.


I made the white heat embossed Party Hats Backgrounds pop with a bit of ink blending turned watercolor. I find that the darker the ink the better for this technique. I made two cards - one with traditional "boy" colors and one with traditional "girl" colors. I used ink blending tools to apply ink over the cardstock, but if you want you could go direct to cardstock with the ink. I used Prom Queen and Slippery When Wet as well as Later Gator and Remember Me. Once I had a heavy application of ink on the cards I sprayed them with water from a Tim Holtz Distress Sprayer and set them aside to dry.


I stamped some images and sentiments from the Cake Walk Stamp Set onto Simon Hurley create. Stark White Cardstock and colored them with Copic Markers. I cut them out and added them to my card with foam tape. I love how the present fits perfectly into the hands of the bear!


Easy peasy! Hope you enjoyed this quick tutorial!

Friday, July 24, 2020

Whimsy Stamps | Slimline Connected Bubbles Emboss Resist Baby Cards

Hi there! I'll be mixing some new release products from Whimsy Stamps with some older supplies to create a fun emboss resist duo of baby cards!


I am loving all of the slimline dies that Whimsy Stamps has been releasing! And the Slimline Connected Bubbles die is no exception! I decided to pair it with the new Footprints Background Stamp and make a couple of baby cards! I never seem to have them when I need them. Watch the video to see how I stretched an A2 sized background stamp to fill a slimline die! 


I thought it would be fun to add some texture to the background, so I also show you how I stretch a traditional 6x6 Polka Dot Stencil to fill a slimline card! It's easy peasy! I stamped my sentiments from the So and Too Stamp Set and trimmed them to strips for my cards.


I embellished each card with some colored pearls and that's all! I hope you enjoyed these cards! Head over to the Whimsy Stamps Store to grab these products for your craft room! 

Monday, July 6, 2020

Pink & Main | Stand Tall, Wear a Crown

Have you checked out the new Summer 2020 release from Pink & Main? You NEEEEEEED to! It's spectacular! I used the new Flamingle stamp and die set for my summery card today.


I used just a few products for this card, but I love how bright and summery it is! There are two sizes of pineapples in the Let's Flamingle Stamp Set. Pineapples are my favorite fruit, so of course I had to use them! I stamped them repeatedly across my background and used white powder to heat set them.


I used an Ergonomic Blending Brush to add color to my background. I LOVE these brushes for all kinds of ink blending, but especially for blending a full background of ink! The background came together so quickly! And I love how the pineapples from Let's Flamingle pop off the page!


Doesn't this flamingo look like a queen! I stamped the large flamingo image from the Let's Flamingle Stamp Set and colored her with Copic Markers and cut out the image with the coordinating Let's Flamingle Die Set.


I stamped and white heat embossed a sentiment from the Let's Flamingle Stamp Set onto black cardstock, trimmed them into strips, and added them and the flamingo image to the card with foam tape. I added a healthy coat of glitter to the flamingo and each pineapple to finish this summer card! Check out the Let's Flamingle Stamp Set and the rest of the Summer 2020 Release in the Pink & Main shop!

Wednesday, May 27, 2020

Pink & Main | Have a Cool Birthday

Ice cream is my favorite sweet treat! I brought together a bunch of sweet Pink & Main stamps and dies to make this cool birthday card!


I wanted to have a fun birthday card with unexpected ice cream colors. I started by stamping the Sprinkles Background Stamp onto white cardstock with Versamark Ink and embossing it with white powder. I used an Ergonomic Blending Brush to blend some light pink, dark pink, and purple inks over the embossed Sprinkles Background for an easy emboss resist background. This is the easiest way I've found to have white embossing with a colorful background. You could first blend and then emboss the background, but then you have to wait for the background to dry completely and I'm much too impatient for that!


The adorable ice cream truck image is from the So Cool stamp set. This stamp set is so adorable! Cute little penguins and ice cream images, but this ice cream truck grabbed my attention! I stamped it and colored it with colors that would coordinate well with the background and die cut the truck with the So Cool dies.


I wanted to have a big birthday sentiment and opted to use the Happy Birthday Dies since my background is heat embossed and I have a die cut image. Die cut sentiments are easy to layer and I love the way the Happy Birthday Dies stand out! This die set comes with a shadow die, but I liked the look of just the sentiment on top of the Sprinkles Background. And that finishes the card! See you soon!