Showing posts with label Blog Hop. Show all posts

Saturday, November 20, 2021

Holiday Lights Hop with Pear Blossom Press


Welcome to the Holiday Lights Hop! Today, I’m sharing a fun, interactive card that really lights up! Don’t worry, it wasn’t hard to make. I’ll show you how. And then, when you hop along with us, you’ll see more beautiful light-up cards, all featuring lights from Pear Blossom Press. Get ready for lots of inspiration, and be sure to comment on my video as well as the rest as you hop, for your chance to win a $50 store credit! Your next stop is Alberto Gava


I can't get over how easy it is to make a light up card with Pear Blossom Press EZ Lights! You'll see how quickly this interactive card came together in my video above. 


This slimline scene is the cutest! All the winter and Christmas vibes are in one place! I pulled out a bunch of Lawn Fawn Stamp Sets and combined them on this card. They're all listed and linked in my video description as well as at the end of this blog post. 


There are a lot of things I could have chosen to light up on this card - the windows, the car headlight, etc ... but my husband loves street lights, so I decided to add three streetlights to my winter scene and have them be my light up elements. 


I added an ink blended background with Distress Oxide Inks and this merry and bright light up scene is everything you could ever wish for! This project is part of a hop, so be sure to hop along to the next stop - the amazing Alberto Gava


Products Used

Pear Blossom Press EZ Lights - https://pearblossompress.com/ez-light/?wpam_id=6

Lawn Fawn Stitched Hillside Borders Dies - https://shrsl.com/1gk94

Lawn Fawn Winter Village Stamp Set - https://shrsl.com/38tyv

Lawn Fawn Winter Village Die Set - https://shrsl.com/38tyw

Lawn Fawn Tiny Winter Friends Stamp Set - https://shrsl.com/38tyy

Lawn Fawn Tiny Winter Friends Die Set - https://shrsl.com/38tyz

Lawn Fawn Tiny Christmas Stamp Set - https://shrsl.com/38tz1

Lawn Fawn Tiny Christmas Die Set - https://shrsl.com/38tz2

Lawn Fawn Home for the Holidays Stamp Set - https://shrsl.com/38tz5

Lawn Fawn Home for the Holidays Die Set - https://www.lawnfawn.com/products/home-for-the-holidays-lawn-cuts

Lawn Fawn Merry Mice Stamp Set - https://shrsl.com/38tz9

Pink & Main Stitched Slimline Die Set - https://shrsl.com/2lb60

Pink & Main Layered Circles Die Set - https://shrsl.com/2cy4u

Prize Ribbon Distress Oxide Ink Pad - https://shrsl.com/36hnn

Villainous Potion Distress Oxide Ink Pad - https://shrsl.com/38tyt

Black Soot Distress Oxide Ink Pad - https://shrsl.com/38tys

iCraft Ultra Bond Liquid Adhesive Pen - https://shrsl.com/2ze45

iCraft 1/8" White Jumbo Foam Tape Roll - https://shrsl.com/2ze4j

Saturday, October 23, 2021

Time for Tea Designs Blog Hop


Hi, there! Time for Tea Designs is so excited that their products are now available in the US over at Simon Says Stamp! To celebrate this, they have recruited some North American-based designers (including me!) to help spread the news with a blog hop. Be sure to hop along to see some adorable creations with a few of the new Time For Tea products that are now available over at Simon Says Stamp! We hope that you will be inspired along the way.
 
Time for Tea Designs is giving away $30 worth of T4TD products that are now available at Simon Says Stamp! Be sure to leave a comment on EACH blog as you hop along with us to enter this giveaway. A random drawing will determine our winner and will be announced on the T4TD Blog on October 30th, 2021.


I stamped out some of the ADORABLE critters in the All Occasions Critters Stamp Set and colored them with Copic Markers. I die cut them with the coordinating dies. I LOVE that the die set has oval shaped dies that perfectly cut out the sentiments, too! 


I wanted to do something fun with the Sun Ray Cover Die, so I cut it once from white, light blue, and dark blue cardstock. I had the idea to create a layered background die by just shifting the colored die cuts slightly to the left and right behind the white piece and I love the look! I added my critters and sentiment on top with foam tape. 

Thanks for stopping by! Remember to hop through all of the links below and leave comments for your chance to win a prize from Time for Tea Designs


Blog Hop

Time for Tea Designs

Thursday, August 19, 2021

InkOn3 and Trinity Stamps Blog Hop | Summer Blooms Kit Release

Today, we have a fun craft collaboration between Trinity Stamps and InkOn3. Design Team members from both companies are sharing inspiration using Trinity Stamps’ card kit called Summer Blooms featuring InkOn3 inks!


No collaboration hop is complete without a giveaway! To be entered to win the giveaway, all you need to do is comment at each stop along the Blog Hop! Trinity Stamps and Inkon3 will be giving away a $25 gift card to their respective stores! Be sure to comment before 11:59 PM PST on August 26, 2021 to be entered to win! Each company will post their random winner by September 1, 2021 at 10AM PST! Make sure to check the Trinity Stamps blog and Inkon3 blog to see if you’re a winner!


- 4x8 Summer Blooms Stamp Set
 - 4x8 Summer Blooms Coordinating Die Set
- 4x8 Trinity Stamps Product Pocket for storage
- 12 piece collection of double sided 6x9 papers - two sheets of 6 double-sided designs
- Summer Sparkles - Kit Exclusive mix of rhinestones in Trinity Stamps Signature storage box
- InkOn3 Mini Ink Cubes - Fadeout no-line coloring ink, Sweet Petunia Pink, Marigold Orange, and Goddess Green

This exclusive kit is available only while supplies last. If purchased separately, these items total $72.50. That's a savings of $32.50! The cost of the kit will be $39.99.


My card is simple, but so colorful! I used the Mini Atelier Ink Cubes from the Summer Blooms Kit direct to paper to create my background and added spatters of black ink as well as Liquid Pixie Dust for shimmer. 


I stamped the corner floral cluster from the stamp set in the Summer Blooms Kit and colored it with Copic Markers then used the coordinating dies ( also included in the kit ) to cut out the image. I die cut a sentiment from the Trinity Stamps A-7 Envelope Builder Die Set from white cardstock and layered it onto vellum and popped up my items onto my card with foam tape. I used Liquid Pixie Dust to add a healthy layer of shimmer to my elements. 


Thanks for joining me for this quick and colorful project! Remember to hop on through the links below for more inspiration using the Summer Blooms Kit


Blog Hop


Lynnea Hollendonner - YOU ARE HERE


Tuesday, July 20, 2021

ThermOWeb and Heffy Doodle Collaboration Blog Hop


Welcome to the Heffy Doodle and ThermOWeb Collaboration Blog Hop! Design Team members from both companies are sharing inspiration using products from both companies! 

To be entered to win the giveaway, all you need to do is comment at each stop along the Blog Hop!
ThermOWeb will be giving away $35 and Heffy Doodle will be giving away £25 to their respective stores! Be sure to comment before 11:59 PM EST on July 25th to be entered to win!

Each company will post their random winner on July 26th at 10AM EST! Make sure to check the Heffy Doodle Blog and ThermOWeb Blog to see if you’re a winner!


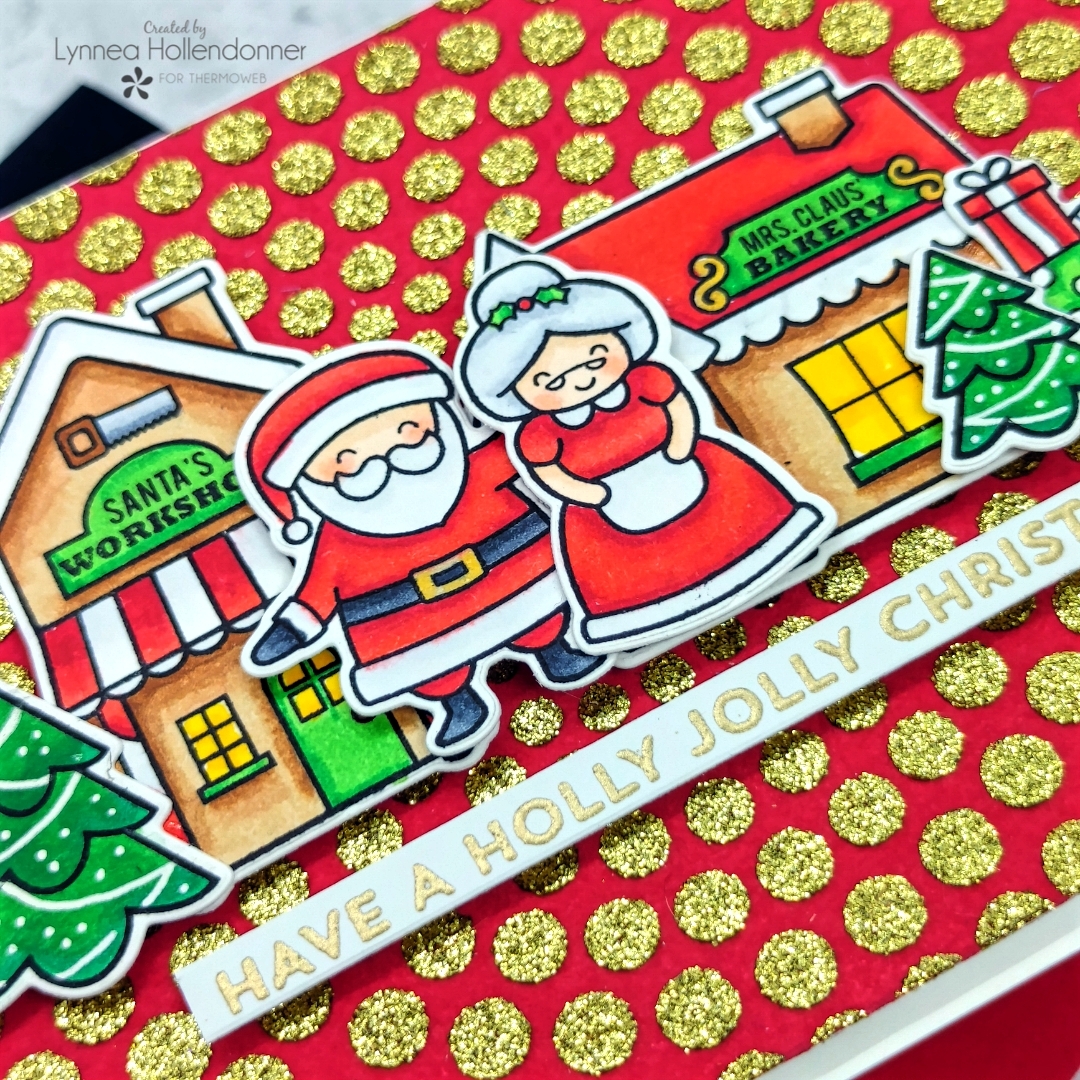
I am a HUGE fan of Christmas so I take every opportunity I get to take advantage of Christmas in July! I used the Heffy Doodle Santa's Village to make a cute little scene! 


I transferred a piece of Ruby Red Deco Foil Flock to a piece of cardstock using an iCraft 6x6 Easy Cut Adhesive Sheet and my die cutting machine. Then I sprayed the back of the Heffy Doodle Circles of Life Stencil with Pixie Spray and temporarily adhered it to the flock background. I used my Stencil Pal to spread an even layer of Gold Glitz Glitter Gel over the stencil and set the panel aside to dry. 


I stamped out the buildings, trees, presents, and Santa and Mrs. Claus from the Santa's Village Stamp Set and colored them with Copic Markers then die cut them with the coordinating Santa's Village Die Set


I cut down my stenciled panel so that I could mat it onto a standard A2 card base and added my images to my card with iCraft 3D Foam Squares and an iCraft Ultra Bond Liquid Adhesive Pen


Thanks so much for joining me! Remember to hop through the rest of the design teams and leave comments along the way for your chance to win gift cards from ThermOWeb and Heffy Doodle

Monday, March 29, 2021

Pink & Main and Heffy Doodle Collaboration Blog Hop


Welcome to the Heffy Doodle and Pink and Main Stamps Collaboration Blog Hop! Design Team members from both companies are sharing inspiration using products from both companies! And there are prizes to celebrate! To be entered to win the giveaway, all you need to do is comment at each stop along the Blog Hop! Pink & Main will be giving away a Surprise Package worth $25 and Heffy Doodle will be giving away £25 to their respective stores! Be sure to comment before 11:59 PM on April 1st to be entered to win! Each company will post their random winner on April 2nd at 10AM EST! Make sure to check the Heffy Doodle Blog and Pink and Main Blog to see if you’re a winner!


All of my adorable images come from the Heffy Doodle Chimply the Best Stamp Set. I colored them with Copic Markers and cut them out with the coordinating dies.  I knew that I wanted to use the Leafy Slim Line Die from Pink & Main as part of my background, but I thought the oak leaf looked a bit too autumn, so I altered it! I cut out the oak leaves and die cut more of the flat style leaves to piece into the design. They match the leaves in the Chimply the Best Stamp Set perfectly! 


I backed my Leafy Slim Line Die Cut with a piece of patterned paper from the Hooray 6x6 Paper Pack - check out my video above to see how I stretched it to fit across my slim line card! I wanted my sentiment to pop, so I die cut the letters for "hello" from a blue glitter cardstock from the Summer Glitter Paper Pack using the Pink & Main Thin Alpha Die Set


I added all of my stamped and die cut images and my glittery sentiment, I added a coordinating sentiment strip stamped from the Chimply the Best Stamp Set and I'm finished! 


Thanks so much for joining me! You can find all the products I used on today's card in the Pink & Main and Heffy Doodle shops! Happy hopping!


Blog Hop


Lynnea Hollendonner - YOU ARE HERE!


Friday, January 22, 2021

Pear Blossom Press and Hero Arts Collaboration Hop


Welcome to the Bold & Bright Hop with Hero Arts and Pear Blossom Press! You’re going to see some of the coolest light-up cards, all featuring your favorite stamps and dies from Hero Arts. Get ready for lots of inspiration, and be sure to comment as you hop along, for your chance to win a $50 store credit!


I really love the card I made for this hop - is it okay to say that? Haha! It's bright and vibrant and glittery! And it lights up! Watch my video above for a full tutorial! 


I started with the cake in my process video, so let's start there! I stamped the cake and candles from the Hero Arts Time for Cake Stamp Set and colored the rainbow center with Copic Markers. I didn't color the outside of the cake at all - I have something special in mind! I scooped out a small bit of Iridescent Glitz Glitter Gel and spread it around the cake with a palette knife. Now I have a chunky, glittery, iced cake! It took almost no time to dry, too!


I wanted to create a special background, so I used the Hero Arts Porthole Fancy Die, but I cut off the outer circle which made it look like a porthole. Now it just looks like a circular grid backdrop. I used i-Brush Blending Brushes to blend on a rainbow of Distress Oxide Inks and added some gold watercolor spatters on top. I adhered the Porthole Fancy Die-Cut piece on top. 


Before I go any further with the front of the card - let's light it up! I pierced three small holes in my background where the candles from my cake would lay. I marked the placement of the lights on my card base as well as where I need to place my button. It's is SO easy to assemble the EZ Lights! The whole process took a little more than 3 minutes! You can't beat that! A real game changer is the double thick foam tape carried by Pear Blossom Press! It makes assembling any kind of interactive card a breeze. I highly recommend that you grab a roll! 


Now let's finish up the front of the card. I wanted a die cut sentiment to go on my card so I cut apart the Hero Arts Happy Birthday Cake Fancy Die! I die cut it from gold cardstock and trimmed the little tabs at the beginning and end of the sentiments to make a stand alone die cut sentiment. 


Every good hop has prizes, right? So Hero Arts, and Pear Blossom Press are each giving away a $50 store credit! Comment on this post by January 29, 2021 to be entered to win. Winners will be posted on the Pear Blossom Press Blog on February 6, 2021.


Wednesday, January 20, 2021

Erin Lee Creative | January 2021 Release Blog Hop

Well, hello hello! Look what time it is! Erin Lee Creative is releasing a collection of new stamps, dies, a stencil, and other embellishment goodies today! We're kicking off this release with a blog hop, so be sure to comment on blog entries along the hop so you can be entered to win a $50 voucher to use in the Erin Lee Creative shop! There will be two winners chosen at random from the comments across all the blogs, so every comment is another entry! 


I placed the Sparkling Palms Stencil onto a piece of white cardstock and used two shades of green as well as a bit of yellow Distress Oxide Ink to create my background. I added some bronze and dark teal shimmer watercolor spatters on top for more texture. 


I stamped the rainbow and palm tree images from the Stay Golden Stamp Set and stamped the sentiment below the image. Watch my video above ... this was NOT how I envisioned this card turning out! But sometimes you need to roll with it! I die cut my panel with a stitched rectangle and added it onto a stitched white layer. To keep with the golden theme I added lots of gold gems all over my card. 


Now it's time for the hop! Remember that each comment is an entry to win a $50 shopping spree at Erin Lee Creative! Good luck! 

Thursday, November 5, 2020

InkOn3 and Kat Scrappiness Blog Hop | Autumn Raccoon Hugs Card

Welcome to the “Happy Harvest Hop from Kat Scrappiness & InkOn3!” We are thrilled you could join us on this blog & Instagram hop celebration! We will be sharing darling fall cards featuring Kat Scrappiness amazing dies and sprinkles and InkOn3’s fabulous inks and darling fall stamps. Come hop with us for inspiration and of course prizes!

The hops November 5th at 10am CST and will end on November 8th at midnight. We will have 4 x $15 winners!! 2 from randomly chosen blog posts and 2 from randomly chosen Instagrams so the more you comment the better chance you have.

To participate in the hop giveaway, simply leave a comment on each blog post, follow each DT on Instagram, comment and tag your friends. The more you comment the more chances of winning. Bonus entries for following our stores on all our social media below:

The winners will be announced on the Ink on 3 and Kat Scrappiness blogs & Instagrams on November 10th. You will need to contact us to claim your prize. You can subscribe to our blogs for a notification email on any new blog posts. You will have 7 days to claim your prize.Thank you for hopping with us and supporting our small businesses!


I love slimline dies! But what I love even more is stretching my slimline dies to get more use out of them! I created a "drop down" look with the Kat Scrappiness Slimline Foliage Frame Die and an ink blended background. I used Marilyn Red, Marigold Orange, and Bee Sting Yellow Atelier Ink from InkOn3 to create a blended background. I die cut the Kat Scrappiness Slimline Foliage Frame from gold foil cardstock and used foam to pop it up over the ink blended portion and trimmed it down. I added it onto a brown A2 card that I spattered with gold paint. 


I used Blackout Hybrid Detail Ink and stamped the raccoon image and sentiment from the InkOn3 Raccoon Hugs Stamp Set and colored them with Copic markers. I cut them out leaving a small white border and added them with foam tape to the center of my Slimline Foliage Frame drop down panel. 


I added a sprinkling of sequins from the Kat Scrappiness Fall Blessings Sequin Mix making sure to tuck them here and there peeking out from under the leaves. And that's all! There's a lot more to be seen, so make sure you hop through the links below! Thanks for stopping by! 


Blog Hop 


Lynnea Hollendonner - YOU ARE HERE!


Monday, November 2, 2020

Erin Lee Creative | Stripes and Hearts Release

Hello, hello! Welcome to the Erin Lee Creative Stripes and Hearts release blog hop! Hop along through the links below for a bunch of inspiration and for a chance to win two $50 gift cards! The winners will be chosen on Monday, November 9th! 


I made two cards using the stripes side of the Stripes and Hearts release - and both are very simple, but pack a punch of color! The Stripe Background Stamp is one of my favorite products from this release. I love those big bold stripes. Perfect for an easy background! I heat embossed it in white and blended color over it with the Stripe Stencil for an emboss resist look. 


I brought back ink smooshing for my second card! Where did that technique go? And can we get an official movement to bring it back? Haha! I just love the Stripe Sentiments Stamp Set! It has a bunch of distressed type writer-esqe sentiments and it is amazing white heat embossed on black cardstock! And the Stripe Die cuts out the sentiments perfectly! 


I hope you enjoyed these projects! Remember to hop along for your chance to win prizes! 

Saturday, October 17, 2020

Erin Lee Creative | October Release Blog Hop

Hello everyone! There's a new release from Erin Lee Creative that just hit the shop and we are celebrating with a blog hop! You'll find lots of inspiration along the way and have a chance to with a prize, too! Leave a comment at each stop in the hop and TWO lucky winners will be drawn to win a $50 gift card to the Erin Lee Creative shop! Winners will be announced on the Erin Lee Creative Blog on Monday October 26th! 


Masculine cards are something that I truly struggle with, and a bunch of other crafters must as well because it's one of my most requested designs! I grabbed a few new Erin Lee Creative release items and gave it a shot! 


I masked off the center of the new Quilted Stencil with some masking paper and blended on some dark and light brown inks. I love how easy it is to change the look of this stencil! I stamped the mountain range from the Stay Wild Stamp Set and gave it just a bit of Copic coloring - not too much! I wanted to keep the card simple! 


I finished the card by adding the Shine Word Die cut from Gold Holographic Cardstock and stamping a sentiment from the Stay Wild Stamp Set in brown ink. 


Thanks for stopping by my blog today! Remember to leave a comment here and on the rest of the blogs in the hop for your chance to win a gift card to the Erin Lee Creative Shop! Good luck to everyone! 

Saturday, September 12, 2020

Pink & Main and Pear Blossom Press EZ Lights Collab

I have a spooky Day of the Dead light up card to share with you! It's part of the blog hop collaboration between Pink & Main and Pear Blossom Press! I love when the companies I love join forces! 


Isn't it cute?! I just love this adorable slimline scene! And their little faces light up! The video above shows just how easy it is to create a light up card, so be sure to check it out! I stamped and colored my images from the Pink & Main Day of the Dead Stamp Set and colored them with Copic Markers then die cut them with the coordinating Day of the Dead Dies. I love how they turned out! 


Now it's time to create my scene! I used a die from the Layered Circles Die Set and cut it from masking paper and positioned it in the top left corner to mask off my moon. I used blender brushes and blended on a few colors of ink to make my sky. I didn't bring the ink all the way to the edge of the circle - this lets me have a glowing moon effect! I peeled off the circle mask and blended on some yellow ink for the moon. 


I die cut a reverse scallop slimline frame using the Blessings Slimline Die Set from black cardstock. I also cut some stitched hills using the Scallop Waves Die Set and added them onto my night sky ink blended piece. 


Now it's time to make the card light up! To see how I do this be sure to watch the video above! It's so easy! I made note of where I wanted the push button and lights to be placed and quickly assembled the light up mechanism. It truly is easy! All you need to do is run the wires and position the light bulbs in the correct place and hold them down with washi tape. You can purchase the EZ Lights from Pear Blossom Press directly or from the Pink & Main shop! Then I added my scene to my card base with Double Thick Foam Tape from Pear Blossom Press. This is a super important part! You want to use thick foam tape so that your button doesn't accidentally get pressed and run down the battery.