Ready for another HSN throwback project? How about TWO?! I made two cards quick and easy using papers, ephemera, and stickers from the MacKenna Christmas Card and Scrapbooking Kit from HSN. Check out the video for my step-by-step tutorial!
I was able to use the components of the MacKenna Christmas Card and Scrapbooking Kit to make two cards. All I added was some adhesive and cardstock! No stamping, die-cutting, or anything too crazy!
I took one sheet of the 12x12 patterned paper and cut it apart to get two different background scenes. I cut down the piece to layer onto a mini slimline card, added silver shimmer watercolor spatters, and mounted it with foam tape onto a piece of mint and white patterned paper.
All this card needs is some puffy stickers to help set the scene! I placed two deer near the center of the card and a sentiment in the top right corner. I added the panel to a mini slimline card base and that's it for card one!
My second card is just as simple! I took a second background piece and trimmed it to size for a slimline card. I added silver shimmer watercolor spatter and used foam tape and mounted it to a pink cardstock mat.
I grabbed a piece of ephemera and added it to the left side of the card with foam tape. I added lots of enamel dots to help bring the focus to the truck and camper ephemera piece and added the panel to a white slimline card base.
I hope you enjoyed this throwback and these two easy cards! I'll see you again soon!
Who's ready for Christmas?! It's only about 4 months away, and I am ready to bring you some fun Holiday vibes using some LDRS Creative products from HSN!
I started by project by using the flower dies from the Poinsettia Layering Dies from HSN to cut two shades of red cardstock, white cardstock, and kraft cardstock. I also used the leaf dies to cut three shades of green cardstock. Be sure to watch the video above to see how easy these dies are to layer and put together. I like to find a reference point when I'm layering. That makes it easier to know where to adhere the pieces to make sure they're lined up properly. Don't forget! LDRS often puts layering guides on the back of their packaging, so don't throw that away! It's a great visual aid.
I wanted a pretty frame to accent my card, so I cut white cardstock using the Floral Foliage Slimline Dies. You can use just the outer die and you'll get a full panel with a cross stitch outline, but if you layer the two dies together, you'll get the frame with the cross stitch and foliage patterns. I cut a slimline card base to 3.25" x 8.25" and started adding my Layered Poinsettia flowers and leaves to fill the background. Every Holiday card should have a bit of sparkle, so I spattered some gold watercolor all over the background. I added foam tape behind the Floral Foliage Slimline frame and added it to the card.
All that's left is to add a sentiment! I used the Wishing You a Very Merry Christmas Dies and cut a layered sentiment and added it to the center of my card with foam tape. That's it! I hope you've enjoyed seeing some previously released HSN products in action! See you soon!
Just look at these rainbow slimline cards - they're perfect for spring and summer! I used the LDRS Creative Large Butterfly Dies and created two cards at once using one of my favorite background techniques. Check out my video and blog post to learn a little bit more about me and my creative process!
I've been loving bright, bold, and beautiful colors lately! I decided to use all the colors of the rainbow on my slimline cards and use a few of my favorite techniques.
I combined a bunch of my favorite techniques for these cards. I love to find ways to stretch my dies, so I decided to use the Large Butterly Dies to create a background instead of using them as a focal point. I cut a whole bunch from white cardstock and sprayed the backs of them with temporary adhesive and placed them all over a slimline card panel. I used a rainbow of LDRS Creative Hybrid Inks and ink blended a rainbow over the background. I removed all of the butterfly die-cut pieces and was left with a masked background. Almost like a stencil!
I had a bunch of leftover pieces that were perfect for making a second card! I used liquid adhesive and glued them onto a second card panel in the same place I had them on the first. Now I have two cards that are the mirror of each other - one background is colorful with white butterflies and one background is white with colorful butterflies! If you know me then you know I love to add spatters to my backgrounds! They add the perfect amount of texture and are great for covering up any imperfections.
I finished off each card with a sentiment from the Large Word Spring Sentiments Dies and some enamel dots. I hope you'll give this background technique a try! It works fabulously with individual dies like I used today or with coverplate dies!
I stamped a sentiment from the Floral Solid Layering 4x6 Stamps with Raven Hybrid Ink onto a piece of white cardstock and used my scissors to trim around the sentiment leaving a small white border. I popped it up near the bottom center of my panel with foam tape and added the card panel to a 3.5" x 8.5" black slimline card base.
Every bit of me wanted to add some black spatters to my panel - it's my favorite way to "embellish" a card, but I decided to change it up and go with some baubles instead. I glued them here and there and that's it! Thanks for joining me!
I love a black background with a bold pop of color! I started by covering a couple of pieces of cardstock with shimmer watercolors and then used the Ginkgo Leaves Die to cut out two large sprigs.
I used the Elegant Stitched Frames Slimline Dies and cut a white card base, a gold and black layer, and then a gold, black, and white layered label shapes. I stamped a sentiment from the Essential Birthday Sentiments 4x6 Stamps onto the white label. I added shimmery white watercolor spatters to the black panel and added the Ginkgo Leaves die-cuts on top and trimmed off the excess.
I layered all of the various pieces together with a mixture of liquid adhesive and foam tape for dimension. Thanks for joining me!
You won't believe how easy it was to make this card! I used a bunch of coordinating products from the LDRS Creative Lovely Watercolor Collection along with a bit of die-cutting and that's it!
I love the Lovely Watercolor papers, ephemera, stickers, and enamel dots! The colors and patterns are just stunning! I chose one of my favorite backgrounds from the Lovely Watercolor 4x9 Paper Pack and cut it with the scalloped die from the Floral Scallop Slimline Die Set. I layered it onto a white card base that I created with the largest die in the same set. It's so easy to create a card base - just fold a piece of cardstock in half, line up the die so that the flat side of the die is lined up with the folded edge, and cut. No need to measure!
I didn't want to cover up too much of the patterned paper, so I chose a tag and the 'sweet friend' piece from the Lovely Watercolor Ephemera Pieces and added them with foam tape to my card. I spelled out the word 'hello' with various colors of stickers from the Lovely Watercolor Small Puffy Alpha Stickers and added them onto the ephemera. I cut a few flowers from white cardstock and patterned paper with the Floral Scallop Slimline Dies and added them below my sentiment along with a scattering of Lovely Watercolor Enamel Dots to finish the card!
Sometimes all you need is a bright background and a pop of white! I used new dies from LDRS Creative and some watercolors on this slimline card.
I used some watercolors from my stash and created a rainbow watercolored background on a piece of LDRS Creative 4x9 Slimline Watercolor Paper. I made sure to overlap the colors to get even blending and once my background was dry I spritzed water over the colors and picked it up with a microfiber cloth creating textured water spots. I used the smallest die in the Floral Scallop Slimline Die Set to cut down the panel and used the next largest scalloped die to cut a piece of white cardstock. I folded a piece of cardstock in half and used the largest die to cut a slimline card base and layered the pieces together.
I love the large floral outline dies that are new from LDRS! I die cut the Lovely Wildflower Cluster Die four times from white cardstock and used liquid adhesive to stack them together for dimension. Stacking dies together is one of my favorite hacks to use instead of trying to cut thin slivers of foam tape. It's much quicker!
I stamped a sentiment from the Everyday Sayings Stamp Set with Raven Hybrid Ink and die cut it with the Everyday Sayings Coordinating Dies. I also cut a shadow from white cardstock and layered them together with foam tape and added the sentiment in the center of the floral cluster. Thanks for joining me!
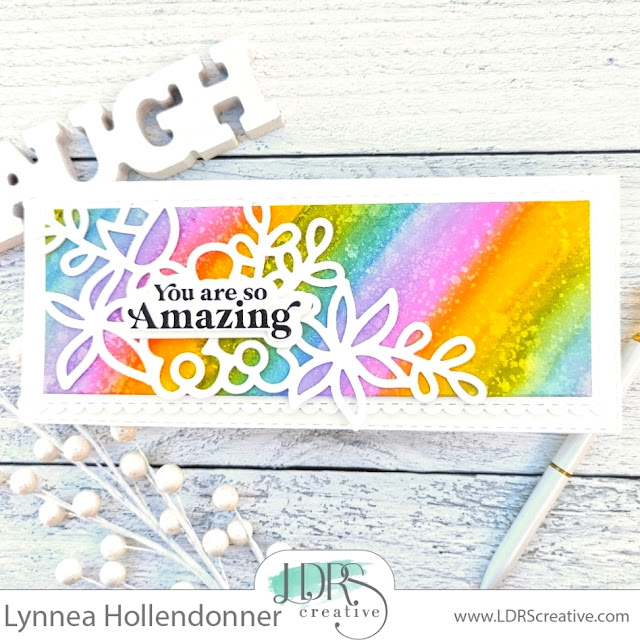
Have I told you lately that you're amazing? ... Because you are! I mixed a few LDRS Creative products from the past few releases together to make this shaped slimline card!
I wanted to create a simple, light, and airy card and realized that I hadn't used the Dahlia Stamp Set in a while. I love the large floral image, so I stamped it with Raven Hybrid Ink and colored it with alcohol markers. I have lots of tips and tricks in my video, including how I get a fabulous crisp black outline, so be sure to watch! Once my image was colored I used the Dahlia Coordinating Dies and cut it out along with the "amazing" sentiment. I also used my Raven Hybrid Ink to stamp the accent row of "x"s and the "you are" sentiment.
Now that I have all of my focal images ready to go, let's start on the card base and background! I used the largest die in the Elegant Stitched Frames Slimline Die Set to cut a card base. This die only cuts the sides - the top, bottom, and right - leaving the left uncut to form the base. I wanted to completely cover my card base with a pattern from the Pastel Patterns 4x9 Paper Pack, so I had to do some creative editing to make this happen. You'll see how in my video! I cut a piece of white cardstock with the Trellis Slimline Coverplate Die and adhered it onto a second piece of white cardstock and then cut it with the smallest layering die in the Elegant Stitched Frames Slimline Die Set so that it would layer onto the card base nicely. I love the extra texture from the coverplate!
I adhered all of the pieces to my card with a mixture of liquid and foam adhesive. And it's all finished! Simple, but it really packs a punch! Thanks for joining me today. I'll see you again soon!
Welcome to the Holiday Lights Hop! Today, I’m sharing a fun, interactive card that really lights up! Don’t worry, it wasn’t hard to make. I’ll show you how. And then, when you hop along with us, you’ll see more beautiful light-up cards, all featuring lights from Pear Blossom Press. Get ready for lots of inspiration, and be sure to comment on my video as well as the rest as you hop, for your chance to win a $50 store credit! Your next stop is Alberto Gava!
I can't get over how easy it is to make a light up card with Pear Blossom Press EZ Lights! You'll see how quickly this interactive card came together in my video above.
This slimline scene is the cutest! All the winter and Christmas vibes are in one place! I pulled out a bunch of Lawn Fawn Stamp Sets and combined them on this card. They're all listed and linked in my video description as well as at the end of this blog post.
There are a lot of things I could have chosen to light up on this card - the windows, the car headlight, etc ... but my husband loves street lights, so I decided to add three streetlights to my winter scene and have them be my light up elements.
I added an ink blended background with Distress Oxide Inks and this merry and bright light up scene is everything you could ever wish for! This project is part of a hop, so be sure to hop along to the next stop - the amazing Alberto Gava!
Products Used
Pear Blossom Press EZ Lights - https://pearblossompress.com/ez-light/?wpam_id=6
Lawn Fawn Stitched Hillside Borders Dies - https://shrsl.com/1gk94
Lawn Fawn Winter Village Stamp Set - https://shrsl.com/38tyv
Lawn Fawn Winter Village Die Set - https://shrsl.com/38tyw
Lawn Fawn Tiny Winter Friends Stamp Set - https://shrsl.com/38tyy
Lawn Fawn Tiny Winter Friends Die Set - https://shrsl.com/38tyz
Lawn Fawn Tiny Christmas Stamp Set - https://shrsl.com/38tz1
Lawn Fawn Tiny Christmas Die Set - https://shrsl.com/38tz2
Lawn Fawn Home for the Holidays Stamp Set - https://shrsl.com/38tz5
Lawn Fawn Home for the Holidays Die Set - https://www.lawnfawn.com/products/home-for-the-holidays-lawn-cuts
Lawn Fawn Merry Mice Stamp Set - https://shrsl.com/38tz9
Pink & Main Stitched Slimline Die Set - https://shrsl.com/2lb60
Pink & Main Layered Circles Die Set - https://shrsl.com/2cy4u
Prize Ribbon Distress Oxide Ink Pad - https://shrsl.com/36hnn
Villainous Potion Distress Oxide Ink Pad - https://shrsl.com/38tyt
Black Soot Distress Oxide Ink Pad - https://shrsl.com/38tys
iCraft Ultra Bond Liquid Adhesive Pen - https://shrsl.com/2ze45
iCraft 1/8" White Jumbo Foam Tape Roll - https://shrsl.com/2ze4j
I knew that I wanted to create a simple card, but fancy it up a bit. That's my style! I reached for the Songbird Fields Slimline Paper Pack and the Elegant Stitched Frames Slimline Die Set. I used the two layering dies to cut out a few patterns of paper and the outer die to cut a white card base and layered my papers and bouquet onto the shaped card base.
I love stacking up sentiment strips to combine sentiments, so I stamped the Happy Me, Happy You Sentiment Stack and cut out the strips with the Sentiment Stack II Die Set and added two strips to the center of my card with foam tape to finish the card. You could easily make a bunch of these and give them as a gift! I hope you have a great day!
I had a bunch of you asking me to show you how I made this card, so I'll be going live today on the Trinity StampsFacebook Page showing you how easy it is to make! I'll see you at 12pm CT / 1pm ET!
I used a rainbow of Distress Oxide Inks over the Layered Pine Forest 4x9 Stencil Set to create my background. Isn't it GORGEOUS?! I just love these stencils!
I finished off the card with a scattering of Something New Baubles Embellishment Mix. Remember to join in on the fun on YouTube and on Instagram! Happy shopping!