Showing posts with label Hero Arts. Show all posts

Friday, January 22, 2021

Pear Blossom Press and Hero Arts Collaboration Hop


Welcome to the Bold & Bright Hop with Hero Arts and Pear Blossom Press! You’re going to see some of the coolest light-up cards, all featuring your favorite stamps and dies from Hero Arts. Get ready for lots of inspiration, and be sure to comment as you hop along, for your chance to win a $50 store credit!


I really love the card I made for this hop - is it okay to say that? Haha! It's bright and vibrant and glittery! And it lights up! Watch my video above for a full tutorial! 


I started with the cake in my process video, so let's start there! I stamped the cake and candles from the Hero Arts Time for Cake Stamp Set and colored the rainbow center with Copic Markers. I didn't color the outside of the cake at all - I have something special in mind! I scooped out a small bit of Iridescent Glitz Glitter Gel and spread it around the cake with a palette knife. Now I have a chunky, glittery, iced cake! It took almost no time to dry, too!


I wanted to create a special background, so I used the Hero Arts Porthole Fancy Die, but I cut off the outer circle which made it look like a porthole. Now it just looks like a circular grid backdrop. I used i-Brush Blending Brushes to blend on a rainbow of Distress Oxide Inks and added some gold watercolor spatters on top. I adhered the Porthole Fancy Die-Cut piece on top. 


Before I go any further with the front of the card - let's light it up! I pierced three small holes in my background where the candles from my cake would lay. I marked the placement of the lights on my card base as well as where I need to place my button. It's is SO easy to assemble the EZ Lights! The whole process took a little more than 3 minutes! You can't beat that! A real game changer is the double thick foam tape carried by Pear Blossom Press! It makes assembling any kind of interactive card a breeze. I highly recommend that you grab a roll! 


Now let's finish up the front of the card. I wanted a die cut sentiment to go on my card so I cut apart the Hero Arts Happy Birthday Cake Fancy Die! I die cut it from gold cardstock and trimmed the little tabs at the beginning and end of the sentiments to make a stand alone die cut sentiment. 


Every good hop has prizes, right? So Hero Arts, and Pear Blossom Press are each giving away a $50 store credit! Comment on this post by January 29, 2021 to be entered to win. Winners will be posted on the Pear Blossom Press Blog on February 6, 2021.


Sunday, October 27, 2019

Soft Heat Embossed Lilac Snowflakes

I just can't wait for the first snow to fall! Where I live it's not uncommon to have a dusting or two before Halloween!


This card is the result of a happy accident - but I love the look! I sprayed the back of the Echo Park Magical Snowfall Stencil a little too heavily with Pixie Spray and I didn't wait long enough for the spray to dry before adding it to my cardstock. I pressed Versamark ink over the stencil and when I removed it and added my Lilac Pearl embossing powder the powder actually stuck to the background. I LOVE it! I think it looks like the soft flurries of snow that picks up and blows around in the wind!


The little snowman is from the Avery Elle Christmas Magic stamp set. I wanted him to match my heat embossed background, so I used some BV Copic Markers to color his hat and scarf. The sentiment is from the Sunny Studio Stamps Bundled Up stamp set. I thought it fit this card perfectly!


I added all of my die cut elements onto my card and finished it off with some string tied in a bow. Head over to the Scrapping for Less store to find these products and more for your Holiday cards!

Sunday, August 4, 2019

Hero Arts Color Layering Red Panda

Hey! I love the simplicity of color layering stamps! I really dislike coloring, so stamping and building
layers is perfect for me! I used the Color Layering Red Panda stamp set from Hero Arts from Scrapping for Less today!


It was so easy to use some reds and oranges to stamp and layer the red panda image. Three steps and you have a realistic looking critter!


I used some of the scene building stamps from the stamp set to create a simple bamboo background for my focal image. I wanted some light clouds in the background, so I used some Distress Ink and a clouds stencil. I stamped the sentiment in the bottom left corner.


So easy and simple! You could create a whole set of these and package them together as a gift! Enjoy the video tutorial!


Thanks for joining me!

Wednesday, July 25, 2018

Hello There Fairgrounds Card

Hello again! I have another card using the July Hero Arts My Monthly Hero card kit! Seriously one of my favorites! 


I used a reverse layout from my previous card with colors from the other side of the color wheel. I stamped and heat embossed the fairgrounds silhouette and the plane and used clear embossing powder to give them some shine. I masked off the top portion of the card and used some Distress Oxide inks on the bottom portion of my card - Carved Pumpkin, Spiced Marmalade, and Fossilized Amber. I added some flicks of water to finish it off!

Thanks for joining me!


Monday, July 23, 2018

You Make My World Go Round

The July My Monthly Hero kit is absolutely AMAZING! I wait all year for my county fair! My family takes the whole week off and spends it at the fair! The sights, the smells....the feeling of complete happiness! As soon as I saw this kit I had to have it! 


This silhouette line image of the fairgrounds and a little farm is so perfect! I would have bought the kit JUST for this stamp! I made a bunch of cards with it, but this one may be my favorite! I stamped it with black Versafine ink and embossed it with clear powder and used Distress Inks to blend over the embossing. I added a sentiment and that is all!


Tuesday, January 30, 2018

Pearl Embossed Flower Background

Hello, everyone! The stomach bug has done a number on my household this past week! It feels like it's been forever since I sat down and played in my craft room! I purchased a few things from Vanessa at Butterfly Reflections, Inc and I couldn't wait to play around!


I started with some pink cardstock and I stamped the new Floral Background stamp from The Stamp Market and heat embossed it twice with Hero Arts White Satin Pearl embossing powder. I completely blame Jennifer McGuire for this purchase! I certainly don't need more embossing powder...but she makes me need it if you know what I mean! I love the pearly shine of this powder! I die cut the Pretty Pink Posh Hello Friend Script die from darker pink cardstock and added some Wink of Stella for extra shimmer and shine!


Hope you enjoyed this super quick card!


Friday, December 15, 2017

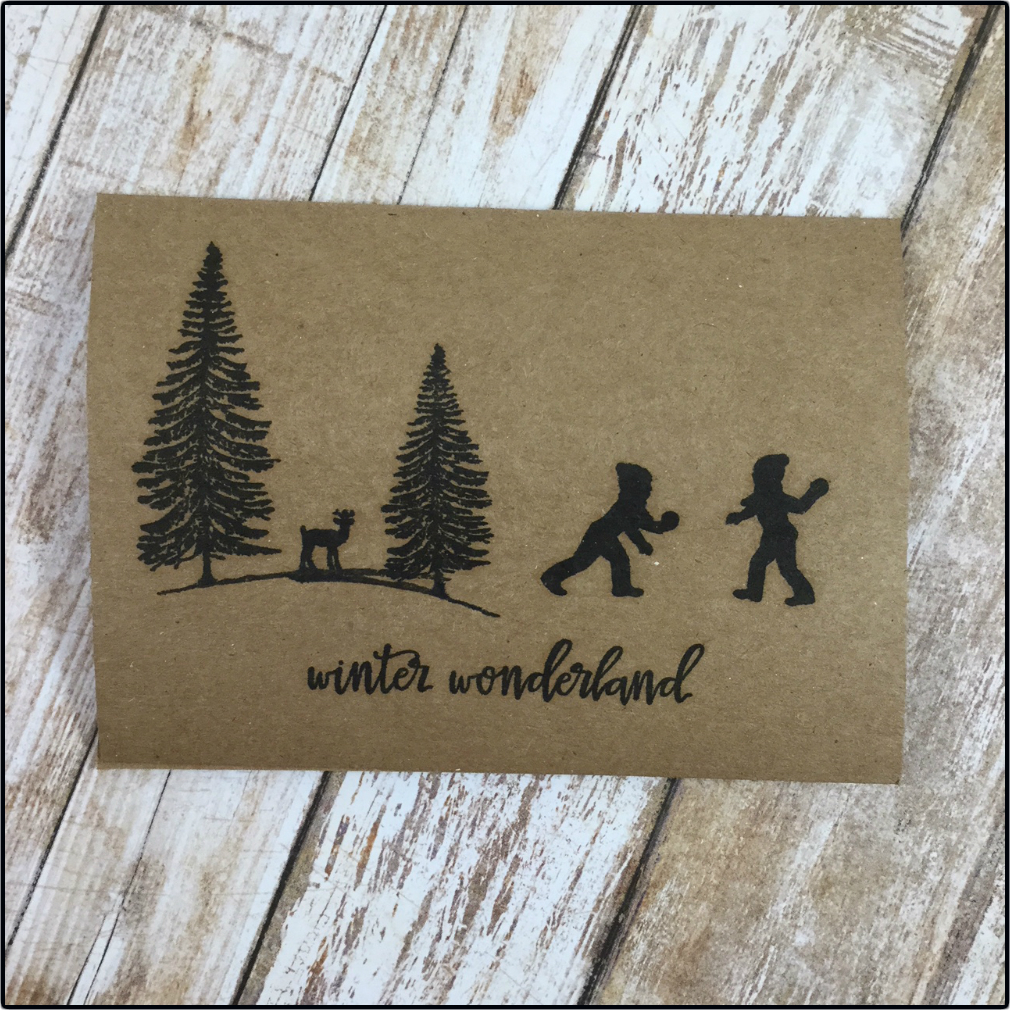
Hero Arts Winter Silhouettes

Hello! I'm sorry I've been away from my blog for so long! All of the Christmas hustle and bustle has kept me...hustling! I've been working on some handmade gifts that I can't wait to show you!!...But of course it has to wait until after Christmas! And I also have some other crafty things in the works! Stay tuned the next couple of months to find out what I've been up to!

Today I have two cards to share using the Hero Arts Winter Silhouettes stamps and dies!


I started with a 4 bar sized notecard and used my MISTI and Versafine Onyx Black ink to stamp most of the images all at once! I had to go back in and stamp the second hill and tree separately, but really this card was so quick to make! I'm thinking about making it my Christmas card design for next year!


I love the first card, but I wanted to see how the design would look if I stamped with Versafine Onyx Black ink onto white cardstock and heat embossed with clear powder. I love it! The pop of white almost reminds me of snow! I can't decide which design I like better!


Sunday, November 19, 2017

Noah's Ark Themed Card Set

Hi, everyone! I have a family member who LOVES Noah's Ark, so I wanted to create a special Christmas gift for her! I thought I would make a Noah's Ark themed card set with many different colors and sentiments so she can use them all through the year! 


I made a whole rainbow of cards! All the way from pink to purple and everything in between! I used a bunch of different sentiments from a bunch of different companies. I'll show you all of them individually! I stamped each sentiment in Versafine Onyx Black ink and added black Nuvo drops to each card.


On of the first sentiments I grabbed is from the Right At Home set called His Love. I love this all occasion sentiment!


The "thinking of you" and "you make me so happy" sentiments are both from an older Studio Calico stamp set that I use all the time! I'm in love with the font!


I knew I wanted to add a birthday sentiment and the font on this one is amazing! This one is from Simon Says Stamp's Birthday Bits stamp set.


I have been using the Simon Says Stamp Kind Flowers stamp set every chance I get! How gorgeous is that script!

Thanks for stopping by!


Friday, November 3, 2017

Peek-a-Boo Die Cutting

Hello! Today I have a card that uses a technique I call peek-a-boo die cutting. I don't know if that's what it's really called, but that's what I think of when I see this technique! 


I stamped the three layers of the tree from the Hero Arts Color Layering Christmas Tree stamp set in green inks along with the top layer with white embossing in the middle of my card. Then I used the Merry die from Concord & 9th in the center of the tree. I made sure to keep every teeny tiny piece of paper - even the tiny insides of the "e" and "r's". I also die cut the sentiment from red cardstock three times. I stacked the dies together and glued the "merry" right into place where I had originally die cut from.


See how the sentiment is like a peek-a-boo?! I love this technique! It's so simple, but I love that pop of color!


I'm entering this card into the a2zscrapbooking challenge - winter! Click the picture below for more info!


Monday, October 9, 2017

Prayers Sympathy Cards

Hello! These are the cards I hate to make. A friend needed two sympathy cards because two people she knew passed away. I hate to make these cards, but I try my best to make them extra special. 


I used the Mama Elephant Water Blooms stamp set to stamp a couple arrangements of flowers and leaves and filled in the empty space with the extra dots images. I spattered on some black ink as I love to do and finished off the card with a stacked prayers die cut. So simple, but I really think it's elegant.


I used the Many Mandalas stamp set from Concord & 9th with white embossing powder on kraft cardstock and added the same prayers die cut from Hero Arts on this card as well.

That's all! Thank you!


Tuesday, October 3, 2017

It's Never Too Early!

Hi, there! I'm sorry I've been gone for so long! My whole house has been sick and it's taken a while to get everyone well again..but I'm happy to be back! I have 2 cards to share with you...and they are Christmas cards! My favorite kind to make!


I saw Jennifer McGuire teach a technique about layering embossing powders and I loved it! I had to try it for myself! I started by covering a piece of cardstock with red embossing powder and then stamped the Simon Says Stamp Emma background stamp with Versamark ink and covered it with Hero Arts Liquid Platinum embossing powder.


I love the shine! I used the Hero Arts Merry stamp and die cut to finish it off.


I tried the technique again and started with covering the cardstock with gold embossing powder. Instead of a stamp, I grabbed one of my stencils and applied Versamark over the top and embossed it with metallic blue embossing powder.


I finished off this card the same way I did with the first. These were so quick and easy to make! I will definitely be using this technique again! Thanks for stopping by!


Friday, September 22, 2017

Oxide Inks and Water

Hello, there! Today I have just a short blog post. This card is heavily inspired by a technique I saw on Jennifer McGuire's blog! Please follow the link to see all of her examples and her video!


I started by taking a regular piece of cardstock and sponging Black Soot Distress Oxide all over the piece. I heat set the ink to make sure it was good and dry. Then I used regular water to spray a stencil from Hero Arts and put the stencil on top of my inked piece. I held it in place with a paper towel for about 5 minutes, and when I looked I was sooooo amazed! It looks so cool! The picture does not do it justice! It's awesome!

I needed to make this into a manly birthday card, so I used a stamp set from Simon Says Stamp to emboss a sentiment with silver embossing powder. I wanted to keep the focus on the background, so I used clear Nuvo Drops to add some little details around my sentiment.

That's all! It's so simple, but really packs a punch! I encourage you to go to Jennifer McGuire's blog and look at her examples and watch her video!!


Wednesday, September 6, 2017

The Happiest Season of All!

It's never too early for Christmas cards! Seriously! I send so many cards at Christmastime, so I never stop making them. And I just love Christmas! Everyone pokes fun at me because I skip all the fall holidays! I put up my Christmas tree on Halloween and I leave it up until about April. I just love the glow of the lights and the happiness that Christmas brings! 


I saw this wood block Hero Arts stamp last year and for some reason I passed it over. I kicked myself over and over again, so I broke down and bought it! I think what held me up was that it was a wood mount stamp and I'm a lover of clear stamps, but seriously! This stamp is so easy to position and it stamps beautifully!


I made two cards, but this one is my favorite by far! I was just trying to test out my new stamp, so I used regular white cardstock and embossed the image with Hero Arts Gold embossing powder. I used one color of blue watercolor, but I did three layers to build up the color. I wanted it to look almost like a wintery sky, so I added some flicks of white acrylic paint.


This one was another test piece - I had some new embossing powder - Zing! metallic blue. I added some green watercolor over the embossing, white flicks of paint, and some red sequins. This was just a test piece and I accidentally bent it on the bottom, but I think it's okay! I'm the harshest critic of my own work, but I'm trying to go easier on myself. We make handmade artwork and it's not always going to be perfect!

I hope this inspires you to start your Christmas cards! We less than four months to go!


Thursday, August 31, 2017

Guest Designing for A2Z Scrapbooking

Hello, everyone! I'm so excited to be a guest designer for the A2Z Scrapbooking Blog today! They host a new challenge each month and all you have to do is use at least one Hero Arts item as the main focal point on your project! This month's challenge is bright and beautiful and you have until the end of the day to upload a project! Here's the card I made! Be sure to head over to the A2Z blog to see all the details of my card!


See you soon!