Showing posts with label One Layer. Show all posts

Monday, December 8, 2025

LDRS Creative | Monochromatic Card Tutorial

Looking for a simple card design that still has tons of dimension? In this video, I’m sharing how I created a monochromatic, one layer card using the aLined Geos Stamps and Chained Edge Die from LDRS Creative. This design is easy peasy, perfect for quick cardmaking and easy mailing, but still packs a punch with layered stamping, texture, and contrast. I chose shades of purple with pops of black, but this card is totally color-customizable - pick any color under the rainbow and make it your own!


Products used - 


I used the Chained Edge Die to cut into a white card base and added a bit of ink blending with La La Lavender Hybrid Ink to color the edge. Then I grabbed the aLined Geos 4x6 Stamps and started stamping with a variety of purple inks and included some pops of gray and black. I like to start with the largest stamps and work my way down to the smallest. I find this is the best way to create backgrounds. If you go the other way, you may run out of room before you get to the largest stamps.


This card is completely flat, so it's perfect for mailing! You can switch up the colors to make a whole rainbow of notecards! There are even more sentiments in the aLined Geos 4x6 Stamps that would work, too. Thanks for joining me for this quick card! 

Tuesday, May 24, 2022

LDRS Creative | Potted Hibiscus One Layer Card

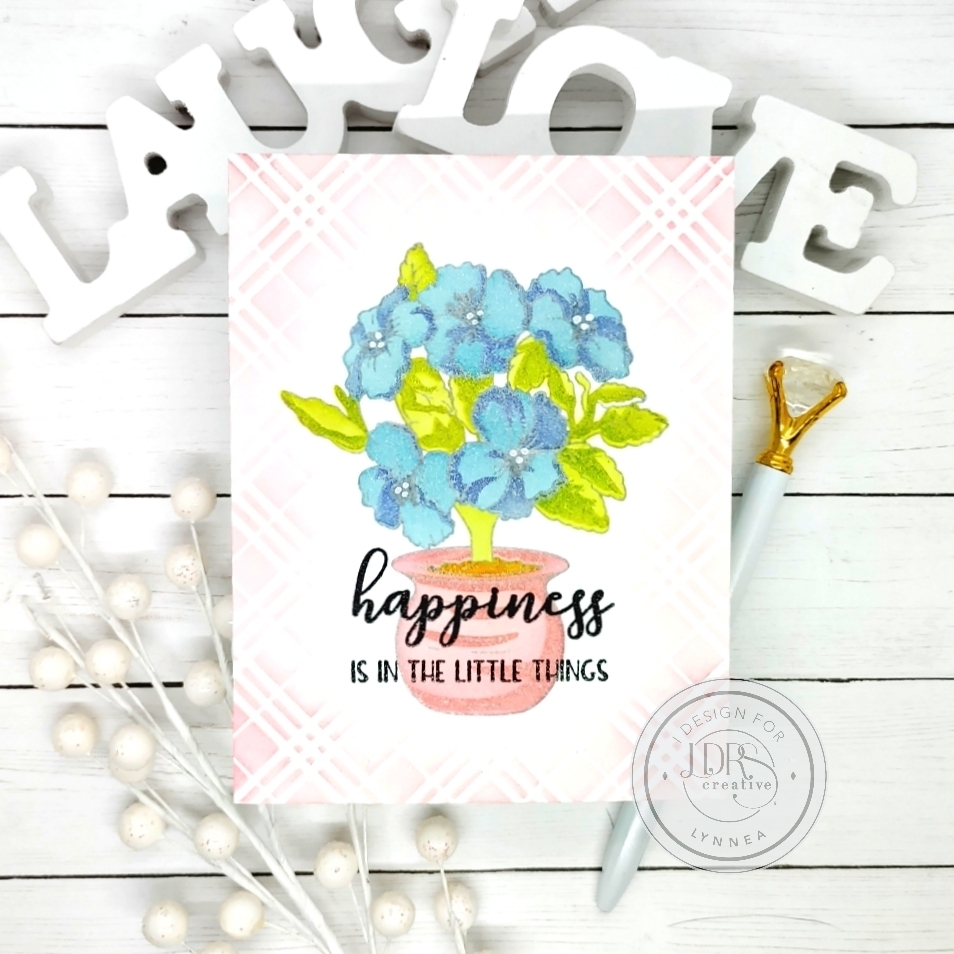
Hi! It's Lynnea and I'm back with another easy one layer card design! This time I used the new Potted Hibiscus Stamps and Layering Stencils


Creating one layer cards is something that's completely outside of my comfort zone ... so of course I've been pushing myself to make them! I stamped the image from the Potted Hibiscus Stamp Set in the center of my card with Alloy Hybrid Ink and embossed it with clear powder so the outline ink wouldn't bleed. Then I used the Potted Hibiscus Layering Stencils to add color to the image. I used a bunch of happy Spring colors of Hybrid Inks - Marina Madness, Parisian Purple, Prickly Pear Perfection, Key Lime Pie, Soft Kisses, Pink Tutu, and Iced Tea


I stamped a sentiment from the Potted Hibiscus Stamp Set on top of my ink blended image using Raven Hybrid Ink. I decided my card needed a little more color, so I blended Soft Kisses Hybrid Ink over the Plaid Stencil to give the card some depth and dimension. And that's it! So easy! This would be a great design to replicate and mass produce. I hope you try it out!

Thursday, May 19, 2022

LDRS Creative | Orchid One Layer Card Set

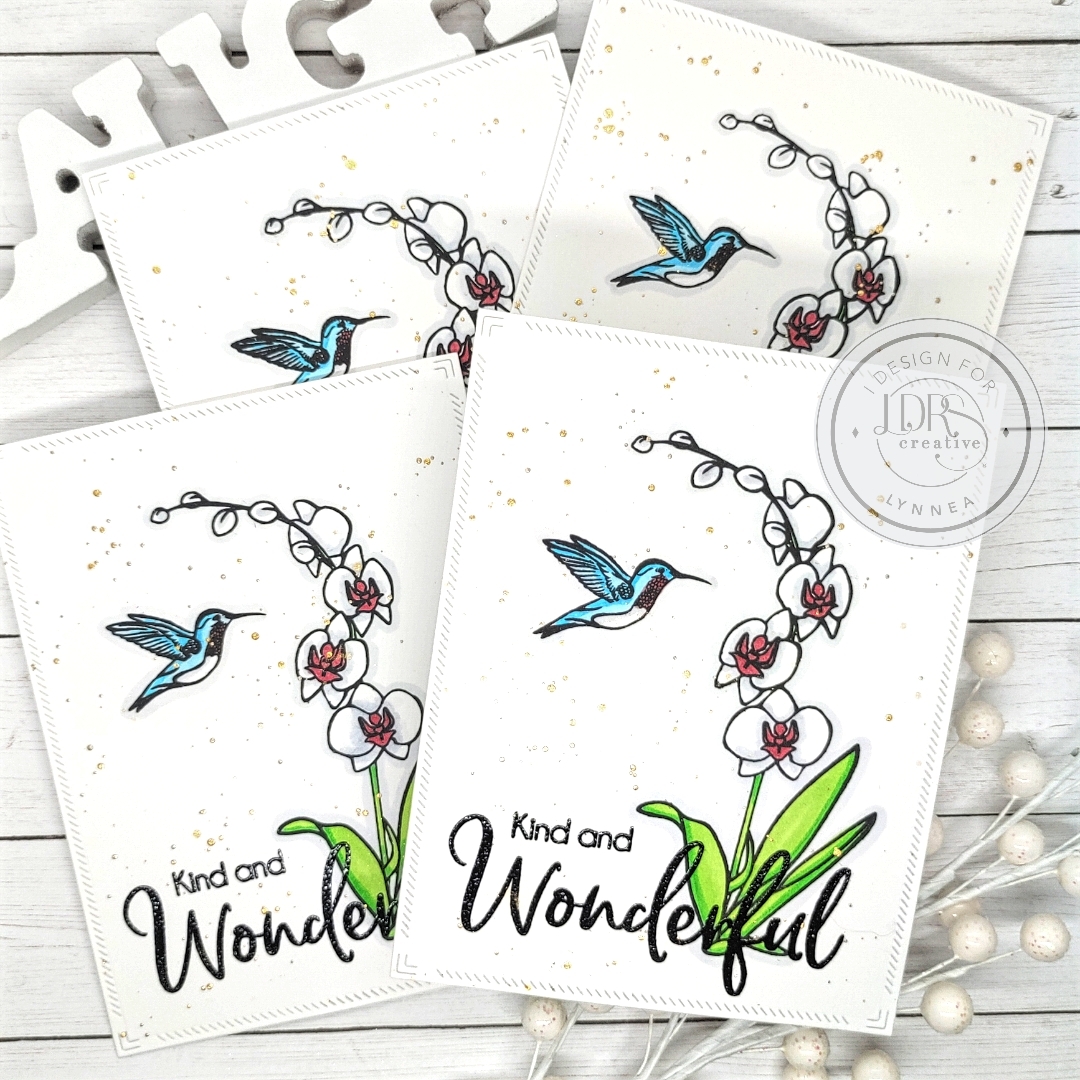
Do you ever find yourself needing a quick set of cards? I like to give them as gifts to friends, teachers, family, etc. I used the new Orchid Stamp Set from LDRS Creative and whipped up this set of cards in about 30 minutes! 


This set of cards was so simple to make, but I added little details along the way to step up the design. Remember that you can always add or take away as many details as you like. There are lots of ways to simplify this set of cards and make them even quicker to make!


I started by using the largest die from the A2 Diagonal Stitched Layered Card Toppers to cut four panels of white cardstock. This is a small detail that just brings a little bit of life to the card. It's a step that can absolutely be skipped if you want, but I like the bit of interest. 


I used my stamping platform and stamped the orchid and hummingbird from the Orchid 4x6 Stamp Set with Raven Hybrid Ink onto each of the four panels. My STAMPendable Stamping Tool came in handy to make sure I got clean, crisp stamping each time. I added some quick alcohol marker coloring using just two markers for each color. I color slowly, so I like to keep coloring simple when I'm mass producing a design. 


Once my coloring was completed I used Raven Hybrid Ink to stamp the sentiments from the Orchid 4x6 Stamp Set. Here's another tip to step up your card! I wanted to make my sentiment stand out from the colored image, so I added LDRS Creative Clear Embossing Powder and quickly heat set the sentiments. This is another step that you could skip, but it really makes the sentiment pop! 


There's only one last thing to do before I call these cards finished - add a bit of shimmer watercolor spatter! It's my favorite finishing touch and I couldn't let these cards go without a bit of sparkle! I flicked on some gold shimmer watercolor, added the panels to card bases, and these cards are done! Thanks so much for joining me! See you again soon! 

Thursday, December 30, 2021

Trinity Stamps Facebook Live with Lynnea | Stamping with Dies

Stamping with dies is such an easy way to stretch your supplies! Join me live on the Trinity Stamps Facebook Page at 12pm CT / 1pm ET for a one layer Happy Dance card! 


I'll see you this afternoon for this happy card that takes just minutes to create! 

Friday, April 30, 2021

Sassy & Crafty | Offset Stenciling and Masking

Hi, all! Do you ever get in a crafty rut? I can't be the only one who does! I've been feeling stressed and unmotivated lately, so I picked out one of my favorite Sassy & Crafty images and stepped up a technique I first tried about a year ago! 


I have been challenging myself lately to go outside of my comfort zone, so I've made a one layer card with masking and offset stenciling! I stamped the My Kind of Crazy image and sentiment on my card and colored them in. Then I cut masks from Gina K Designs Masking Magic and placed them over my stamping. 


I used Purple Tape to adhere the Awesome Stars Stencil over my card and blended on some bright pink ink. I removed my stencil, wiped it off, and then re-positioned it on my card offsetting it from my ink blending and added some Gold Glitz Glitter Gel over the top. I LOVE how the pink ink peeks out from under the Glitz Glitter Gel


I first tried this technique about a year ago and it's something easy that I love to come back to when I need a kick start in my craft room! I hope you'll try it! 

Tuesday, March 16, 2021

LDRS Creative | One Layer Masked Ink Blending

I decided to challenge myself today and create a one layer card! There are many techniques packed into this simple card and I love how it turned out! 


I did a bit of stamping, masking, coloring, AND stenciling using a die cut on this card! A little bit of something for everyone! I started by stamping the "thanks" from the Lily Stamp Set onto my card front. I needed to create a few masks, so I used the Lily Die Set and die cut the "thanks" and the flower from LDRS Creative Stamp Masking Paper. I placed the mask over my sentiment and stamped the large floral image with Raven Hybrid Ink over the top then I colored in the flower with alcohol markers adding some white gel pen highlights. 


Now it's time for the star of the show! I placed my die cut masks for the sentiment and the lily over the stamped images so that I could do some masked stenciling. I LOVE the Mosaic A2 Coverplate Die and decided to use that as a stencil, so I die cut it from heavy weight cardstock and positioned it over my colored card front and securing it with masking tape. You could use any color cardstock for your die cut stencil, but I chose to use white so that I could use the panel on a later card. I used blending brushes and blended Alloy Hybrid Ink over the top portion of the "stencil" and Pink Tutu Hybrid Ink over the bottom. I slowly peeled off the masking tape and removed my stencil and masks and voila! A super pretty one layer card! 


I added a few clear gems here and there around my lily - which I think still qualifies as one layer! Haha! I hope you'll try this easy technique in your craft room! See you soon! 

Saturday, October 10, 2020

InkOn3 | Knockout Nibbles Encouragement Card

 I needed a quick, easy, and cute encouragement card for a friend who needs a "pick me up," so I reached for the InkOn3 Knockout Nibbles Stamp Set


Since this card has to get mailed across the country I thought it would be best to stretch myself and create a one layer card. It was hard, but I did it! Haha! I stamped the little critter and sentiments from the Knockout Nibbles Stamp Set onto a piece of white cardstock using Blackout Hybrid Detail Ink - my FAVORITE ink for Copic coloring! I used just a few colors of Copic markers to color in the little critter. 


Just because this is a one layer card doesn't mean it has to be boring! I grabbed a couple of coordinating Copic colors - yellow and blue - and just started dotting around my image. I did a big dot and then a bunch of little dots, another big dot and a bunch more little dots, and repeated with both colors until I had the look I wanted. 


It's not a card from me if it doesn't shimmer! I keep a bit of Liquid Pixie Dust in a Small Fine Tip Water Brush and painted on some magical shimmer onto the critter to finish the card! I hope you're inspired! 

Wednesday, September 23, 2020

Simon Hurley create. | Snazzy Snowmen One Layer Card

Melted snowmen can be cute, too, you know! I love the Simon Hurley create. Snazzy Snowmen Stamp Set and made an easy one layer card perfect for mass production! 


I find it easiest to create a one layer card with multiple stamped images with a stamping platform. My favorite is the MISTI. I cut a piece of Stark White Cardstock to 4.25" x 5.5" and placed the sentiment from the Snazzy Snowmen Stamp Set at the top center of the card and stamped it with black ink. Then I stamped the melted snowman stamp from the Snazzy Snowmen Stamp Set five times on the front of the card. 


I used just a few Copic markers to color my images. Some YR07 and YR07 for the carrot noses, C0 to add some shading to the snowmen, and then went all around the stamped images with BG10 for an icy glow. 


You could embellish with sequins or enamel dots, but I decided to leave it just like this! It's a super "cool" card and easy to make a bunch of them! See you soon! 

Wednesday, July 8, 2020

Simon Hurley create. | Easy Copic Colored Baseball Cards

I'm keeping it simple and one layered ( shocking, I know haha! ) with the Simon Hurley create. Home Run Stamp Set and making a set of 3 Copic colored cards!


I made this set of 3 cards in less than an hour. That's great for me considering I'm a terribly slow color-er! All of my images and sentiments are from just one stamp set - Home Run. I found it easiest to start by stamping the sentiments in the top center of a piece of Stark White Cardstock cut to the size of an A2 card. Then I filled in with my stamped images around the sentiments. I used the glove, the baseball, and the bat and baseball. There were fitting sentiments for each image!


After my images were stamped I colored them with some simple Copic Marker coloring. And that's it! Card set completed! You can find the Home Run Stamp Set and the rest of of Simon Hurley's products on the Ranger website!

Friday, December 20, 2019

Crafty Festival of Christmas - Christmas Thank You Card Set

Hi! This is the last week for the Crafty Festival of Christmas hop! I hope that these last five weeks have given you some Holiday inspiration! This week is an anything goes theme! I decided to use the December 2019 card kit from Simon Says Stamp to make a quick set of thank you cards!


I used a light mint ink to stamp a bunch of the snowflakes from the Gnome for the Holidays stamp set from Simon Says Stamp all over my four card bases. I thought this formed a cute little background! I kept the larger snowflakes towards the top and the smaller ones towards the bottom so that it looks like the snowflakes are falling down. I love the little "stick" style trees in the stamp set! I used two different colors of green inks to stamp them in a line in the center of my card.


I wanted to have a bold "thank you" sentiment under my trees so I used the sentiment from the Simon Says Stamp Thankful Flowers stamp set. I also added a smaller sentiment to the cards. I love mixing sizes and fonts of sentiments! It adds a lot of interest! To tie in the black sentiment I added a scattering of black sequins at the bottom of my cards.


I hope you've enjoyed this fun collaboration! There is more inspiration for you to see! Just click through the links! And have a Merry Christmas!

Blog Hop


Lynnea Hollendonner - YOU ARE HERE!

Friday, December 13, 2019

Monochromatic One Layer Card

I never make one layer cards - or monochromatic cards! So I decided to try and push myself and do it! I didn't even add gems! Haha!


I used a piece of masking paper to mask off a circle from the top center of my card and inked up the Rain of Hearts stencil from Penguin Palace with some gray ink. I kept the ink heavier at the top than at the bottom. I stamped the image and sentiment from the Happy Track & Field Chapter 2 stamp set in the center of my masked circle and colored it with Copic markers.


I love this card so much that I might have to do a whole set in a bunch of different colors! See you soon!

Sunday, July 14, 2019

Winston's Lake House One Layer Card

Hey, everyone! My family spent this past week at the lake, so it's super fitting that this month's theme from Scrapping for Less is camping and outdoors!


The Winston's Lake House stamp set from Newton's Nook Designs is SO cute! There are so many cute scene building stamps! I almost went with a lake scene - but the little bear and cabin images just spoke to me!


This card came together super quickly with just a bit of masking! I stamped my sentiment first and then the bear image. When masking it's important to remember to stamp whatever image you want to be in front first! I stamped the bear image onto masking paper and cut it out with scissors and placed it over my original stamped image and stamped my lake house. When I removed the masking paper it looks like the lake house is set behind the little bear! I used my Spectrum Noir Triblend markers to color them in.


I didn't to much to embellish the card - just some gems and clear glitter! Check out my video below!


Thanks for watching!


Wednesday, April 17, 2019

Gina K Designs Warm Spring Wishes One Layer Cards

Hey, everyone! I created a set of one layer cards perfect for Spring using the Warm Spring Wishes stamp set from Gina K Designs!


I created all four cards using the same techniques. I made my own stencil by die cutting a circle from the center of a piece of stencil plastic and I used the negative piece for my cards - the actual circle piece that I cut out. I used some Pixie Spray from Thermoweb to adhere it onto the center of my cards and sprayed them with Distress Oxide Sprays in Cracked Pistachio and Iced Spruce.


I used the leaf image from the Warm Spring Wishes stamp set and stamped it around the edge of my masked circle. I used Distress Oxide inks for all of my stamping except for my sentiments. They were done with Versafine Onyx Black ink.


I hope you'll check out my video below! I share specific colors of inks and show you exactly how I made these cards!


Thanks for watching!


Tuesday, April 16, 2019

Birds on a Wire One Layer Card

Hey everyone! I never get tired of seeing little birdies on a wire, so I used the Birdhouse Cubby stamp set from Art Impressions in the April 2019 box from The Hedgehog Hollow to create a simple one layer card!


This card was really so simple to create! And you can color the birdies any color you want! I started by using a Copic Multiliner pen to draw two wires going across the length of my card. Then I used the Nuvo Hybrid Black Shadow ink pad included in the April 2019 box to stamp the six birds from the Birdhouse Cubby stamp set from Art Impressions. The sentiment is super cute, but it was stacked and it didn't really fit with the composition of my card, so I used some masking tape and masked off the different parts of my sentiment so that I could stamp it on a single line. There's more info on that in my video below! It didn't turn out perfectly, but I love it anyway!


I colored my birds with my Spectrum Noir Triblend markers and gave them little yellow bellies with light blue bodies. I decided to add a few Nuvo Crystal drops to finish off my card! Check out the video below!


Thanks for watching!


Wednesday, September 30, 2015

Lawnscaping One Layer Challenge

Hey everyone! Today I am bringing you a card for the current one layer Lawnscaping Challenge. It was a struggle for me! I love my foam tape!


Here is my card! I used the Lawn Fawn Fantastic Friends set and my alcohol markers - both Copic and Spectrum Noir - to color my image.


I started by stamping my sentiment at the bottom of my card with Memento Tuxedo Black ink. From there I went on to stamp my fish bowl and all the little decorations and the fishy inside.

Once everything was stamped out I colored the images with my Copics. I thought it looked like the fish tank was just floating, so I used some cool gray markers to add some shading.


After everything was colored I added some clear Wink of Stella and a coat of Glossy Accents over the water. And that's it! I did get a little outside of the lines in places...but everyone I send my cards to knows I make them by hand, so it's okay!

Come back tomorrow for another card project!!


Thursday, October 30, 2014

Hello Pumpkin Card Set.

Hi, guys! I don't know why...but recently I've really been enjoying making sets of cards. I was always really big on making individual and unique cards. Then I started following Catherine Pooler on YouTube and I love how she makes KISS (Keep It Simple Stamper) cards. I thought "Hey! That's a great idea!" I tried it out, and I love it! It's so easy to stamp multiple images, cut them all out, and assemble multiple cards at once. I mean...why not? If I all ready have the supplies out, I might as well use them! 

So here's another fall card set using Studio Calico's October card kit - The Underground! 


I used Neenah 110lb Solar White cardstock to great four A2 card bases. Next, I cut a few strips of patterned paper from the paper pad. The first is a 1 inch strip and the second is a 1/2 inch strip. I layered them onto the cards so that the thicker strip was on top of the thinner strip.

Next, I stamped my pumpkins. See the card that's brownish/pink laying on the bottom left? That was a happy accident. I stamped a pumpkin using Coral Bay Studio Calico ink and must not have cleaned my stamp well enough before moving on to stamping in Simon Says Stamp Khaki ink. I kind of like the effect though! I stamped another pumpkin in the Khaki ink and another in Going Green SC ink.

For the little pumpkins I used some more Studio Calico inks - Orange County and Purple Rain.


What I love about this particular set that I've made is that I didn't need to fussy cut the pumpkins! I used circle punches! Even quicker and easier than the other set that I made! The larger pumpkins were punched with a Fiskars 2 inch circle punch while the smaller pumpkins were punched out with a 1/2 inch circle punch from EK Success.


I stamped the "hello" sentiment in Doc Brown SC ink and used my paper cutter to cut a thin strip of cardstock around the sentiment. Then I used my Cutter Bee scissors to cut a banner end into the left side of the cardstock. I took my paper piercer and curled the edges of the banner so that the stood out a little more. As a finishing touch I tied little bows from the orange floss that came in the kit.

All done! These four cards probably took about 15 minutes to make. That's with me taking time to determine my layout and pumpkin placement. Not too shabby!

Thanks for joining me! I'll be back soon with another video!