Showing posts with label i-crafter. Show all posts

Sunday, March 28, 2021

i-crafter | Heather Alpha Hello Card

Need a quick hello card? Grab a stencil and the Alphabet Heather Die Sets from i-crafter and you're ready to go! 


I wanted to create a simple card with a lot of detail, so I grabbed a piece of light blue cardstock and blended three colors of blue ink over the Japanese Kumiko Stencil with i-brush Blender Brushes. This gives me a LOT of depth and color variation. I added some spatters of white paint for more texture and trimmed the panel down to 3.25" x 8.25" and foam mounted it onto a slimline card base. 


I die cut the letters for "hello" from the Alphabet Heather Upper Die Set and the Alpha Numeric Heather Lower Die Set three times each and stacked them up for dimension and added them in the center of my card. Hope you enjoy! 

Sunday, March 14, 2021

i-crafter | Happy Birthday Ribbon Rosette

Hey, all! I made an easy birthday ribbon from the i-crafter Ribbon Rosette Die Set that can be used on a card or as a birthday badge! 


I die cut all the pieces from the Ribbon Rosette Die Set using a dark blue galaxy patterned paper, white cardstock and some sliver foil cardstock. You'll need three of the rosette portion and 2 of the tails. I find it's easiest to assemble the ribbon if you adhere the ends of the three rosettes together, but leaving one end open. Then fold back and forth to form the rosette and adhere the open ends together. I made a video on the i-crafter YouTube channel showing how to assemble the Ribbon Rosette Die Set and you can check that out here for tips and tricks! 


I think it's fun to step up the Ribbon Rosette with a touch of flair, so I cut my sentiment from silver foiled cardstock. You can easily add this birthday ribbon onto a card or glue a pin to the back to make it a birthday badge! I plan to save this project and add the birthday name and age to the white portions of the tail to customize this even more! 

Monday, March 1, 2021

i-crafter March Release | Slimline Borders and Edges

Get ready for the March Release from i-crafter! There are a bunch of new dies available in the shop RIGHT NOW and I used the new Slimline Edges and Borders Die Set for my mini slimline card design!


The GREATEST thing about the Slimline Edges and Borders Die Set is that you can use these dies to add elegant edges to a variety of card sizes - slimline, A2, A7, mini slimline and more! 


I created an alcohol inked panel on Yupo Paper with alcohol inks as well as some gold foiling and trimmed down a small portion and added it to the bottom of my mini slimline card. 


I used the scalloped border design from the Slimline Edges and Borders Die Set and cut a piece of white cardstock and popped it up on top of my alcohol inked panel and trimmed off any overhang. I used purple ink and my i-Blend Brushes to add a bit of purple ink to the edges of my white panel. 


I finished my mini slimline card with a butterfly cut from gold cardstock with the Butterfly Bursts Die Set and the hello sentiment from the Hello Flower Die Set. You can find all of the i-crafter products I used on my card in the i-crafter shop NOW! Happy shopping! 

Sunday, February 28, 2021

i-crafter | Shiny Box Pops Unicorn Add-On Card

I love showing ways to use the products in your stash and stretch them into new projects! I used some elements from the i-crafter Box Pops Unicorn Add-On Die Set to make a regular A2 card!


I wanted to create a magical background for my unicorn, so I used alcohol inks and kept my edges wispy and ethereal! I used a gray blue and pink and when they mixed I got a dusty purple color. I mixed in some silver additive to create some additional shine in the background.


I cut the unicorn from the Box Pops Unicorn Add-On Die Set from white cardstock and the sentiment, stars, and decorative pieces of the unicorn from silver foiled cardstock. The unicorn is made to go in the center of the Box Pops Oval Base, but I wanted to have him on a standard card, so I just cut off the bottom! I arranged all of my pieces onto my card and adhered them with foam tape. 


I hope that this card inspires you to take another look at your add-on die sets and see how you can stretch them for even more card designs! 

Sunday, February 14, 2021

i-crafter | Spring Bunny Peek Through Card

Hello, everyone! I have a fun card that I made using the Easter Treat Lantern Add-On Die Set from i-crafter! I made a video showing the intended way to use this die set for the i-crafter YouTube channel and you can watch that here, but today I wanted to do something fun and make a peek through card! 


I used the bunny drop in piece from the Easter Treat Lantern Add-On Die Set and die cut it three times from a piece of white cardstock. Remember to use your i-mend Self Healing Cutting Deck for gorgeous and precise cuts! The Easter Treat Lantern Add-On Die has little pieces to add details to the bunnies, but I totally cheated and used Copic Markers instead! I quickly brought them them to life by adding a mouth, eyes, and rosy cheeks and ears. 


The white background was just too harsh looking, so I used an i-Brush Blending Brush and blended on some yellow ink keeping the color more saturated towards the edge of the card and blending out to white on the inside. I die cut the "Happy Spring" sentiment from the Easter Treat Lantern Die Set and tucked it in between the bunnies. 


I added foam tape all over the back of my die cut panel and popped it up onto a piece of floral patterned paper. I love the way the flowers peek through from behind the bunnies! 

Monday, February 1, 2021

i-crafter February Release | Hello Flower

I can't believe it's the first of February!!  A new month means new products from i-crafter! I used the Hello Flower die set to make an easy, but colorful card. 


I just LOVE word dies! They are one of my favorite ways to finish a card! I created an easy watercolor background using water brush pens and some black paint for spatters. I popped up the "hello" from the Hello Flower Die Set and added some rolled flowers from the same die set. I cut two sets of leaves for each flower from gold cardstock and staggered them for a pop of flair! 


You really can't go wrong with a clean and simple card! The Hello Flower Die Set and the rest of the i-crafter February release is available now! Happy shopping! 

Sunday, January 24, 2021

i-crafter | Koi Pillow Box with Colorful Sprays

I'm sharing an easy way to quickly add color to the Koi Pillow Box Die from i-crafter. I like to add little candies or gifts inside of the pillow box to give to a friend! 


There are so many ways to bring color and pattern to the Koi Pillow Box - patterned papers, colored cardstock, etc. I went with Distress Oxide Sprays! I cut all of the pieces from the Koi Pillow Box Die Set from heavy white cardstock and sprayed them with a bunch of colors! I used blue and purple on the body, green and yellow on the fins, and then pink on the gills for a splash of color. I love how the sprays give added texture! 


The Koi Pillow Box will perfectly fit small candy bars, a gift card, or a pack of sequins! My son loves sequins and I thought this little fishy would be a great way to give him a little gift! There are little holes in the top of the Koi Pillow Box so that you can thread a piece of ribbon or twine through, but I didn't want that to hinder him, so I decided to leave it off. This little guy was so easy to put together! It would be great for teacher gifts! Thanks for stopping by - see you soon! 

Sunday, January 10, 2021

i-crafter | Stenciled Kokeshi Dress Up Card

Remember playing with paper dolls as a kid? It was one of my favorite "quiet" activities! The Kokeshi Dress Up Die Set from i-crafter takes me right back to my childhood! 


The only limit to the Kokeshi Dress Up Die Set is your imagination! I pulled together a bunch of my gold foiled patterned papers and cut out all the pieces for my little girl. The die set even has different hair styles! And you can accessorize with the fan or a parasol. So many options! I cut out all of my pieces and glued them onto the body from the Kokeshi Dress Up Die Set with liquid adhesive. 


Such an amazing focal point needs an equally amazing background. I sprayed the back of the Japanese Kumiko Stencil with a temporary adhesive and used i-brush Blender Brushes to ink over the stencil with a gradient of inks. I started with an orange-y red at the bottom, to a dark pink, and finished with a light pink at the top. I blended in a diagonal direction to add a bit more interest to the background. I popped up the Kokeshi Dress Up element and all that's left is a sentiment. I like to look through my die sets for fun sentiments for my cards, so I pulled the hello script sentiment from the Dashed Circles Flip Card Die Set and cut the letters for 'friend' from the Carly Alphabet Die Set and added them with liquid adhesive to the corner of my card. 


Thanks for joining me! I hope you love the way I mixed together a bunch of i-crafter products and that you're inspired to do the same! 

Friday, January 1, 2021

i-crafter January Release | Wisteria Vines Slimline Card

It's time for a new release from i-crafter! I'm not usually drawn to greens, but I love them on this slimline card! 


This card is a mix of me and not me - I stepped out of my comfort zone, but not too far! I usually don't go all out with layers, but this card just called for them! I cut a slimline panel and masked off about an 1/8" border and blended an ombre of green inks dark to light. I matted that layer with olive green cardstock and added that onto a white slimline card base. 


I die cut the new Wisteria Vines die from white cardstock and adhered it on top of the ink blended panel. A tiny bit hung over the edge, so I trimmed off the bottom leaf. It just looked better! I wanted a stand out sentiment, so I reached for an older die set - the Zip Gift Tag Die Set. I cut the "thanks" three times from white cardstock and trimmed them into rectangles. I backed each of them with a different shade of green cardstock that matched my ink blended background. 


The new Wisteria Vines Die Set as well as the rest of the January release is available in the i-crafter shop now! Happy shopping! 

Sunday, December 27, 2020

i-crafter | Flip Card Heart Bloom

Hi there! I hope you all had a very Merry Christmas! I can't believe it's time to transition into Valentine's Day cards! The December release from i-crafter is full of everything love themed and perfect for Valentine's Day cards. 


I love how easy it is to make interactive cards with the Flip Card Heart Bloom Die Set. There are a few video tutorials on how to assemble flip cards on the i-crafter YouTube channel, so be sure to check them out for visual walk-throughs.


I die cut both the front and back panels for the card from white cardstock using the Flip Card Heart Bloom Die Set. You want to make sure you do any of your decorating before you assemble the card - it makes it a lot easier! I decided to do some easy masking and ink blending. I used masking tape to mask off the outer heart shape and used i-brush Blender Brushes to blend a gradient of pink inks onto the outer triangle and heart windows of the card. I moved my masking tape and blended red inks onto the outer heart frame using an i-brush Blender Brush


After my ink blending was complete I assembled the card with a bit of double sided tape. I wanted a bit of shimmer, so I added a panel of white shimmer cardstock to the inner portion of the card. I die cut the "love" from the Flip Card Heart Bloom Die Set, closed the card and opened the heart windows, and adhered it to the back of the card in the center of the windows. 


I wanted the inner card to be a bit more interesting, so I cut a piece of pink and gold glitter cardstock and added it to the bottom of the card. That's all! An easy i-crafter Valentine's Day card! See you soon! 

Sunday, December 6, 2020

i-crafter | Love Birds Floral Card

It's hard to think that Valentine's Day is right around the corner ... it's not even Christmas yet! But in the crafty world you've got to stay on top of your holidays, right! 


I love that there are so many ways to use the Tunnel Card dies from i-crafter! Of course the traditional way - a box style tunnel card - but I often prefer to use the pieces individually. I picked the circular die with the two love birds on the branch and cut it from the top center of a white panel. 

The Tunnel Card Love Birds Die Set has two smaller dies that cut out the features for the birds. I chose to cut the accent pieces from white cardstock and color them with Copics, but you could cut multiple times from colored cardstock if you prefer. Honestly - I don't love birds in real life! I'm not sure how these birds are supposed to be colored, so I decided to use my creative brain and just go with the flow! I colored the wings, beaks, and feet with a dark gray marker and the faces with orange. I used liquid adhesive to put the pieces of the birds together. 


I wanted to create a simple monochromatic background, so I grabbed my favorite die set - Cherry Blossom Burst. I added double sided adhesive to the back of a peachy orange piece of cardstock and cut the dies multiple times. The die set is meant to pop up off the card, but since I added double sided adhesive they will remain flat. I'm okay with that - especially since you can still see all of that gorgeous detail! 


I needed some color behind my love birds, so I used i-Brush Blender Brushes to add a few shades of orange to a card base behind birds and popped up the whole panel with foam tape. 


I finished off the card by adding small black gems at the center of the Cherry Blossom Burst flowers. I completely forgot to add a sentiment, but that's okay! It's a mistake I make frequently haha! I'll add a sentiment to the inside of the card once I send it out. See you soon!

Tuesday, December 1, 2020

i-crafter December Release | Matchbox Stories Baby Boxes

The Matchbox Stories Die Set is my favorite from the new i-crafter December release! There are so many possibilities with this set! My video today shows you how to assemble the matchbox as well as an idea for a baby announcement.


In the video above I show you how simple it is to assemble the Matchbox Stories box. I love how you can customize these boxes for weddings, birthdays, vacations, etc. depending on the patterned papers you use! 


The December release from i-crafter is available now in the i-crafter shop! Thanks for stopping by! 

Sunday, November 22, 2020

i-crafter | Simple Holiday Gift Card Envelope

 I don't know about you, but I'm a terrible gift giver. Absolutely terrible! Gift cards are my go-to gifts during the Holidays, so I went back to some older i-crafter products to make a cute and simple gift card envelope! 


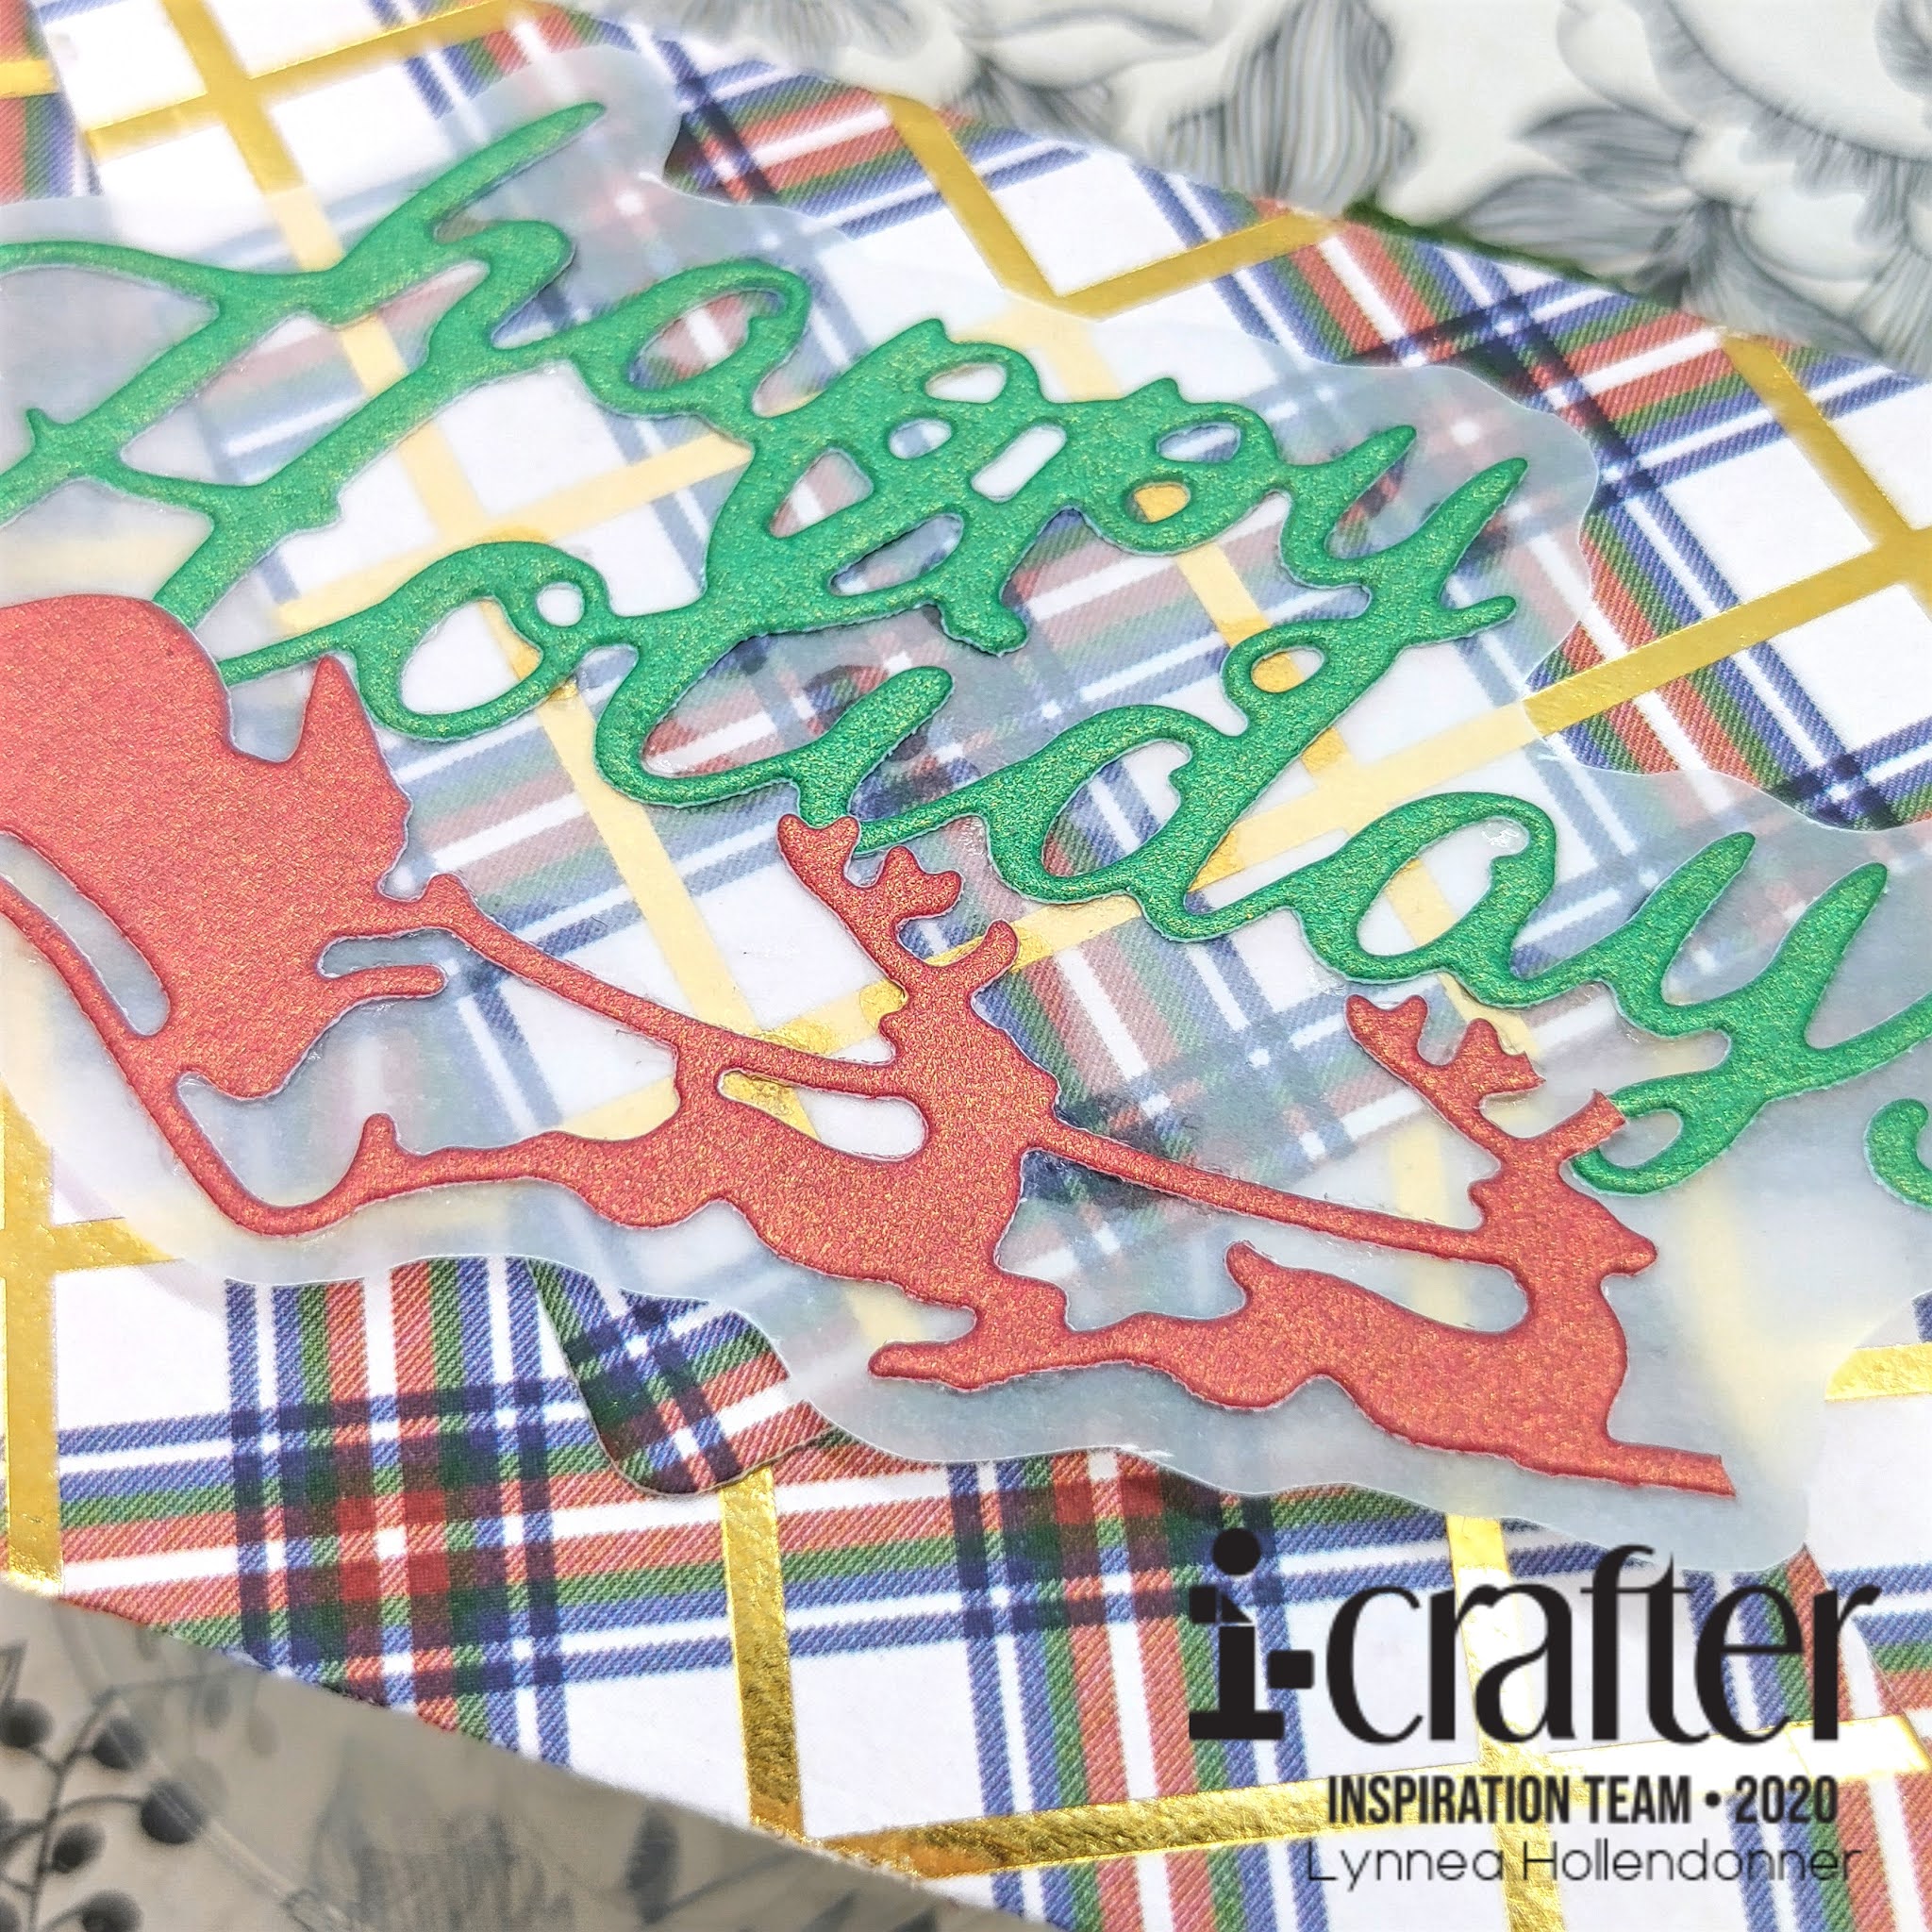
I used the Animalopes Die Set released at the beginning of this year to create my gift card envelope. The Animalopes Die Set can create a BUNCH of cute little animal envelopes - but the main die that cuts the mini envelope can be used for more than just cute critters! It's perfectly sized for gift cards or even little notes! I die cut the envelope and flap from a piece of plaid patterned paper, folded up the envelope, and glued the flaps down. It took me about a minute from start to finish! 


I wanted to keep the gift card envelope simple, but give it a punch of classic Christmas. I used the Tunnel Card Santa Add-On Die Set to cut the sentiment from green shimmer cardstock and Santa and his reindeer from red shimmer cardstock. I thought they got a bit lost against the plaid, so I glued them to a piece of vellum and used my scissors to "bubble cut" around the elements. 


You guys! I can't stress enough how SIMPLE this was to create! And I love that I can mix up my patterned paper to match the style of the gift card recipient! Thanks so much for stopping by! 

Sunday, November 8, 2020

i-crafter | Inside Out Globe Card

Sometimes I like to add little surprises to the inside of my cards. Often times we think about the outside of the card, and and the inside. I call this card an inside out card - it's just as pretty on the inside as it is on the outside! 


I started this card by using my i-Brush Blender Brushes to blend pale pink and tan inks onto my card front. I wanted to keep the color palette soft and slightly antique-y. Once my stenciling was complete I used the globe die from the Hello World Die Set to die cut the front of my card. You want to be sure that you open your card base before die cutting! You only want to cut the front panel of your card, not the back. And I should mention that this design will work whether you're creating a top fold card - like me - or a side fold. So however you fold your card, just make sure it's opened before you cut! 


I looked through the die cut globe opening in the front of my card and lined up a sentiment from the Wonderful World Stamp Set and stamped the sentiment in the center of the window. I didn't take into account that my die cut shape would be left side heavy, but don't worry I will fix that later. If you recreate this card I would do this next step before stamping. I die cut the same globe from the Hello World Die Set from light pink cardstock and used my scissors to cut out the center of the image. Then I added glue and puzzle pieced it into the window cut out. Now you can see the globe on the outside and the inside of the card! 


To fix the lopsidedness of my sentiment I added some gems to the globe. I kept them right side heavy to even out my design. This card is so easy to recreate and I love that it's pretty on the inside, too! See you again soon! 

Sunday, November 1, 2020

i-crafter November Release | Fern Berries Stencil Two Ways

Can you believe it's already the 1st of November?! It's crazy! But that means it's time for a new release from i-crafter! I used the new Fern Berries Stencil two ways and made a quick video for you! 


I used the Fern Berries Stencil with heat embossing and with white pigment ink blending. The looks are totally different, but I love both of them! 


I finished each card with a bit of die cutting and a sentiment from the Holiday Dovetail Card Die Set so that I could keep the focus on the stenciled backgrounds. 


Thanks for stopping by!

Sunday, October 25, 2020

i-crafter | Pine Tree 3D Snowflake Background

I'm stretching my i-crafter dies again! This time I've taken the Pine Tree 3D Die Set and made a wintery snowflake background. You can find a full video tutorial below! 


The i-crafter Pine Tree 3D Die Set is meant to create a 3D tree decoration, but I wanted to show you a way to get more out of your dies! I die cut a few sizes of the snowflake "branches" from the die set from white glitter cardstock as well as pale purple cardstock. I used foam adhesive and stacked a purple snowflake on top of a glitter snowflake. Since these snowflakes are actually meant to be branches and form a tree, they have a little cross cut in the centers, so I cut small squares from purple glitter cardstock and adhered them on top - covering up the little crosses. 


I wanted to have a dark wintery night sky background, so I used my i-Blend Blender Brushes to blend on some navy blue, purple, and even a bit of black ink onto the background. The fingertip blender brushes are perfect for this! Sometimes with the larger brushes I find that one color takes over everything, but using the fingertip brushes gives me a lovely balance of color! 


I added some silver spatters to the card background and added the Pine Tree 3D snowflakes to the background. I stamped a sentiment from the Christmas Sentiments Stamp Set and trimmed it into a strip and added it to the left side of the card with a double layer of foam tape. I hope you enjoyed this simple inspiration! 

Sunday, October 11, 2020

i-crafter | Snowflake Bursts

 Hello, hello everyone! I don't know about you, but winter is one of my favorite seasons! I wait all year for the first snowflake to fall! The Snowflake Bursts Die from i-crafter just makes my heart happy! 


The Snowflake Bursts Die is the latest in the bursts die lineup from i-crafter and it's wonderful! I die cut the largest die in the set from white cardstock so that I could add my own colors. I feel like pink and mint are big hits for Christmas this year, so I used the i-brush Blender Brushes to add some pink ink to my snowflakes. I used a light pink ink all over the snowflakes and then a darker pink at the centers. The i-brush Blender Brushes were the PERFECT size to get in the center of those snowflakes! 


Now for my background. I used the i-brush Blender Brushes to add some mint ink to the background keeping the color concentrated towards the bottom and fading out towards the top. I watered down a slightly darker ink and spattered some onto the background for texture. I added small dots of glue to the back of my inked Snowflake Bursts Die Cut and added it to the bottom of my card. Be careful when adding adhesive to the die cut - this die will pop up in areas, so you want to be sure you don't add adhesive to those areas! Then I trimmed off the portions of my Snowflake Bursts Die that were hanging off the bottom. 


I finished the card by stamping a sentiment from the Christmas Sentiments Stamp Set in black ink on the right side of my card. That's it! I hope this brings you flurries of happiness! See you soon!