Showing posts with label Gansai Tambi. Show all posts

Saturday, November 9, 2019

You're the Good Kind of Weird

Hey, everyone! It's Christmas All Year Long at Scrapping for Less and I have some fun inspiration for you using the My Favorite Things Beast Friend stamp set. This was one of my first stamp sets from My Favorite Things  and it's still one of my favorites!


I stamped and colored the little yeti holding the string of lights with my Copics. My favorite way to color these guys is with light Neutral Gray Copic markers and skin tones for his face and ears. I grabbed some Distress Inks and started blending ink onto a background panel. I only used Crushed Olive, but because I didn't clean off my blender brush the inside blending is a different shade of green. I quite like it when I stumble upon happy accidents!


Once the ink blended background was completely dry I white heat embossed the three trees from the Beast Friends stamp set repeatedly across my card. I was going to leave it this way, but I decided to add a bit of shine with a gold ink from the Gansai Tambi Starry Colors watercolor palette. I'm so glad I did! To match the gold watercoloring I heat embossed a gold sentiment onto a strip, popped up my sentiment and yeti, and added some gold glittery enamel dots around the card.


I love how the gold and green play off each other, don't you?! Thanks for joining me! I hope you're inspired to break out your Christmas supplies and get crafty!

Friday, June 14, 2019

Gold Watercolored Peonies

Hi, everyone! I'm watercoloring some more peonies from the Pretty in Peony stamp set from The Rabbit Hole Designs today! 


I stamped the flowers and a leafy stem from the Pretty in Peony stamp set and watercolored them with my Gansai Tambi Starry Colors watercolors. I used a mix of the white gold and red gold to create some depth of color. These watercolors are SO shimmery! The photos don't do it justice!


I added the flowers onto a piece of watercolor patterned paper and scattered some pearls around the card. I just LOVE the shimmery watercolor! I wanted to keep it the focal point of this card!


Monday, January 7, 2019

Square Watercolor Block Cards

Hi, there! I have a set of two square cards to share with you today! These cards are quite simple to make and are perfect for kids! I'm using the Wild Thing stamp set from Pink & Main - one of my favorite stamp sets from 2018!


Aren't they just so cute!? I cut down two pieces of watercolor cardstock to 5 inches square - one for each card front. I used a pencil and a T-square ruler to pencil in four squares on each card that are 2 inches square. Then I grabbed my Gansai Tambi watercolors and went to town!


I started with this card and doing simple washes of single colors. I tried to choose colors that would be good for girls or boys. I painted straight colors inside of my pencil squares. You do want to be careful not to get paint over the pencil. That will seal in the pencil and you won't be able to erase it. I watercolored just inside of the pencil lines, so the watercolor squares are technically a tad bit smaller than 2 inches.

For my second card I tried something a little different and tried to blend some watercolors together. I couldn't NOT do a rainbow! Hahaha!! I added some black watercolor spatters to both backgrounds for some added texture - and because I love spatters!


My idea for these cards were to make some silhouette animals. I love silhouette stamps! I think they're so amazing with black ink! I planned to just die cut the Wild Thing dies from Pink & Main and adhere them to the squares, but I thought it was hard to tell what the zebra and lion were without the stamped details. You could pretty clearly tell what the crocodile and giraffe were, but I didn't want to repeat the animals. I decided to white heat emboss the stamped images from the Wild Thing stamp set on top of the black die cuts and it was like magic! I LOVE it! The white and black together are so amazing against the bright colored squares! I popped each critter up with foam tape for dimension and added a coordinating sentiment on black cardstock from the Wild Thing stamp set.


I plan on making more of these! I love the way they turned out and they were so quick to make because I didn't do any coloring on the little critter images! Thanks for stopping by! Don't forget to check out the Pink & Main store to purchase the stamps and dies I used in my projects today!


Thursday, December 6, 2018

Peas on Earth

Hi! I picked up the Peas on Earth stamp set from Ink Blot Shop last Christmas and I'm ashamed to say I'm using it for the first time! It's such a cute stamp set! I love that it has images and sentiments for making classic Christmas cards as well as cute ones! I decided to use the cute peas and coordinating sentiment to make today's card!


I'm not very artistic....at all. And I have a small work area and I only have room for basic supplies on my desk. I wanted to watercolor a rainbow of colors in a circle shape in the middle of my card. Usually I sketch out a circle using a circle die or a bowl, but this was an impromptu card and I was too lazy to get up and grab something to create a perfect circle! Haha! So I tried to freehand it - and as you can see - it didn't work too great. Oh well! I wasn't going to scrap it! I never do! I used my Gansai Tambi watercolors and stamped the earth and little flourish with Versamark ink and white embossing powder. I wanted the sentiment to be in white, but I knew it wouldn't show up. Looking at it now I should have used white embossing on black cardstock.

I stamped the little peas and some Santa hats, colored them with watercolors, and fussy cut them. I adhered them on top of the earth with foam squares!


Thanks for joining me! This stamp set is one I will be using again!


Friday, April 20, 2018

I'll Be There For You

Hi, all! I'm totally in love with The One With All The Stamps stamp set from The Ink Road stamps! I love the TV show Friends and this stamp set is too cute! I made a quick and simple card using my favorite technique - watercolor with spatters!


I stamped the famous couch image multiple times on watercolor cardstock with Versafine Onyx Black ink and covered it with clear embossing powder. All the couches were colored with the signature reddish orange color and then I filled in the background with an aqua. I mixed black and white acrylic paints with a bit of water and added some spatters, popped the panel onto my card base, and added my sentiment!


Saturday, March 31, 2018

You're My Lobster

Hello! I've been waiting for The Ink Road's The One With All the Stamps to come back in stock and it finally did! I ordered as soon as I saw it was restocked! My husband and I love the TV show Friends and we got a good giggle out of the stamp set! I couldn't wait to make a lobster card for him!


I watercolored a little background and added some gold paint spatters with my Gansai Tambi watercolors. The lobsters are colored with Copics and gold heat embossed the sentiment onto black paper. Some foam dots and this card is complete!


Sunday, August 6, 2017

Lawn Fawn Father's Day Card

Hey! I have another out-of-season card to share with you! This one is going into my county fair, too! I pretty much make Mother's and Father's Day cards only once a year, so I had to make this one special! 


I started by stamping frames from Lawn Fawn's Flirty Frames with Versafine ink and embossed them with clear embossing powder. I masked off the frames and stamped various images from Let's BBQ and a sentiment from Happy Everything inside of the frames and watercolored them with my Gansai Tambi watercolors.


I thought the backgrounds was too white, so I diluted my black watercolor to a very light gray and watercolored the whole background. Some black Nuvo drops and some Glossy Accents here and there and this card is done! Thanks for stopping by!


Monday, July 31, 2017

A Very Special Unicorn

Hey there! This blog post is a very special one for me. Today my husband and I finally adopt our son! Those of you who have followed me for a while may remember that in October of 2015 we became foster parents with the hopes of adopting. We were placed with our son in November of 2015. He is the most amazing little boy and we have been praying for 21 very very long months that he would be ours forever. Today he will finally share our last name. Anyone who has adopted through foster care knows the stresses, fears, and worries we have had for almost 2 years. We have been so blessed by our baby boy (...I guess he's a toddler boy now!) ! When we found out that I wouldn't be able to have kids we were devastated. Traditional adoption was far out of our finances and we thought we would never have a family. But there are so many kids in the foster care system that need loving homes and we are so happy that he is ours!! We don't have a lot, but we have a lot of love for him! 

Anyway, here is the card I have planned for today! 


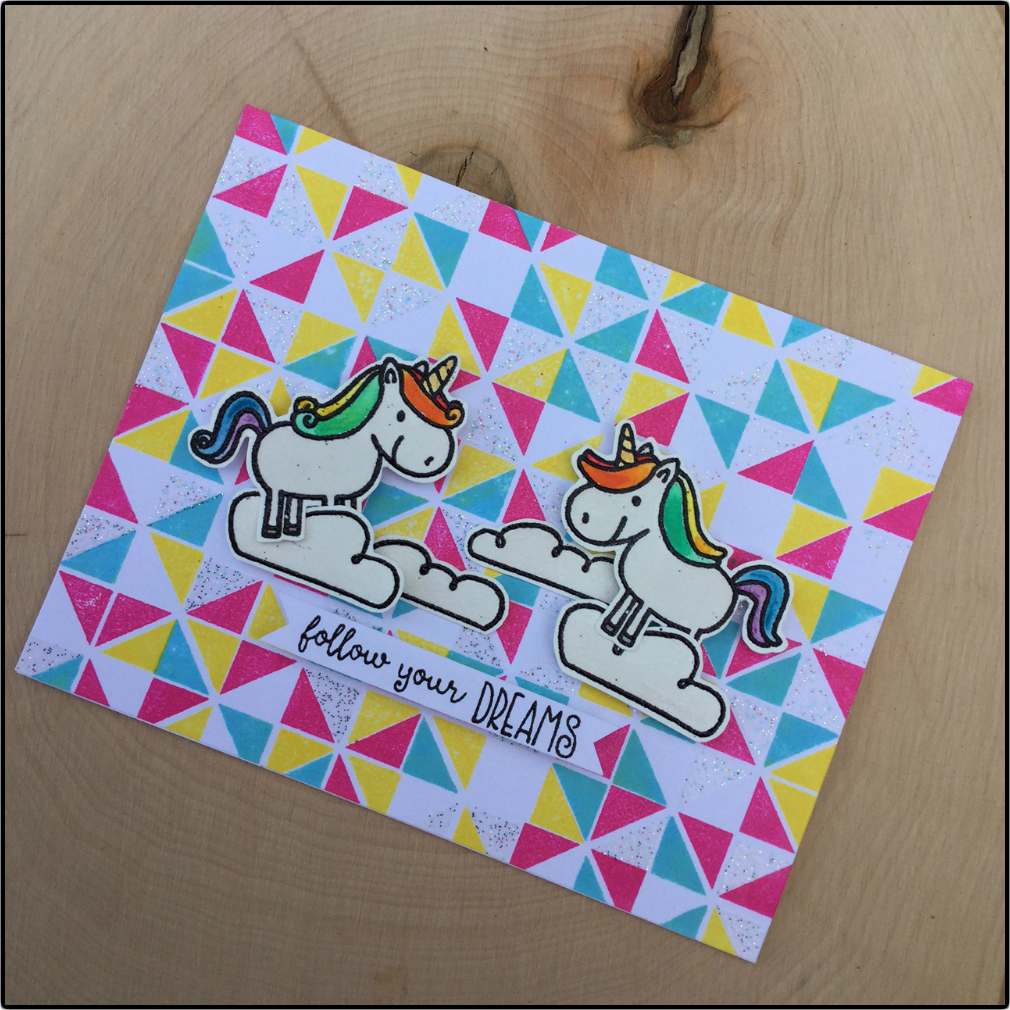
Follow your dreams - it means so much to me. I dreamed of having a family and it seemed like a unicorn dream a few years ago...but now I have my son forever!

I watercolored my unicorns and clouds with Gansai Tambi watercolors and added a bunch of shimmer with my Wink of Stella clear glitter brush pen.


I created my background with Simon Says Stamp inks and rainbow sparkle embossing powder and the Concord & 9th Triangle Turnabout stamp. This stamp is a-maz-ing! Seriously! Quick and easy backgrounds are my favorites!

That's all! This card was really quick, but I think it's super cute! See you soon!


Saturday, July 29, 2017

Magical Unicorns on the BRink Blog!

Hey! I'm guest designing over on the Butterfly Reflections, Ink blog today! I've made a card with lots of glittery, shiny rainbows and a unicorn! Here are some photos! Be sure to head over to the BRink blog for all the details on products and how I made the card!


See you next time!


Thursday, July 6, 2017

Floral Watercolor

Hey, everyone! I have 2 cards to share with you today using the Floral Bliss stamp set from Simon Says Stamp. 


I stamped the floral image and sentiment on to watercolor cardstock using Versafine Onyx Black ink and used clear embossing powder over the ink. I used a few colors from my Gansai Tambi watercolors to color over the flowers. I did 3 layers to really build up the color.


I added black watercolor flicks and die cut the panel with a stitched rectangle die. I die cut a piece of patterned paper with another stitched rectangle and mounted everything onto a black card base. I added white Nuvo drops for some texture.


I liked the design so much that I repeated it using a blue Daniel Smith watercolor. I used a different patterned paper and card base and I used gold Nuvo drops instead of the white.


I can't decide which one I like better! These were so quick to throw together, but I really love them! See you soon!


Sunday, June 11, 2017

Floral Bliss

Hello! I have 2 super quick cards to share with you! I've been loving watercolor lately...well...I suppose for the past year! It's so easy and really helps me to relax!


For this first one I did a gradient of color with my Gansai Tambi watercolors, and then crinkled up some plastic wrap that I stole from my kitchen cupboard. I've had the same role since my freshman year of college! I'm glad it's finally getting used! I only let the background sit for about 30 minutes and it was dry! It was 94 degrees here today...so it didn't take much time at all! And this was the result! I stamped the floral image from the Simon Says Stamp Floral Bliss stamp set and added a sentiment. I used a marker to draw a fake banner to keep it a one layer card. I added some white Nuvo drops and some clear droplets from Pretty Pink Posh. The background does all the work!


I did this card almost exactly the same, just a different color scheme! I did just a regular watercolor background...no plastic wrap this time!


That's all for today. These are super quick and easy to recreate! They would be perfect to make a set of identical cards and give them as a gift!

Tuesday, May 30, 2017

Floral Border Cards

Hey, there! Today I have 5 cards to share with you! Four are super simple...even the fifth is simple...but a little more involved than the others! I used some older products...but who says that's a bad thing!


Here's the first card...the more involved one! I started by stamping the floral border image from an old Studio Calico card kit - Lisse Street from April 2015. I love love love this image! I stamped it with Versafine black ink and used clear embossing powder. It was super easy to line up and stamp because I used my MISTI! Where would I be without it! The sentiment is from the My Favorite Things Geometric Greenery stamp set. I used my Gansai Tambi watercolor set to add some quick and easy messy coloring to the image. Can you believe that was the hard one?! I popped on some sparkling clear sequins from Pretty Pink Posh and decorated an envelope. Easy peasy!


While I had the image mounted on my MISTI I went ahead and stamped a bunch more cards! For these two I added a strip of washi tape and a die cut sentiment from the card kit. I have a bad habit of hoarding pretty things...and my goal for this year is to use more of what I have!


And now for the simplest design! I stamped and embossed like the others and then just added a sentiment die cut! And just like that I have five cards done and ready to send out!

Thanks for joining me!

Sunday, April 9, 2017

Simon Says Stamp Rainbow Challenge

Hello, everyone! I'm sneaking in to show you some cards I made for the current Simon Says Stamp Monday challenge - make a rainbow! The challenge ends tonight, so there's not much more time to play, but I love to craft under pressure! If you want to join the challenge, click on the image below!

The challenge is to make a rainbow. I decided to use my favorite watercolors (Gansai Tambi) to add some background color. I used the whole rainbow...just not on one card! I wanted to have bright colors in the background, but I thought a whole rainbow would be overwhelming, so I decided to use just a few colors on each card! 


I started by heat embossing the Emma Background stamp from Simon Says Stamp onto some watercolor cardstock. I mixed up some watercolors and painted my background. I used a pretty blue color towards the center and a minty pool color - my absolute favorite! - on the outside. Since the background is so pretty, I wanted a sentiment to be simple. I used the Prayers set from Hero Arts and die cut the sentiment many times from different colors of cardstock. I used some white and some pink and layered them together. I die cut one more from gold foiled cardstock and put that one on top. I love how the pink pops out from the side! Another little peek of a rainbow! I white embossed a coordinating sentiment onto some gray cardstock, trimmed it out, and popped it up with foam squares. 


I made this card in almost the same way! I mixed up the sentiment a little by die cutting four layers of black cardstock and glueing them together. I covered the die cut with Wink of Stella and then a thick layer of Glossy Accents. I also added some sparkle to the coordinating sentiment strip. 


I thought it might be fun to only emboss part of the stamp on the top part of my card...so I did! I watercolored the background the same way, a dark color in the center and a lighter color around the outside. I die cut a peachy color cardstock and covered it with Wink of Stella and Glossy Accents. 


Last one! This one is a bit different! I started by stamping the background stamp with Squeezed Lemonade and Picked Raspberry Distress Inks. Then I used a Distress Ink bleed technique from Jennifer McGuire! I just sprayed the cardstock with a bit of water and let the color move around. Once the ink was dry I used my MISTI to stamp right on top of where I originally stamped with Versafine Onyx black ink and embossed it with clear powder. I wanted to keep this a one layer card, so I used the same black ink and clear powder to add a sentiment to the bottom of my card. 


That's all of them! I hope you take some inspiration from my rainbow backgrounds! 

Wednesday, March 29, 2017

No Dies Allowed!

Hello, everyone! I recently stumbled across the CAS-ual Fridays challenge blog and I thought I would challenge myself with this week's theme - no dies allowed! I don't know about you, but I frequently seem to be using my dies. I've only owned dies for about a year and a half...but I honestly can't remember not having them! I always seem to be reaching for sentiment dies, stitched rectangles...or something! So this was a real challenge for me! Click the link below to go to the CAS-ual Fridays challenge blog to get involved!


Here are my cards!


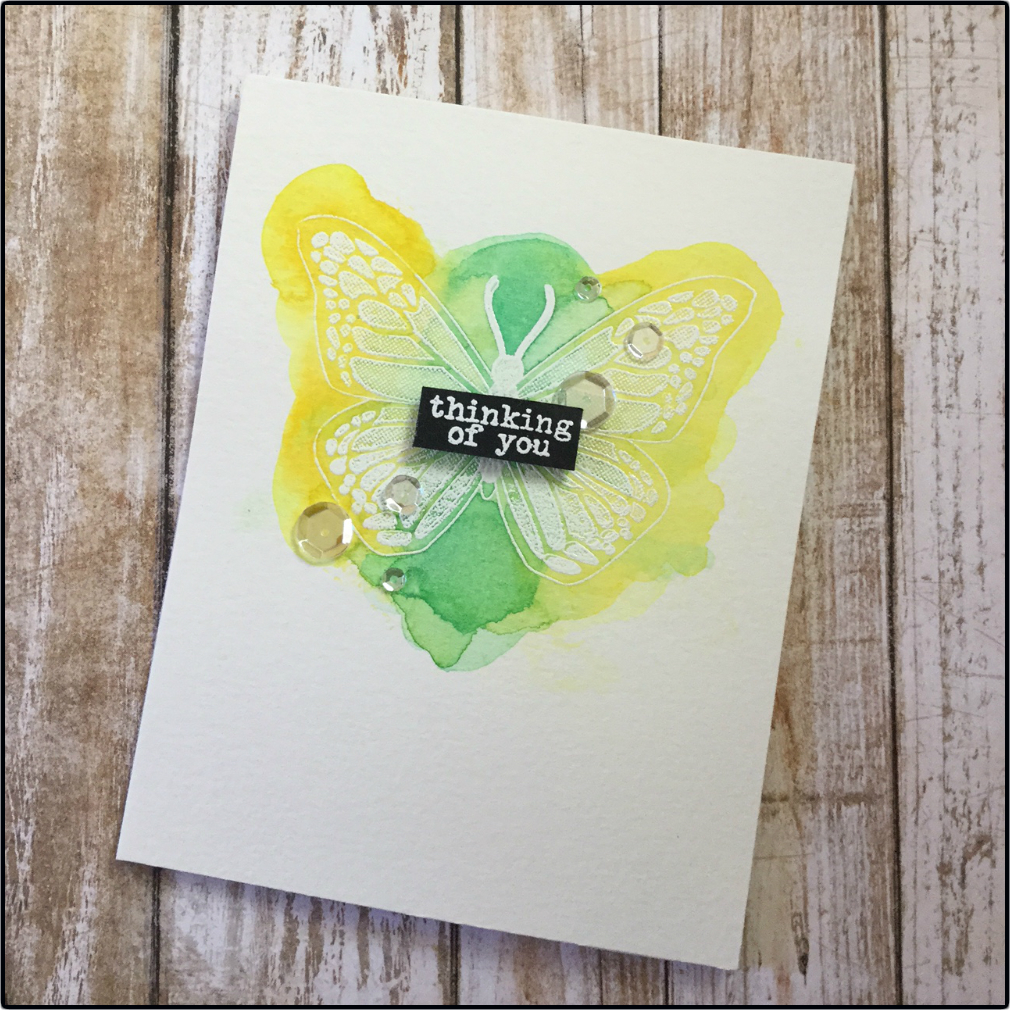
I used the gorgeous Butterfly Beauty stamp set from Concord & 9th. I'm in love with this set! There are so many pieces to the stamp set and I've played with it often...but these are 2 of my favorite cards!


I started by stamping my image onto watercolor paper and embossing it with white powder. I did this twice so that I could make 2 cards. Then I pulled out my Gansai Tambi watercolors...one of the best finds I've found in a long time! I find myself watercoloring a lot lately! I kept darker colors to the middle and lighter colors to the outside, but I used plenty of water so that the colors would mix to make a middle color.

I painted about 3 or 4 layers of watercolor, using a paper towel to dab off excess color here and there and a heat gun to speed up the drying. I took a couple of sentiments from the set and heat embossed them on black cardstock. I trimmed them down and popped them up with foam.


I used some liquid glue and sparkling clear sequins from Pretty Pink Posh in various sizes to add a bit of glitz! Clean and simple has been my style lately...and I love how these turned out!

Thanks for stopping by!