Showing posts with label Friday Frenzy. Show all posts

Friday, December 25, 2020

Whimsy Stamps Friday Frenzy | Repeat Stamping Birthday Card

Can you believe it's the last Whimsy Stamps Friday Frenzy of 2020! Wow!! I used one of my favorite "techniques" for today's birthday card - repeat stamping! 


I used the Polka Dot Pals Tobias Stamp Set to create my background - but I didn't use the main image. I love to use the smaller coordinating images in stamp sets to build a background. i stamped the stars all over and colored them with Copic Markers. I die cut the present from the bookmark and Tag Die Set and stamped a sentiment from the Birfday Party Dragons Stamp Set


Thank you so much for joining me on my Friday Frenzy adventure this year! 

Friday, December 18, 2020

Whimsy Stamps Friday Frenzy | Starry New Years Card

Happy Friday Frenzy! I know 2020 has been rough, but we're looking forward to new beginnings in 2021, right?! Here's an easy ink blended and heat embossed New Year card!


This card is simple, but there are a few different textures and elements that pack a punch! I stenciled the Star Galaxy Stencil onto dark purple cardstock with white pigment ink and added spatters of gold watercolor for extra shine. 


I lined up the short stem and sentiment from the Happy New Year Stamp Set and stamped and white heat embossed them in the center of my card. I trimmed down my panel and added it to a white card base adn added a scattering of clear gems. 


Thanks for stopping by! Come back next week for the last Whimsy Stamps Friday Frenzy video of the year!

Friday, December 11, 2020

Whimsy Stamps Friday Frenzy | Elegant Ornaments Winter Card

It's Friday Frenzy time! This will probably be my last Holiday themed Friday Frenzy video from Whimsy Stamps, so soak it up! Haha!


I got my hands on the Blurry Flurries 6x6 Paper Pack a couple of weeks ago and I've been DYING to use it! I used three patterns on this card, but there are so many more gorgeous prints in the pack! I die cut the Elegant Ornament Die from two different patterns. This die is meant to cut and remain part of the background, but with a couple of scissor snips I easily separated the die cut from the background for an individual element. 


I added the ornaments onto another piece of the Blurry Flurries patterned paper. Isn't the background just gorgeous! I die cut the Large Merry Word Die from silver glitter paper and stacked it on top of white die cuts for dimension and added it to the card. 


With a few color and sentiment tweaks I think you could easily recreate this card for New Years! That ornament could become the ball dropping! Thanks for watching. I'll see you soon! 

Friday, December 4, 2020

Whimsy Stamps Friday Frenzy | Birfday Party Dragons

 Hey, all! And welcome to my Friday Frenzy feature for Whimsy Stamps! I'm making a cute and easy rainbow birthday dragon card today! 


You won't believe how easy this card is to create! That background - patterned paper! Shocking, I know! I just love the Rainbow 6x6 Patterned Papers. They make stunning backgrounds!


I colored up the dragon from the Birfday Party Dragons Stamp Set and added lots of glitter and shine with Glossy Accents. I added the Slimline Bunting Borders die cuts to the background and popped up the dragon with foam tape. 


That's it! A quick and easy birthday card that anyone will love! See you next week for another Friday Frenzy video

Friday, November 27, 2020

Whimsy Stamps Friday Frenzy | Fairy Sweet Rainbow Christmas Card

Hi, hi! It's Friday Frenzy at Whimsy Stamps again! My last one for November - and wow that's scary! I have a non-traditional Christmas card to share today. Rainbows are never out of season, right!


I stamped the Fairy Sweet Rubber Stamp and colored her with Copics. I colored her to match the colors in the Rainbow 6x6 Paper Pack and trimmed down one of my favorite patterns to be the background. I stamped a sentiment from the You're My Jolly Stamp Set at the bottom of the image to finish the card. 


Thanks for stopping by! 

Friday, November 20, 2020

Whimsy Stamps Friday Frenzy | Funky Frames Winter Card

Happy Friday Frenzy, everyone! I hope you've had a great week and are ready to mix it up with some old and new products from Whimsy Stamps!  


The new Funky Frames Dies are wonderful! I love that there are 3 different frames and 3 different hangers so that you can mix and match and turn the frames for a bunch of different looks! 


I used two patterned papers from the Chill 6x6 Paper Pack and the Hugs Bunny Stamp Set and made a cute little wintery frame ( or window! ) scene. 


This card is super simple to put together, but so cute! See you next Friday! 

Friday, November 13, 2020

Whimsy Stamps Friday Frenzy | Pine Bough Christmas Card

Hello and happy Friday Frenzy from Whimsy Stamps! Whew, we are just flying through November! Already half way through! That means it's time for another easily mass produced Christmas card design! 


When I am creating a card meant to be mass produced I tend to keep coloring to a minimum ( or in this case nonexistent! ) and I find that it's a good time to use up some patterned paper! 


I stamped the Pine Bough Background Stamp with dark brown ink and cut it out with a slight border. I used foam tape to mount it onto a piece of patterned paper from the Tartan 6x6 Paper Pack. I die cut the Merry Large Word Die four times from red cardstock and stacked them together for a dimensional sentiment. I thought it was missing something, so I sprayed the sentiment with Silver Glitter Dust Spray and added it to the card with iCraft Ultra Bond Liquid Adhesive


That's it! See you next Friday! 

Friday, November 6, 2020

Whimsy Stamps Friday Frenzy | Slimline Scenic Countryside Die Set

Hello and welcome to another Friday Frenzy with Whimsy Stamps! I'm using the Slimline Scenic Countryside Die Set to make an adorable slimline winter scene! 


I love how easy it is to make amazing scenes with the Slimline Scenic Countryside Die Set. I made a wintery Christmas Scene, but you can customize the backgrounds and colors of the houses and use this die set for every season. Even those snowy hills can be made to look like grassy hills! 


I kept this card clean and cozy with just a bit of patterned paper for the sky and a stamped and bubble cut sentiment. The focus is all on that adorable winter village scene! Come back next Friday for another Friday Frenzy feature. See you then! 

Friday, October 30, 2020

Whimsy Stamps Friday Frenzy | Christmas Dragon Shaker Card

Hello, hello and welcome back to another Whimsy Stamps Friday Frenzy feature! I'm mixing the old with the new to make an adorable Holiday shaker card! 


This shaker card was easy to make and I love that you can customize the colors to your style! 


Thanks so much for being here! Come back next Friday for more Friday Frenzy fun! 

Friday, October 2, 2020

Whimsy Stamps Friday Frenzy | Leaf Layers Slimline Card

Hooray for a new release from Whimsy Stamps! I'm using one of my favorites - the Leaf Layers Stamp Set


The Leaf Layers Stamp Set has a variety of solid leaf images and their layers. You can use these separately or together! They easily line up to give instant dimension to your stamped images! I decided to stamp the solid images in yellow, orange, and red and the layering image in a dark brown. I slightly offset the top layer for even more dimension. 


I added a frame from gold glitter cardstock with the largest die in the Slimline Birthday Scallop Die Set and a simple "thanks" sentiment from the Thanks Word Die Set


I'll see you next Friday with another Whimsy Stamps Friday Frenzy video! 

Friday, September 25, 2020

Whimsy Stamps Friday Frenzy | Easy Halloween Shaker Card

Whimsy Stamps has done it again! They have another paper pad with ready made scenes! There's no need to stress about stamping or masking or anything! The Vampire 6x6 Patterned Papers are PERFECT for easy shaker cards! 


This shaker card is so easy, but I thought I would share all the tips and tricks I know in the video above! I chose one of my favorite patterned scenes from the Vampire 6x6 Patterned Papers and cut it with the largest of the Zig Zag Rectangle Dies. Then I taped the two largest of the Zig Zag Rectangle Dies together and cut a frame from heavy white cardstock. 


I created a simple shaker with a piece of acetate and some Double Thick Foam Tape. This is one of the BEST things I have ever found for creating shaker cards! I used some powder tool to reduce static and filled my shaker with sequins and added my Vampire Patterned Paper scene to seal up the shaker. 


All that's left is a sentiment! I die cut the Foolish Mortals Word Die four times - three times from regular black cardstock and once from black glitter cardstock. I adhered the stack of sentiments together with the glittered die cut on top and added them to the left of my shaker card. That's it! 

Friday, September 18, 2020

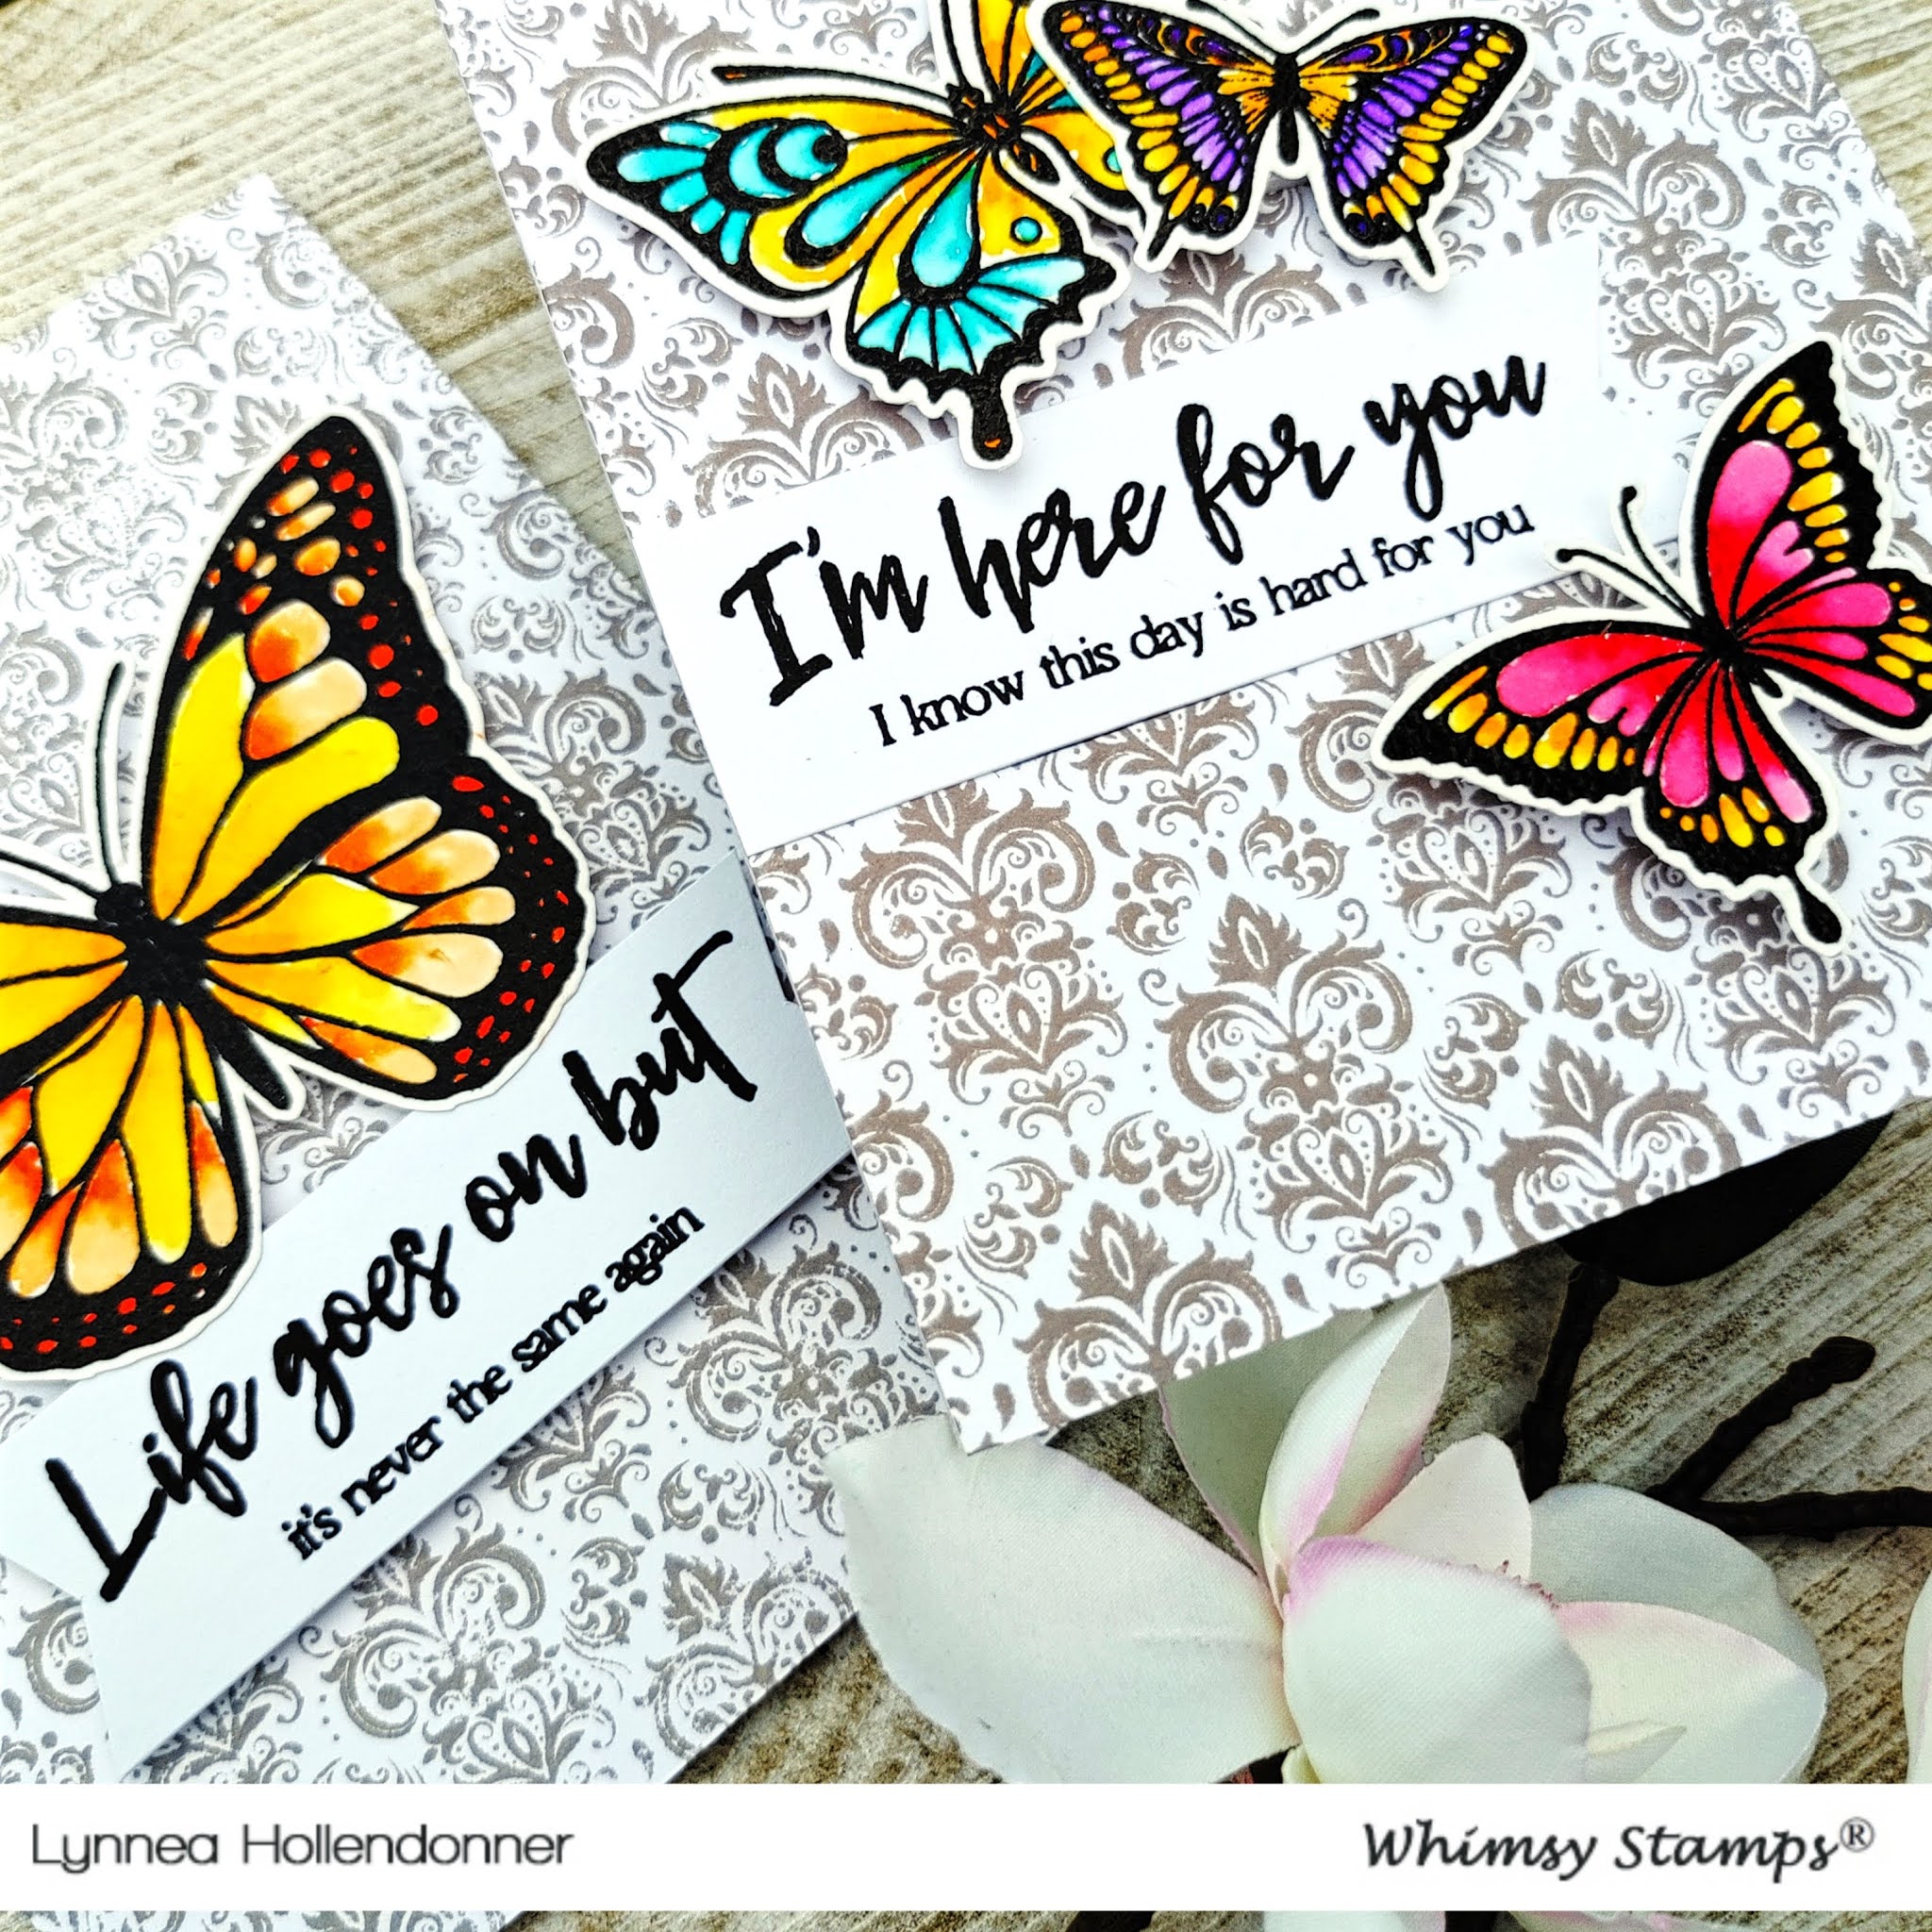
Whimsy Stamps Friday Frenzy | Vintage Wallpaper Sympathy Cards

Unfortunately we live in a world where sympathy cards are necessary. I made two elegant butterfly sympathy cards with Karin Brushmarkers and other Whimsy Stamps goodies.  


The Vintage Wallpaper Background Stamp could be used for a bunch of different card styles depending on which color ink it's stamped in. I decided to go with a light gray to keep the background subtle. 


I stamped all four butterflies in the Butterflies Stamp Set and colored them with Karin Markers. I've only worked with these markers a few times, but oh how I love them! The colors are bright and vibrant! I used 283 Gold in each butterfly as well as 204 Aqua, 181 Lipstick Red, 195 Amber, and 247 Pale Violet. 


I stamped sentiments from the Life Goes On Stamp Set and added them with foam tape. I love this stamp set because you can build your own sentiments. And the mix of text size and font is wonderful! 


I'll see you next Friday with a new Friday Frenzy video

Friday, September 11, 2020

Whimsy Stamps Friday Frenzy | Aussie Friends Slider Card

 Hi, friends! I'm showing you an EASY way to use some Whimsy Stamps products to create a slider card. This tutorial will show you the basics allowing you to go wild and create more elaborate slider cards! 


Aren't those little kangaroos scooting across the card adorable? They're from the brand new Aussie Friends Stamp Set. And so is the little koala, too! 


I paired the new Aussie Friends Stamp Set with the Quilted Rainbow Inlaid Die Set from a previous release as well as a bit of ink blending. I love the colors together! Then I created a simple slider mechanism with the Kinetic Straight Basics Die Set to give the kangaroo some motion. 


That's all for today! Come back Sunday for some more Whimsy Stamps inspiration! 

Friday, September 4, 2020

Whimsy Stamps Friday Frenzy | Easy Haunted Scene Cards

Intimidating scene cards are a thing of the past with the Haunted Patterned Papers from Whimsy Stamps! See how easy it is to make spooky Halloween scenes!


Can you believe that all I used for these backgrounds is patterned paper! I stamped a sentiment and added a simple image to each card and boom!


I used the recently released Spooks & Spells Stamp Set and colored the witches legs and the bat with Copics and trimmed them out for my cards.


The sentiments are from the You're My Boo Stamp Set. I LOVE this sentiment builder stamp set and Whimsy Stamps has a few more just like it! So you're covered for just about any sentiment you could need!


I added all of my pieces onto the Haunted 6x6 Patterned Papers and that is literally all! Can you believe it? So easy, right!

Friday, August 28, 2020

Whimsy Stamps | Using Word Dies to Create a Background

Happy Friday Frenzy! Let's get spooky and mix up some old and new Halloween products from Whimsy Stamps!


One of my favorite things to do is create my own backgrounds! Don't get me wrong - patterned papers are absolutely fabulous - but backgrounds are my jam!


I cut out a bunch of word dies from the Chills Word Die Set from white cardstock and glued them onto my card. I tried to keep a pattern going, but if it's a little imperfect that's okay. I added some vellum die cut with the Notched Squares Dies and some cute little candy corns from the Candy Corn Dress Up Stamp Set.


Come back next Friday for more Friday Frenzy Halloween inspiration!

Friday, August 21, 2020

Whimsy Stamps Friday Frenzy | Sugar Skull Cuties Birthday Card

It's officially spooky time - one of my favorite times of the year! Get geared up and ready! Whimsy Stamps has all kinds of spooktacular goodies hitting the shop!


I have all kinds of Sugar Skull goodness going on in this card! And I mixed in a bunch of previously released Whimsy things too!


I have a friend who's birthday happens to be on Halloween ( lucky, I know! ), so that's why I made this Halloween birthday card! That cute little kitty is from the Sugar Skull Cuties Stamp Set and the drippy droppy cake is from the Chameleon Party Stamp Set. I build my own customized sentiment by mixing together sentiments from the Candy Corn Dress Up Stamp Set and the Candy Mouse Stamp Set!


I found some complimenting Sugar Skulls 6x6 Papers and die cut them with the Zig Zag Rectangles dies and layered them onto the card. Come back next week for more Whimsy Stamps Friday Frenzy inspiration!

Friday, August 14, 2020

Whimsy Stamps Friday Frenzy | General Store with Spooks & Spells

Time for another Friday Frenzy video from Whimsy Stamps! This time I'm mixing old and new products to make a Halloween card!


When I saw the General Store Rubber Stamp I knew I wanted to turn this cute little country store spooky! I simply stamped it in black ink and chose not to color it in. Even in black and white the detail is INCREDIBLE! To spook it up I stenciled some bats from the Halloween Creatures Stencil swooping in from the top with black ink.


I colored some adorable critters from the Spooks and Spells stamp set and added them to my card. Aren't they too cute?! I decided to trim down my panel and added a star background with yellow ink ( for a pop of color! ) with the Star Galaxy Stencil.


The sentiments in the Spooks and Spells stamp set just make me giggle! I stamped a fitting "batty" sentiment in red ink at the bottom of my card and that's ti!