ThermOWeb and Sassy & Crafty are celebrating their collaboration week with an Instagram hop! How exciting! Head to my Instagram HERE to participate and see lots of inspiration!
The magic of foiling never fades for me! I LOVE the results every single time! I grabbed the Sassy & Crafty Butterfly Wings Stencil and went to work! I sprayed the back of the stencil with Pixie Spray so that none of those little details would shift while I worked. I decided to show off my favorite Deco Foil of all time - Rainbow Shattered Glass! - on both black and white cardstock. I pressed the Butterfly Wings Stencil down onto a piece of cardstock and used my Stencil Pal to spread Deco Foil Transfer Gel DUO over the stencil in an even layer. I removed my stencil and placed it over my second piece of cardstock and repeated the process. These pieces take a few hours to dry, but I prefer to let them sit overnight to make sure they are fully dried.
You'll know the Deco Foil Transfer Gel DUO is dry when it turns clear (instead of white) and is only slightly tacky. Let's add some foil! Because I used the DUO Gel I have the choice of transferring foil with the heat and pressure from my laminator or just using pressure from my die cutting machine. I LOVE that! I chose to use my die cutting machine simply because it's easier for me. I cut a piece of Rainbow Shattered Glass Deco Foil to be slightly larger than my background and placed it pretty side up onto my background. You want to make sure that the silver back side of the foil makes contact with your medium (whether thats gel, toner, or adhesive). I placed my foil and background into a typing paper carrier sheet and ran it through my die cutting machine. I slowly peeled back the foil backer and I had GORGEOUS foiled butterfly backgrounds!
All that's left is to put the cards together! I added the sentiment strips with iCraft 3D Foam Strips and the butterflies with iCraft 3D Foam Squares. These cards have gorgeous shine, but are pretty simple. I like to use the iCraft Foam Adhesives when I have a simple card so there is a lot of dimension to my elements.
I hope you enjoy these cards combining my favorite ThermOWeb and Sassy & Crafty goodies! See you soon!
I used two methods of foiling on my Valentine's Day card - one with heat and one without. And I have to say - my no heat method could be a new favorite of mine!
Let's start with the method of adding Deco Foil Transfer Sheets to a background without heat. I used one of my favorite adhesives - iCraft 6x6 Easy Cut Adhesive Sheets - to cover an entire piece of A2 sized cardstock with adhesive. I chose three colors of Deco Foil for my background - Red, Enchanted Rose, and Silver Stars. I started with the Red Deco Foil Transfer Sheets and cut about a 2" x 6" piece of Foil and crunched it up in my fist so that the Deco Foil looked crackled then I started pressing random portions onto the adhesive covered background. The effect is AWESOME!
Once I had a good bit of the Red Deco Foil on my background I repeated the process with the Enchanted Rose Deco Foil Transfer Sheets. I cut off a piece of foil, crunched it up, and pounced it onto my background. Then I filled in any empty areas with the Silver Stars Deco Foil Transfer Sheets. This technique is an awesome way to create a distressed, foiled background! But you'll probably have some sticky areas left on your background. Here's a tip! I used my anti static powder tool ( what I would use for heat embossing ) and rubbed it all over my background. No more sticky spots!
Now let's switch gears to the heat method of adding foil. There are a LOT of ways to add foil with a laminator to a background, but I LOVE to reach for Toner Sheets! They are easy and quick - right up my alley! I always like to preheat my laminator and let it heat up for about 20 minutes after the "ready" light comes on. I find I get a better transfer if my laminator is good and hot before I start foiling. I used the Gina K Designs Stars and Stripes Foil Mates and trimmed a piece of Red Deco Foil to be slightly larger than my background, placed the foil on top of the toner sheet pretty side up, and ran it through my laminator. Now I have pretty foiled stars!
I hope you learned some new tips and tricks! I love that you can use either of these two backgrounds separately on their own or mix them together for one cool card! See you soon!
Ready for some easy ways to use ThermOWeb products without a laminator? I used Flock, Foil, and Glitz Glitter Gel along with some fabulous Reverse Confetti stamps and dies to make two cards!
I love the versatility of ThermOWeb products and how they can be used both with and without a laminator. I used traditional Christmas colors and made two sparkly and shiny Holiday cards.
One of my favorite things for Deco Foil Flock Transfer Sheets is to use it as a die cut background! The colors of the Flock Transfer Sheets are bright and vibrant and the texture it brings to the card is amazing! I used the Reverse Confetti Center Frame Cover Panel Die and die cut a piece of Emerald Green Flock. You die cut Flock Transfer Sheets the exact same way as you would die cut cardstock. There were little cut outs in the background die and I wanted to fill them in with something shiny. I covered a piece of white cardstock with iCraft Easy Cut Adhesive and transferred Gold Deco Foil onto the adhesive covered cardstock. All you do is peel back the adhesive backing and place the Gold Deco Foil Sheet pretty side up into the adhesive ( the adhesive should make contact with the "dull" side of the foil ).
I kept the same color scheme for my second card, but switched up my medium. I sprayed the back of a stencil from my stash with Pixie Spray and let it dry for about a minute before adhering the stencil to a piece of green cardstock. I used a Stencil Pal and spread Gina K Designs Gold Glitz Glitter Gel over the stencil and set my background aside to dry. I stamped the poinsettia cluster from the Reverse Confetti Lantern Additions Stamp Set five times and colored them with watercolor markers. Once they were colored I die cut them with the coordinating dies.
I hope you've been enjoying the ThermOWeb and Reverse Confetti collaboration week and that you found some helpful tips and inspiration in my video today! See you again soon!
ThermOWeb and Unity Stamp Co are at it again! There are five new Holiday designs of Unity Toner Card Fronts and they are stunning! I have a video showing off all five designs and three different coloring mediums with both classic and non-traditional color palettes!
Unity Toner Card Fronts are incredibly versatile. You can use just about any coloring medium with them. Today I used Copic Markers, watercolor, and ink blending - both dye inks and hybrid inks. I love that you can use what you already have in your stash! The Unity Toner Card Fronts are perfectly designed for ready to foil card fronts, but you can absolutely cut them up or embellish them and change your card designs!
I added color to each of my Unity Toner Card Fronts before transferring foil to them, but you can absolutely foil first and add color after. It's personal preference in my opinion! Let's start with the two Unity Toner Card Fronts that I colored with Copic Markers. The Unity Toner Card Fronts have a coated surface and I love how they take color! The Flurry Forest Unity Toner Card Front is one of my favorites. I love the chunky trees! I used two shades of pink and two shades of mint Copic Markers and quickly added color right over the toner.
I colored the Ornate Ornaments Unity Toner Card Front with the same Copic Markers before I added Gold Deco Foil to each of the card fronts. When I use Deco Foil Transfer Sheets in my laminator I think it's important to heat up my laminator really well. I turn on my laminator to the 5mil setting and let it heat up for about 20 to 30 minutes before use. I placed a piece of Gold Deco Foil that was slightly larger than the Unity Toner Card Front pretty side up onto the background and ran it through my laminator. You want to be sure that the reverse side of the foil makes contact with the toner in order for the foil to transfer. Then let the background cool and peel away the Deco Foil Transfer Sheet and see the beautiful foiled design!
Let's move on to some ink blending. This is probably my favorite way to add color to the Unity Toner Card Fronts. Remember that slick coating I mentioned before? It really helps with blending! I used some bright rainbow colors of dye ink for the Gifts a Plenty Unity Toner Card Front and they blend together beautifully! After I completed my ink blending I lightly buffed away any excess ink that may have sat on top of the toner. I cut a piece of a Silver Deco Foil Toner Sheet to be slightly larger than the background and ran it through my hot laminator (pretty side up!). I love the silver gifts against the rainbow ink!
I wanted to try ink blending again, but this time with a different type of ink. I used a few colors of red hybrid inks and blended them over the Holiday Lights Unity Toner Card Front. I chose to foil the background with Silver Stars Deco Foil. I thought the Silver Stars Foil would shine with those chunky lights and it does! It would be a really fun idea to pick multiple colors of Deco Foil Transfer Sheets and foil the light bulbs in multiple colors!
I've saved my favorite for last! I colored the Snow Many Flakes Unity Toner Card Front with shimmery watercolors. Although these card fronts are not made from watercolor cardstock I didn't have any trouble blending watercolor on them. Once my panel was dried it was slightly warped, but the heat from the laminator not only transferred the foil onto the design, but it also flattened my panel! Bonus! I used Iridescent Deco Foil for my final design. I LOVE the shine!
I kept each of the Unity Toner Card Fronts in their original form, but there are so many ways you could cut them or manipulate them into other designs! I used a sentiment from the Unity Stamp Co glimmering Greetings Stamp Set on each of the card fronts. I used both heat embossing and stamping onto die cuts to finish the Unity Toner Card Fronts into full card projects. I hope you've enjoyed this set of cards!
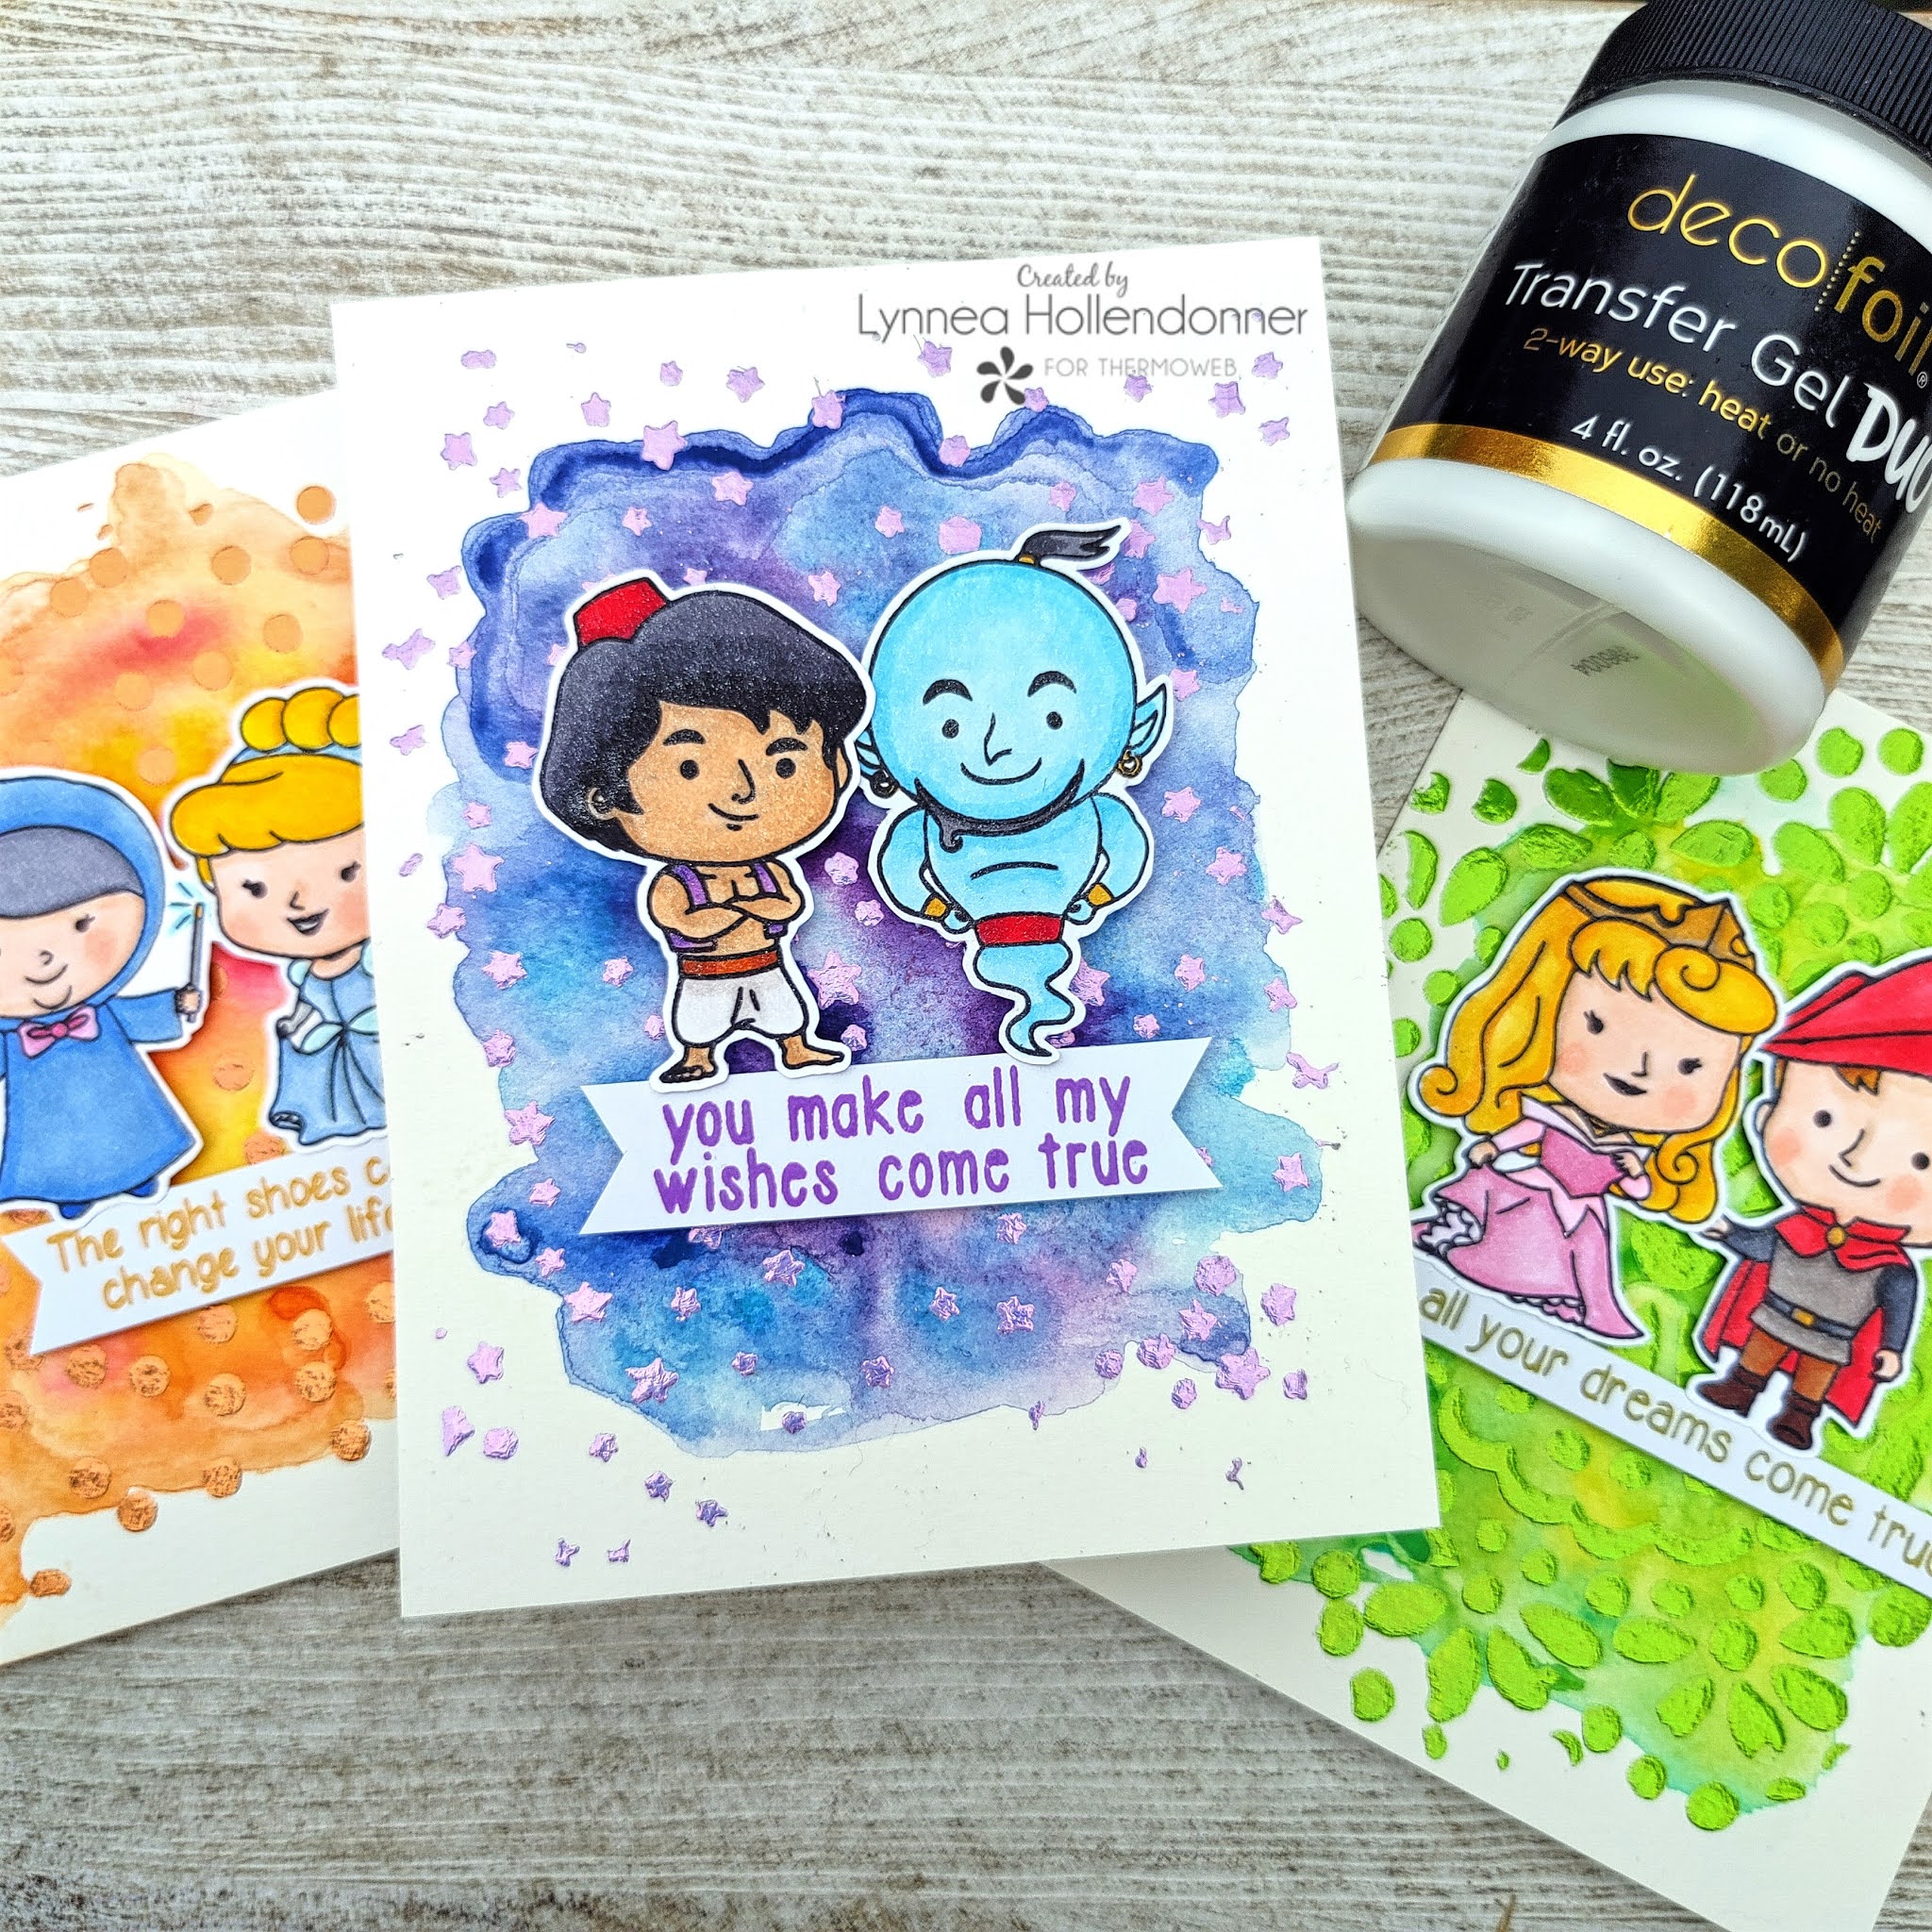
I made three cards with three different stencils and Deco Foil Transfer Gel DUO. I even color coordinated the Fairy Tale Foils to my watercolored backgrounds! These were easy to make and didn't require any heat from a laminator! Let's start!
I began by watercoloring three backgrounds that I thought would match a few colors of the Fairy Tale Deco Foil colors. My watercoloring process is simple and easy - I brushed some clean water onto my background and dropped in colors and let them blend. Each background is made up of multiple colors to give it dimension. I made three backgrounds because I had three stencils that I wanted to use - How can you possibly choose just one?! I chose the Honey Bee Stamps Twinkle, Twinkle Stencil and the Doily and Confetti Stencils from Kindred Stamps. Once my watercolored backgrounds were dry I sprayed the back of each stencil with a light application of Pixie Spray and placed a stencil onto each of my backgrounds. I used a Stencil Pal to spread a thin and even layer of Deco Foil Transfer Gel DUO over each stencil and set them aside to dry for a few hours.
You'll know the Transfer Gel DUO is dry when it is completely clear. Don't worry about it being tacky - the extra "stick" is what lets you use it with just the pressure from your die cutting machine. You can still use your laminator to apply Enamels, Foils, and Fock - but I find it VERY easy to just use my die cutting machine! I cut down a few sheets of the Fairy Tale Foils to be slightly larger than my card front and placed them pretty side UP on top of the DUO Gel. I use a piece of typing paper folded in half as a carrier sheet when putting the backgrounds through my machine. This makes it so that the cut marks from my cutting plates don't press into the foils. Another tip is to place your foil side down onto your "clean" plate. That way the cut marks don't actually come in contact with the foil! Then run the sandwich through the machine and slowly peel back the release paper - and you'll have a pretty pretty foiled background! I used three colors of Fairy Tale Foils for my backgrounds - Peach Princess, Lily Pad, and Prince Periwinkle. I thought they matched the watercolored backgrounds perfectly!
All of my images and sentiments come from some of my favorite stamp sets from Kindred Stamps! I used the Rags to Riches Stamp Set, Once Upon a Nap Stamp Set, and the Arabian Nights Stamp Set. I colored each image with Copic Markers and trimmed them out with scissors. I stamped a sentiment with a coordinating ink color to keep everything matching and added them to my cards with iCraft 3D Foam Squares. These are my favorite foam squares when I want images to really POP off the page!
I couldn't decide on just one color of the Fairy Tale Deco Foil Transfer Sheets to feature, so I used all five colors! I covered an A2 sized heavy weight piece of white cardstock with an iCraft Easy Cut Adhesive Sheet and trimmed off the excess. If you watch the video then you know this card was going in a completely different direction than the end result! Originally I thought I wanted thin rectangle frames on my card, so I die cut the adhesive covered cardstock with the Altenew Fine Frames Cover Die. This gives me a BUNCH of adhesive covered frames.
The Fine Frames Cover Die cuts two sizes of frames - one larger and one smaller. I separated the sizes and used the thicker set of frames for the Deco Foil Transfer Sheets. I started with the largest of the frames and transferred the Enchanted Rose Deco Foil onto it by removing the backing of the iCraft Easy Cut Adhesive Sheet and adding the foil "pretty side" up into the adhesive. You want the adhesive to be touching the "back" of the foil - it should be making contact with the silver side. Then I rubbed my fingers over the Enchanted Rose Transfer Sheet until the foil was completely transferred onto the adhesive covered frame. You want to make sure you don't use anything too sharp like a bone folder or your nail or you'll tarnish the foil. Then slowly peel away the Deco Foil Transfer Sheet and you'll have a pretty foiled frame! I repeated this process with the remaining frames until all 5 new colors of Fairy Tale Deco Foil Transfer Sheets were on the frames.
No remember - at this time I'm working with frames! I'll share how I got to my final design in a moment, but for now I needed to adhere my frames to my cardstock. I used iCraft Ultra Bond Liquid Adhesive and started with the largest foil covered frame and alternated foil frame, flock frame, foil frame, flock frame - you get the idea! When I had the frames adhered I realized that I really disliked how I had designed the card. So I did something shocking! I cut apart the frames so that I had 4 pieces - 2 long and 2 short. I played around quite a bit with the arrangement of my pieces before I finally settled on a design and added it to a black card with iCraft 3D Foam Squares for dimension. I added some CUTE colored images and a sentiment from the Kindred Stamps Once Upon a Nap stamp set with Gina K Designs White Foam Squares ( for just a bit of lift ) and that finishes the card!
I hope you've enjoyed this look at the new colors of Fairy Tale Deco Foil Transfer Sheets! There will be more fairy tale inspiration from the team this week so be sure to check back!