Showing posts with label Deco Foil Transfer Gel BLANCO. Show all posts

Wednesday, January 5, 2022

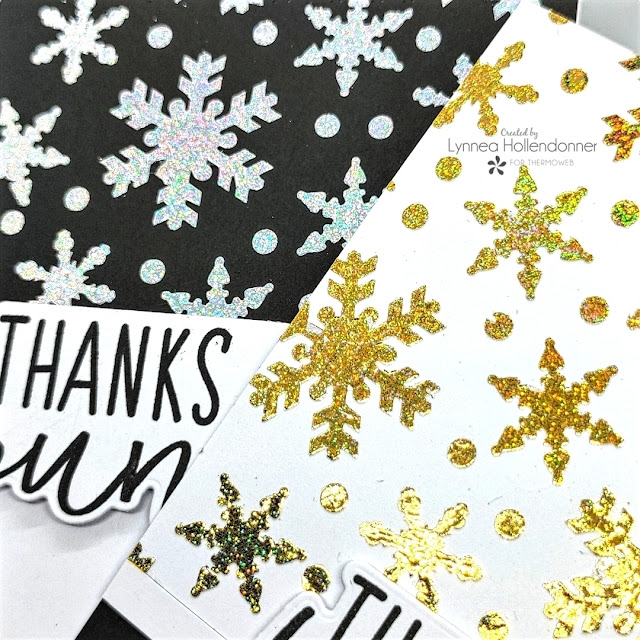
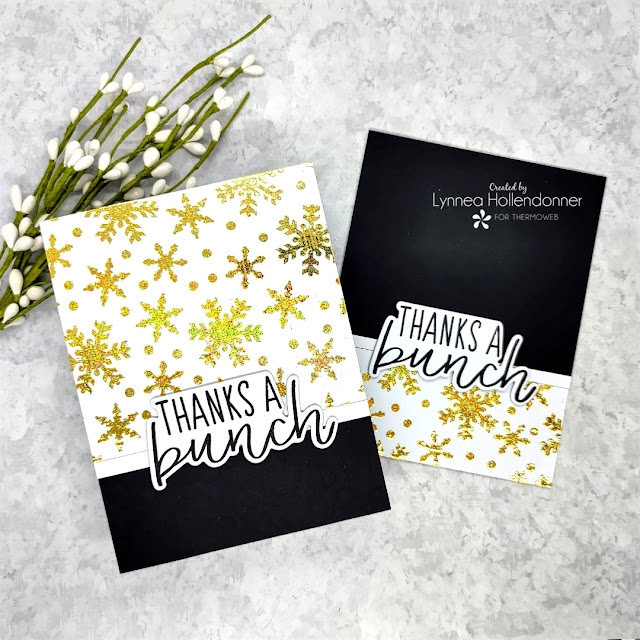
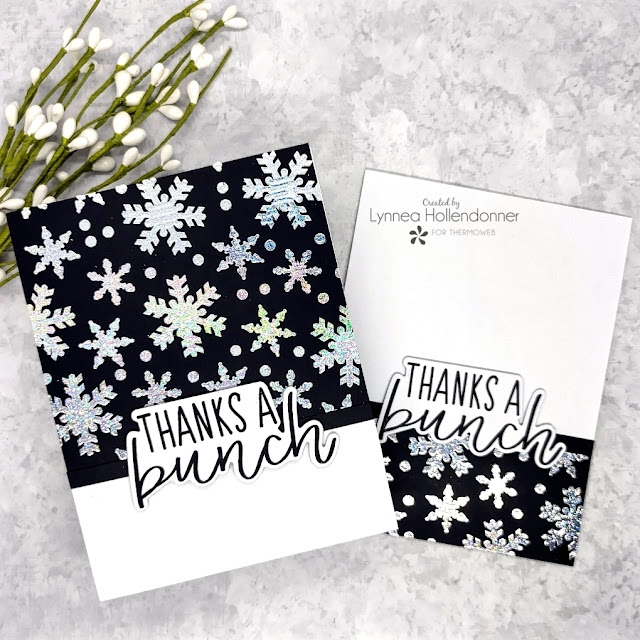
ThermOWeb Live with Lynnea | Snowflake Cards with Unity Foils

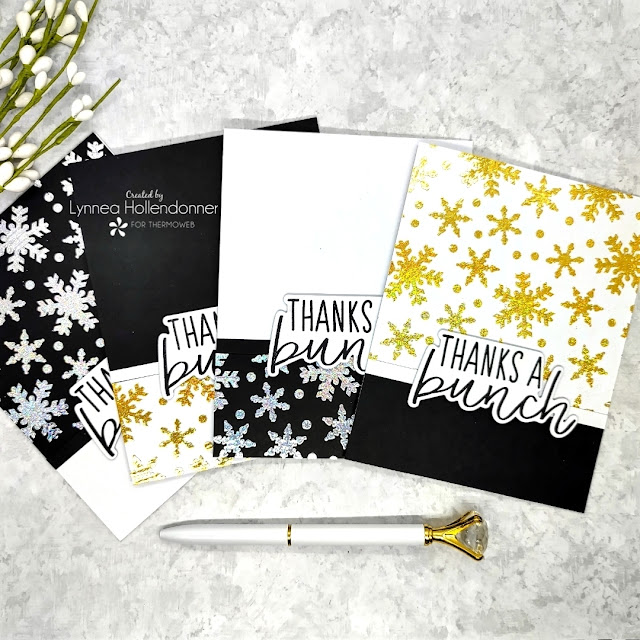
Tis the season for sending thank you cards! I have an easy way to make four foiled snowflake thank you cards! I'll share my step by step process LIVE on the ThermOWeb YouTube Channel on Wednesday the 5th at 11am CT/12pm ET! 


I like to make clean and simple cards with a punch of something special and the Unity Transfer Foils are certainly something special! I LOVE that they glitter!! 


The weeks after Christmas I am busy making and sending thank you cards, so any time I can make a two for one design I will! Cutting a panel in pieces is one of the quickest and easiest ways to make two cards from one panel. Plus it's one of my favorite designs! 


I used a snowflake stencil along with some Deco Foil Transfer Gel Blanco and created both a white and black background. I thought the Deco Foil Unity Silver Glitter Foil would really POP on black and the Gold Glitter Foil would look best on white. I didn't even have to clean my stencil in between applications - I'll show you a little trick for that in the live tutorial! 


I'll see you LIVE on the ThermOWeb YouTube Channel on Wednesday at 11am CT/12pm ET for all the glittery, foiled, snowflake, mass producing goodness! 

Friday, November 12, 2021

ThermOWeb and Ink Blot Shop Collab | Adding Foil 3 Ways

There are so many ways to add Deco Foil to your cards. I'm sharing three card backgrounds featuring easy foiling techniques as part of the ThermOWeb and Ink Blot Shop collab! 


The backgrounds of these three cards really shine! Literally! I used three different ways of adding Deco Foil to backgrounds. They're all easy!


I wanted to try a bit of masking withe the Ink Blot Shop Superhero Bursts Stencil, so I sprayed the back of the negative pieces with Pixie Spray and arranged them on my card. I sprayed the back of the Wild Hatch Herringbone Stencil and placed that onto the cardstock on top of the masking stencils and used my Stencil Pal to spread Deco Foil Transfer Gel Blanco over the stencil. I removed the masking pieces and set the panel aside to dry. Once it was dry I transferred a piece of Rainbow Shattered Glass Deco Foil to the background using Deco Foil Parchment Paper and my laminator. 


I used a Let's Get Crafty Gel Pen to outline the bursts so that they would stand out and stamped a face from the Funny Faces Stamp Set in each burst. I stamped sentiments from the Spaced Out Greetings Stamp Set around the bursts and finished off this card with some adorable googly eyes.


My second background technique ends up with two cards! Bonus! I saw the numbers background sheet from the Brutus Monroe Really Radiant Toner Card Front Mixables pack and thought it would pair perfectly with the Teacher Greetings Stamp Set from ink Blot Shop! I transferred a piece of Glass Slipper Deco Foil to the Toner Card Front with my laminator using Deco Foil Parchment Paper


I cut the Toner Card Front so that I could get two cards from one background and used my iCraft Ultra Bond Liquid Adhesive Pen to adhere a thin strip of coordinating cardstock to give the eye a "break," I stamped the sentiments using the Teacher Greetings Stamp Set as well as the Spaced Out Greetings Stamp Set. Some pearls help tie everything together! 


Ready for the last foil technique? This one lets you create a full foiled background! I trimmed a piece of a Deco Foil Toner Sheet to the size of an A2 card and transferred Magenta Deco Foil to it using my laminator. I LOVE that I can customize foiled backgrounds to any color! I stepped up the background by heat embossing the Ink Blot Shop Starry Sprinkle Background Stamp onto the foiled background, Be sure to watch my video for tips! 


When paired with my starry background I think the Scribble Circle Stamp Set looks like a fancy planet! I added my "planet" to the left side of my card with 1/16" Jumbo Foam Tape and topped off the card with a sentiment that I stamped and fussy cut from the Greetings to You Stamp Set


I hope you've enjoyed coming on this fun foiling journey with me! I'll see you again soon! 

Monday, November 8, 2021

Pink & Main | Cocoa and Cookies for Santa

One of my favorite Christmas traditions is making cookies for Santa. We always made a bunch of different kinds of cookies while we drank hot cocoa and watched Christmas movies. I combined some stamp sets from Pink & Main to make the perfect Santa cookies card! 


I am a firm believer that all Holiday cards should sparkle! I started my card with a piece of black glitter paper from the Metallics Glitter paper Pack and used Deco Foil Transfer Gel Blanco over the Blizzard Stencil to create some bright white snowflakes against the black glitter. The background is just striking! 


I love how well different stamp sets from Pink & Main work together. I stamped the snowflake cookie from the Christmas Cookies Stamp Set (my favorite stamp set from last year) and the Santa mug from The Mugs and Kisses Stamp Set (my favorite from this year!). I also stamped some whipped cream and a candy cane stick and colored all the images with Copics and then die cut them with the coordinating Christmas Cookies and Mugs and Kisses Die Sets


I trimmed down my background panel and added it onto a white A2 card base with foam for dimension and finished off the card with a sentiment strip from the Mugs and Kisses Stamp Set. I hope this card brings you some Santa cookie nostalgia!

Monday, September 20, 2021

Miss Ink Stamps | Bugs and Kisses Sneak Peek

Let's sneak a peek at the new Bugs & Kisses Stamp Set from Miss Ink Stamps! Creepy crawlies are my thing and mixing them with lovely foiling makes it even better! 


I stamped the beetles from the Bugs and Kisses Stamp Set onto a piece of white cardstock and used a stitched die to cut out the panel and colored them with Copic Markers. 


I love beetles and think they are truly gorgeous. I wanted to create a shiny background to mimic their shiny coverings, so I added Deco Foil Transfer Gel Blanco over the Wonky Checker Stencil and let it dry. Once it was dry I used my laminator to transfer Brutus Monroe Rainglow Foil over the stencil. I LOVE the effect! 


I stamped a sentiment from the Bugs and Kisses Stamp Set and created a drop shadow with a piece of black cardstock. I used foam to mount all of my pieces onto my background. 


I hope you've enjoyed this quick peek at the new Bugs and Kisses Stamp Set! Visit the Miss Ink Stamps store tomorrow for the full release! 

Friday, July 23, 2021

ThermOWeb and Heffy Doodle Collaboration

Are you ready for a ThermOWeb and Heffy Doodle collaboration?! All the cuteness is coming your way! I made a couple of foiled cards with the most adorable images! 


Heffy Doodle has the cutest images! I couldn't pick just one stamp and stencil to work with, so I made two cards! Add a bit of foiling and these cards really shine! 


Both of these cards were easy to make and came together quickly! Just a bit of stenciling, coloring, and die cutting! 


I sprayed the back of the Lots of Happy Stencil with Pixie Spray and temporarily adhered it to a piece of white cardstock. I used a Stencil Pal and spread an even layer of Deco Foil Transfer Gel Blanco over the stencil and set the piece aside to dry for a couple of hours. You'll know the panel is dry when the back of the cardstock no longer feels cool to the touch. Once it was completely dry I cut a piece of Glimmering Gold Gina K Designs Fancy Foil slightly larger than the stenciled panel and placed it pretty side up onto the panel. I used a piece of Deco Foil Parchment Paper and ran it through my laminator. I LOVE the results! Such a happy background! Haha! 


I stamped a few images from the Hello Squeakheart Stamp Set and colored them with Copic Markers than used the coordinating Hello Squeakheart Die Set to cut them out. There are so many adorable sentiments in the Hello Squeakheart Stamp Set, but I wanted to make this birthday card a bit brighter and happier, so I die cut the Yay Heffy Cuts Die from Poppin' Pink Neon Flock Transfer Sheets. I used the same die to cut the word four more times from white cardstock and glued them all together using an iCraft Ultra Bond Liquid Adhesive Pen


I added the images to the front of the foiled panel with iCraft 3D Foam Squares and the sentiment with an iCraft Ultra Bond Liquid Adhesive Pen and that finishes card number one! 


My second card is made much like my first, but I added some extra ink blending to fill in the background. I sprayed the back of the Messy Desk Stencil with Pixie Spray and used Purple Tape to mask off the areas of the stencil I didn't want to add to the card. I used a Stencil Pal to spread Deco Foil Transfer Gel Blanco over the stencil and allowed it to dry. Once it was dry I trimmed down a piece of Rainbow Shattered Glass Deco Foil and placed it pretty side up over the stenciled portion and ran it through my laminator with a piece of Deco Foil Parchment Paper as a carrier. 


I thought the background was a little empty, so I added the Confetti Hearts Stencil over the panel and held it in place with Purple Tape. I blended a light teal ink and then rotated the stencil and blended light pink ink so I had two colors of hearts in the background. I stamped and colored some sweet images from the Treat Yo' Self Stamp Set and then die cut them with the coordinating Treat Yo' Self Die Set.


I used the Hello Heffy Cuts Die to cut a piece of Sunshine Yellow Deco Foil Flock and stacked it on top of four white cardstock die cuts. I added everything to my stenciled background with iCraft 3D Foam Squares and an iCraft Ultra Bond Liquid Adhesive Pen


I hope you love these bright and happy cards as much as I do! I loved mixing up ThermOWeb and Heffy Doodle products for this collaboration! See you soon! 

Tuesday, June 29, 2021

ThermOWeb and Miss Ink Stamps Collaboration Instagram Hop

We are hopping over on Instagram today to celebrate the ThermOWeb and Miss Ink Stamps collaboration! I have had the Opal Deco Foil in my stash for a long time and never used them! Gasp! I remedied that today and paired it with the Pick a Card Stencil from Miss Ink Stamps


I used Deco Foil Transfer Gel Blanco over the Pick a Card Stencil and let it dry then ran it through my laminator with a piece of Opal Deco Foil. I LOVE the gorgeousness! 


I stamped a couple of images from the Miss Ink Stamps Queen of Hearts Stamp Set and the Painting the Roses Stamp Set and colored them with Copic Markers. 


I used iCraft Foam Tape to adhere my images and a sentiment onto the stenciled and foiled background.


Thanks for stopping by! Head over to Instagram for the hop and your chance to win prizes! 

Monday, June 28, 2021

Miss Ink Stamps and ThermOWeb Collaboration

Hello, hello! How exciting that two of my favorite companies are collaborating! I'm showing how to use your Miss Ink Stamps Dazzle Dust and ThermOWeb Deco Foil Transfer Gel Blanco in a new way!


I am always looking for fun ways to use my products and today I thought I would try creating a customized glittered background! I stenciled Deco Foil Transfer Gel Blanco over the Medium Polka Dot Stencil. Before the Blanco Gel could dry I sprinkled one some Ocean Waves Dazzle Dust onto the bottom portion of my stenciled design then set the panel aside to dry. 


While my panel was drying I stamped and colored the flower from the Gardenia Stamp Set with Copic Markers and cut it out with scissors. 


I added the flower to the Dazzle Dust background with iCraft 3D Foam Squares and decided to add a bit more texture with a die cut sentiment. I cut the word "thanks" from Blue Diamond Deco Foil Flock and added it to my card.


A big thanks to ThermOWeb for collaborating with us this week! Want to win a few prizes? Remember to leave comments on each collaboration blog post on both the Miss Ink Stamps and ThermOWeb blogs this week! 

Wednesday, June 16, 2021

Simon Hurley create. | Rainglow Foiled Geometry Stencil

Oh how I love geometric patterns! And foiling! And birthdays! I've foiled the Geometry Stencil from Simon Hurley create. to make this bright birthday card! 


I sprayed the back of the Geometry Stencil with Pixie Spray and adhered it to a white piece of cardstock. I spread Deco Foil Transfer Gel Blanco over the stencil and let it dry. Once the gel was dry I heated up my laminator and foiled the background with Brutus Monroe Rainglow Foil


I stamped the cupcake and present from the Cake Walk Stamp Set and colored them with Copic Markers. I stamped a sentiment and trimmed out all three pieces with my scissors and added them to the center of my card with foam squares. 


I hope this card makes you smile! See you soon! 

ThermOWeb | Neon Enamel Beach Scene

Every beach needs a pop of neon, right?! I used Neon Enamel Transfer Sheets from Rina K Designs to give my beach scene a bit of neon shine! 


I wanted to make a fun beach "scene" that didn't take a lot of effort. I am all about simple and easy cards with a bit of flair! I sprayed the back of the Ocean Waves Stencil from LDRS Creative with Pixie Spray and adhered it towards the bottom of an A2 card panel. I used a bit of Purple Tape to mask off the top portion of my cardstock because I tend to get a bit messy! I used a Stencil Pal to spread some Deco Foil Transfer Gel Blanco over the stencil and set the panel aside to dry. 


Once the Deco Foil Transfer Gel Blanco was dry I decided to make my beachy waves bright pink for a fun pop of color! I trimmed a piece of Rina K Designs Poppin' Pink Neon Enamel to be slightly larger than my card front and placed it shiny side up over the Transfer Gel Blanco and ran it through my laminator. I can't get enough of the hard candy coating look! To finish setting the scene I used a variety of Rina K Designs Electro-Pop Inks and the LDRS Creative Rainy Day Stencil along with the Simon Hurley create. Scene Maker Stencil


I needed some cute images to finish off my card, so I stamped and colored the sloth from the Pink & Main Summer Sloths Stamp Set and the tree from the Beach Unicorn Stamp Set. I cut them out with the coordinating dies and used the iCraft Ultra Bond Liquid Adhesive Pen and iCraft 3D White Foam Squares to pop them onto my card. 


I finished off the card by stamping a sentiment with Rina K Designs Poppin' Pink Electro-Pop Ink to match my waves. I hope this brightens your day!

Wednesday, June 9, 2021

Simon Hurley create. | Neon Enamel Rain Drops

It's raining NEON!! I used the Simon Hurley create. Looks Like Rain Stencil and Neon Enamel Transfer Sheets for a rainy, but BRIGHT, card! 


I used Deco Foil Transfer Gel Blanco over the Looks Like Rain Stencil and then used my laminator to transfer Hello Yellow Neon Enamel onto the design. I LOVE the pop of shiny, neon rain!


I stamped a few images from the Puddle Pals Stamp Set and colored them with Copic Markers and trimmed them out with scissors and added them to my card with foam tape. 


I hope you enjoyed this card tutorial! See you soon! 

Friday, March 5, 2021

Miss Ink Stamps | Latte Love Foiled Background

A new stencil release from Miss Ink Stamps just hit the shop and the Latte Love Stencil was just BEGGING to be foiled! 


I can't get over this background! The Latte Love Stencil is one of my favorites from the new stencil release! It's such a pretty pattern! 


I sprayed the back of the Latte Love Stencil with Pixie Spray and temporarily adhered it to a piece of black cardstock. I used a Stencil Pal to add an even layer of Deco Foil Transfer Gel Blanco over my stencil and then set my background to the side to dry for a couple of hours. 


I knew that I wouldn't want to cover up a lot of the background, so I chose some of my favorite images from the Alice Stamp Set to go along with a sentiment from the Wonderland Wisdom Stamp Set. I stamped my images, colored them with Copic markers, added white gel pen highlights, and trimmed them out with scissors. 


Once my background was dry I cut down a piece of Iridescent Deco Foil to be slightly larger than my stenciled background and placed it pretty side up onto my card front. I used Deco Foil Parchment Paper as my carrier sheet to send the background through a hot laminator and just LOOK at the results! Oh I can't even say how much I love this background! 


I hope you love this foiled Latte Love background! There are SEVEN new stencils to see in the Miss Ink Stamps Shop! AND!! For a limited time you'll receive the Pocket Full of Posies Stencil for free with a $50 purchase (no code necessary!), so shop quick!