
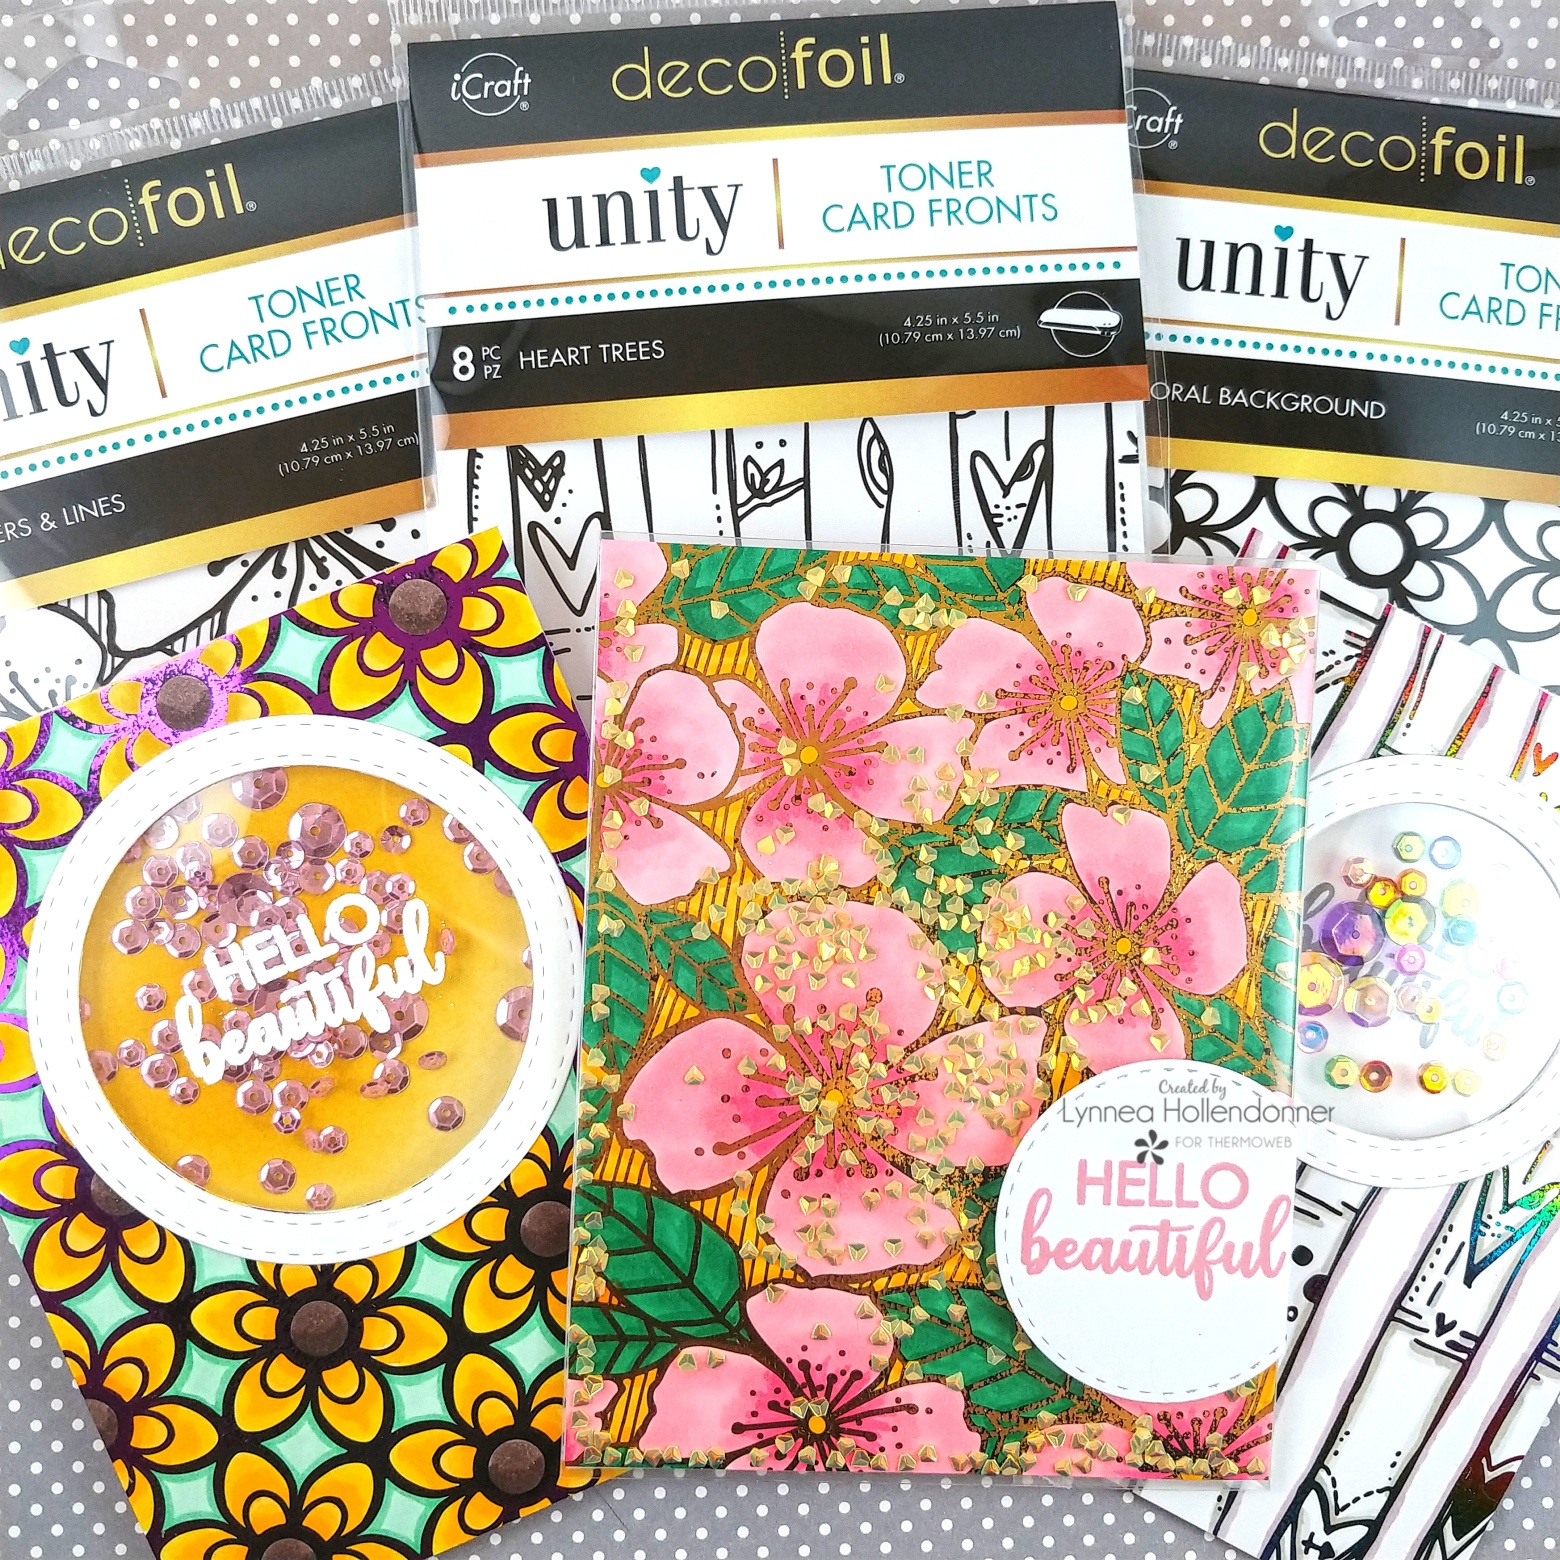
Be sure to watch the above video to see how to put together each of the three different styles of shakers! It's easier to show you how to create them rather than tell you haha! But I'm going to do my absolute best! There are six patterns of Toner Card Fronts and I've already used three of them, so it was easy to decide which patterns to use today! I just love each of the patterns and I can't pick a favorite! Last time I added ink and then foiled, so this time I decided to add foil first and then color so that I could show you that it doesn't really matter. You get great results either way! I cut pieces of Deco Foil Transfer Sheets to be slightly larger than the Toner Card Fronts and ran them through my laminator on the 5 mil setting with a parchment paper carrier sheet. I used Purple Deco Foil for the Floral Background Toner Card Front, Gold Deco Foil for the Flowers and Lines, and Rainbow Deco Foil for the Heart Trees Toner Card Front. Then I colored each of the Unity Toner Card Fronts with Copic Markers. Sometimes I even oopsed and accidentally colored over the foil and it didn't change the foil. It was like magic!

Once all three of my Unity Toner Card Fronts were foiled I started making my three shaker cards. Let's start with the easiest and most common. I call it ... wait for it ... a standard shaker card! Shocking, I know! I die cut a circle from the top center of the Floral Background Toner Card Front and used Gina K Designs 1/4" Terrific Tape to adhere a piece of heat resistant acetate to the back of the card front. Before I built the shaker card I stamped a sentiment from the Rina K Designs Sending Sunshine stamp set with Versamark Ink onto the acetate window and heat embossed it with white powder. I used Gina K Designs White Foam Tape to create a shaker well at the back of the Unity Toner Card Front. I made sure to create a circle with the foam tape around the die cut circle window and then added more for stability. I filled up the shaker well with pink/purple colored sequins and added it to a card front with a bit of yellow ink blending for an additional splash of yellow.

My second style of shaker card is similar, but a bit more complicated. And it's flat, so it goes through the mail easily. I call it a flat see through shaker card! I die cut a small circle from the front of the Heart Trees Toner Card Front and before I did anything else I temporarily adhered the Toner Card Front to a card base with 1/4" Purple Tape and added the circle die back in place (like a puzzle piece), opened the card, and ran it through my die cutting machine again. Now I have a die cut circle in the exact same place on the Heart Trees card front and my card base.

I used 1/4" Gina K Designs Terrific Tape to adhere a piece of acetate to the back of the Heart Trees card front just like you would for a standard shaker card. This time instead of adding foam tape I added more Terrific Tape and added some rainbow sequins directly onto the acetate and then took a second piece of acetate and sandwiched the sequins between the two acetate pieces. Because I used Terrific Tape and not foam tape the sequins don't move around a lot. They're kind of like bubbles! I used more Terrific Tape and adhered the Unity Card Front onto the card base lining up the die cut circles. I stamped a sentiment from the Rina K Designs Sending Sunshine stamp set on the inside of my card base so that it peeks through to the outside of the card. You can see the sentiment through the flat shaker window from the outside if you peek through the sequin bubbles! And that's my second shaker - A flat see through shaker card!

My last style of shaker card is the one I'm currently obsessed with! A full panel shaker card! It's so easy and another style of flat shaker so it's just all around perfect! I used the Flowers and Lines Unity Toner Card Front for this card because it was one that once it was colored I couldn't imagine cutting it down! I used a stamp pocket - you know the things that are so popular for storing 4x6 stamp sets - but you could just use a large piece of acetate or packaging and wrap it around the card front instead. I like the stamp pockets because they are perfectly sized. I just slipped the entire card front into the pocket and it fits like a glove! I trimmed off the excess so that only an inch and a half or so of the stamp pocket hung off the side and dumped some gems inside. I flipped the pocket over and used 1/4" Gina K Designs Terrific Tape on the back of the pocket flap and folded the excess over and adhered it to the back of the card front. This seals up the full panel shaker!

I used more Gina K Designs Terrific Tape to adhere the panel to a card front, added a stamped sentiment, and that's it! It was so difficult to photograph this particular shaker because of the glare from the pocket, foil, and gems - but really there is SO MUCH sparkle and shine! And the gems move around so freely, but it's still flat! The Deco Foil Unity Toner Card Fronts add even more shine to a shaker card. I hope these three styles of shaker cards inspire you and that you'll find a new way to shake, shake, shake your cards!
No comments:
Post a Comment