Monday, November 30, 2020

Pink & Main | Simple Birthday Card

I'm all about sharing ways to get more use out of your crafty goodies! I used the My Vote Stamp Set from Pink & Main to make an easy birthday card!  


Let's start with those happy balloons! They're from the My Vote Stamp Set and they're the star of the show! There are a couple of images in the My Vote Stamp Set that can be used for more than just political cards, but I just love these balloons! I stamped the balloon image three times and colored them then cut them with the My Vote Dies


I chose a piece of patterned paper from the Thankful 6x6 Paper Pack and die cut it with the largest die in the Stitched Rectangles 1 Die Set. I stamped a cute and chunky sentiment from the Spotlight Sayings Stamp Set on the right side of the card with black ink. 


I added the balloons with foam tape and the strings flat onto the card so that the balloons would pop off the card a bit. I finished the card with a sprinkling of Falling for You Glitter Enamel Dots. There you go! A quick and easy birthday card with the My Vote Stamp Set! See you soon! 

Saturday, November 28, 2020

InkOn3 | Ink Smooshing with Atelier Inks

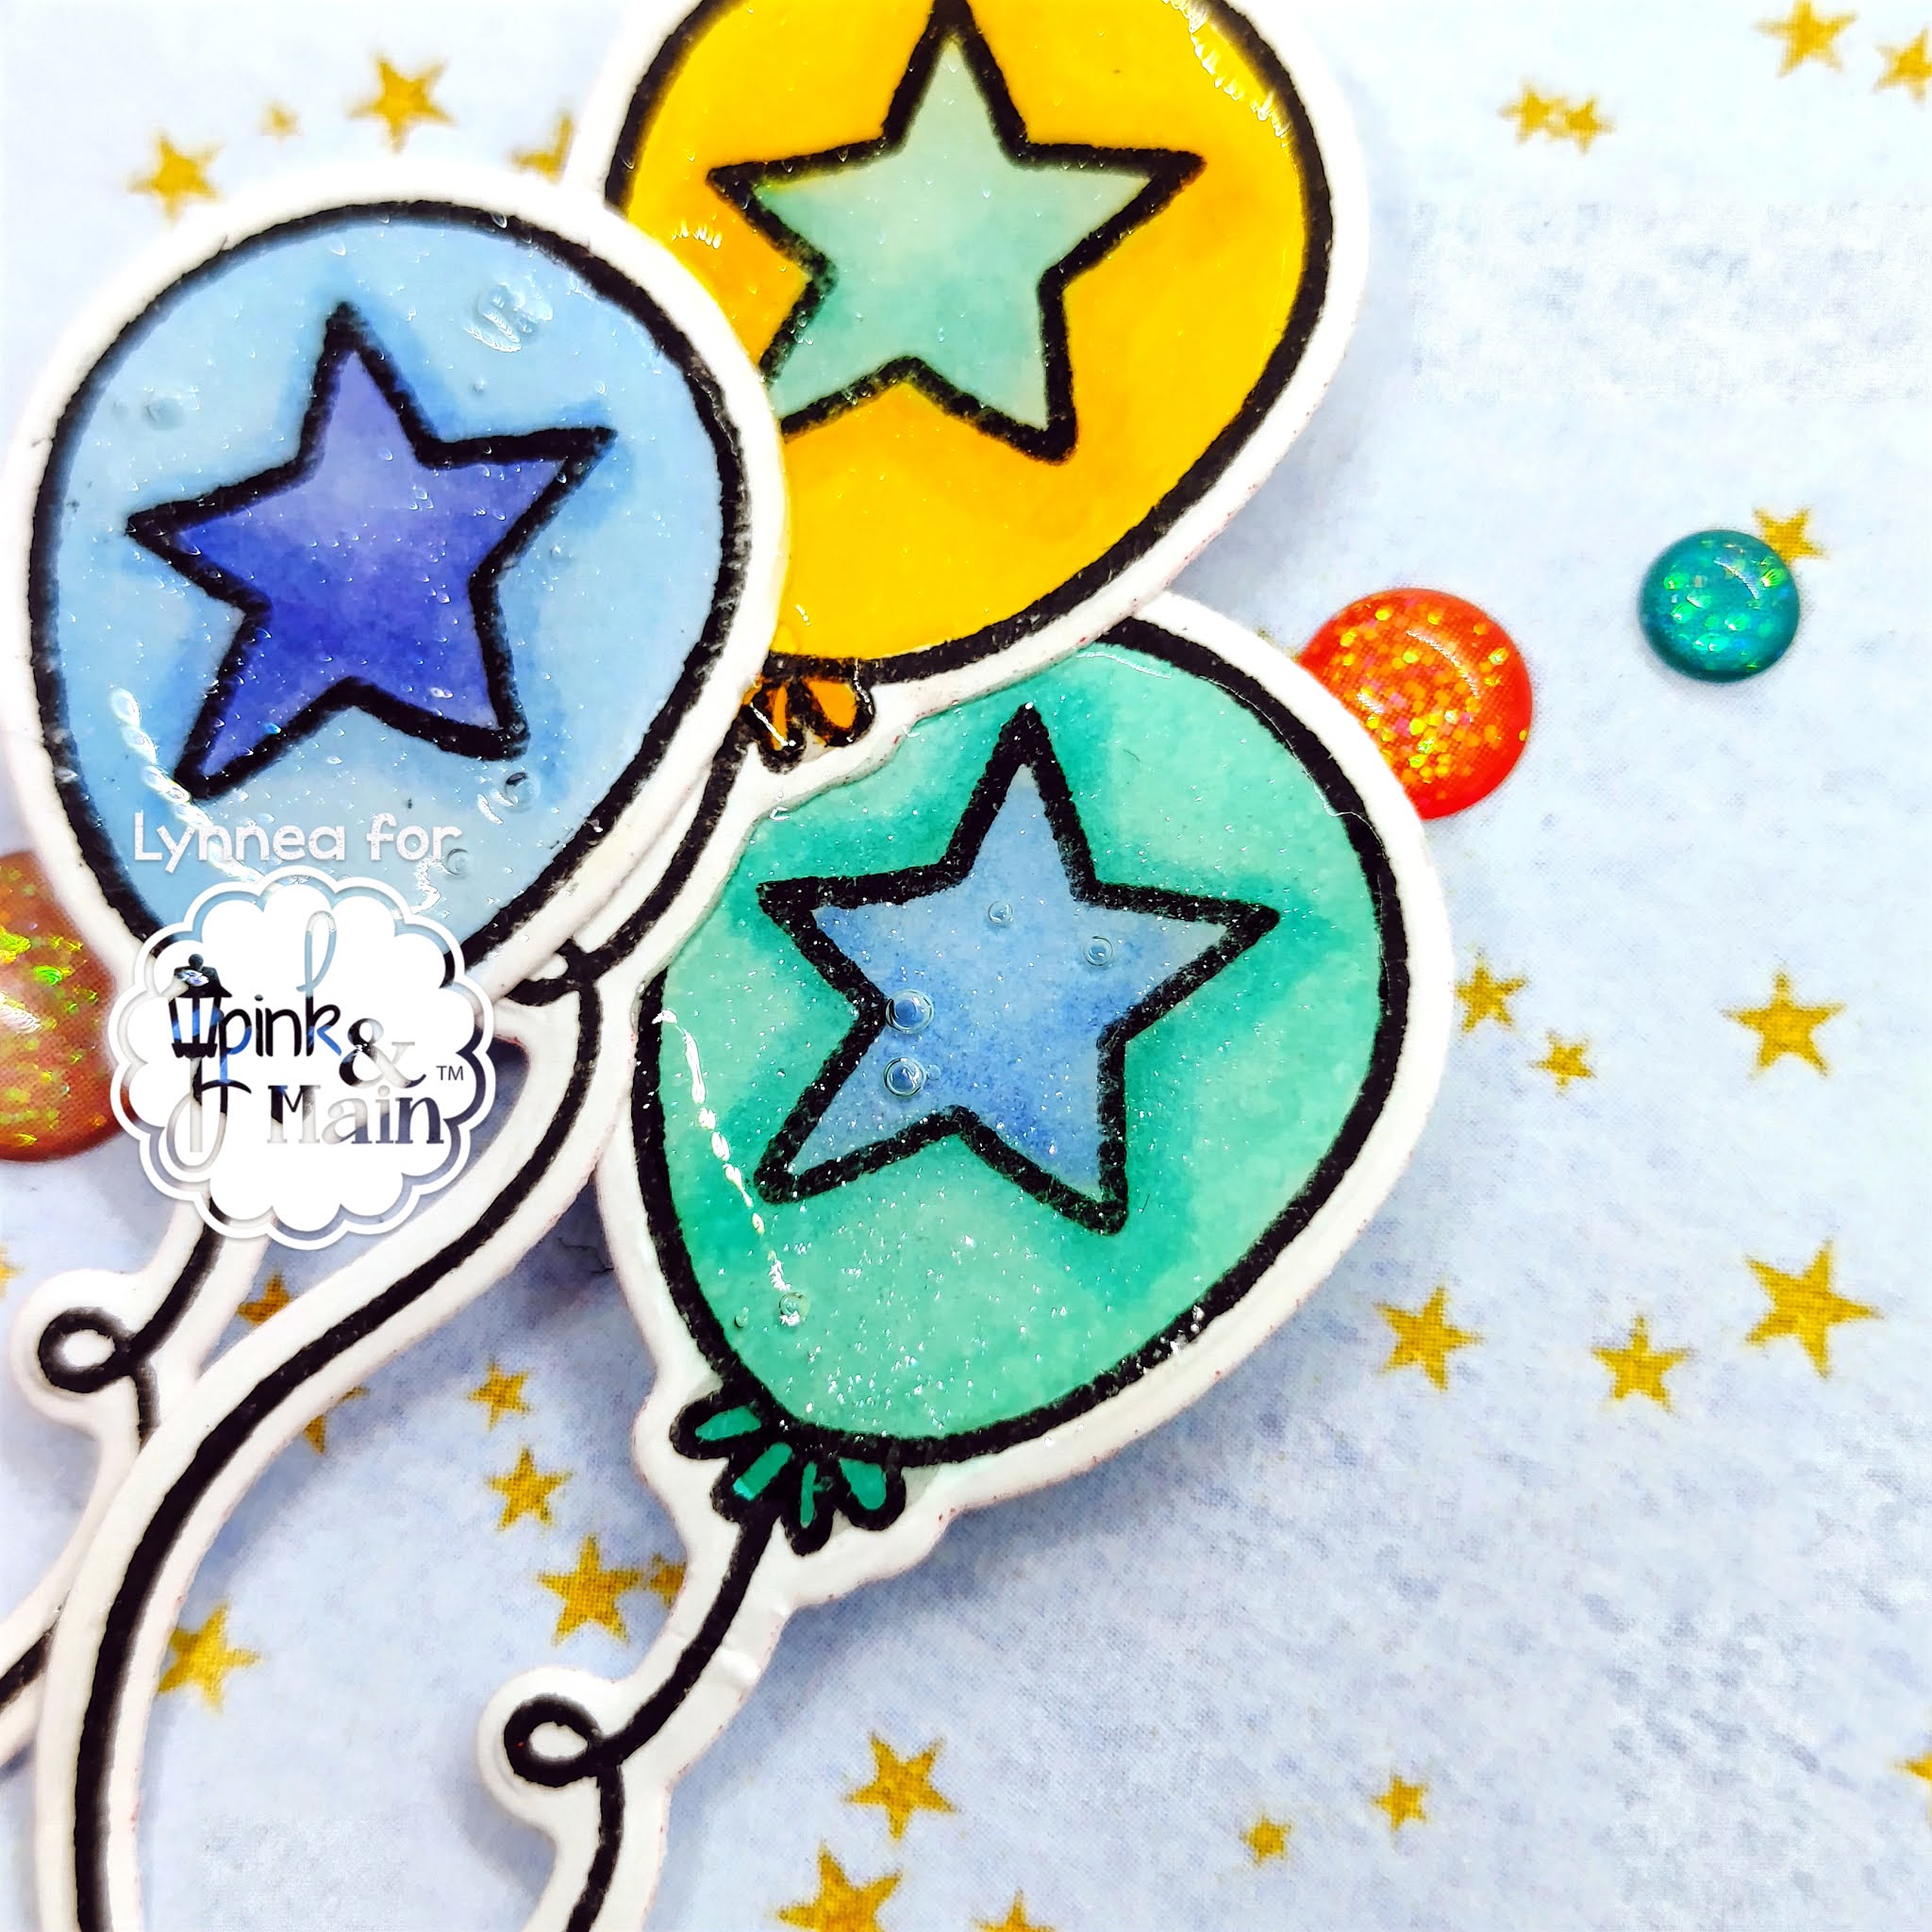
Can't stop won't stop with the rainbow Christmas cards! I used some Atelier Inks from InkOn3 to create a smooshy rainbow background for this punny card! 


I would like to start an official petition to bring back ink smooshing! Haha! It's one of my favorite techniques. It's effortless and easy to blend colors for an organic looking background. I pressed some Bee Sting Atelier Ink onto my work surface. I use a glass mat, but a piece of plastic packaging would work, too! I sprayed the ink once or twice with water and then used an old stamp pocket ( again, a piece of plastic would work just fine! ) and picked up some of the ink and pressed it onto a piece of watercolor cardstock. I repeated the process with Trinity Teal Atelier Ink and Sweet Petunia Atelier Ink, The colors mixed together giving me a rainbow background! 


I added a spritz of water to a drop of Shark Tooth White Atelier Re-Inker and used a paint brush to spatter some paint onto my background. I used Blackout Hybrid Detail Ink to stamp the adorable images and color them with Copic Markers. I trimmed out the images and added them to the smooshy background with foam tape. 


I wanted this card to shimmer and shine, so I added a good and healthy coat of Liquid Pixie Dust to the peas and the earth. That's all! I hope you try this smooshing tutorial! 

Friday, November 27, 2020

Sum More Fun Holiday Glow | Three Vintage No Coloring Classic Christmas Cards

Hello, there! The Holiday Glow Pack has just been released from SumMoreFun! As always, this is a limited edition pack, so grab it while you can! I made a quick video showing you three easy ways to create classic Christmas cards with no coloring! 


Here are some quick details about the Holiday Glow Pack - you're going to get 3 stamp sets, 6 card bases and 6 envelopes, and five 6x6 patterned papers, as well as five slimline patterned papers. Can I just say how much I love these three stamp sets?! They have "built in shading," which is PERFECT for me - I hate to color! 


Just look at this adorable snow man! Ughhhhh I love him! So much that I needed to make a whole background with him! I stamped in white pigment ink and smudged it a bit with my fingers to soften the look. 


I just had to mix together a couple of stamp sets to create this card! I love this large window and I thought it would be cute to create a simple Christmas Eve scene. 


My last card is fun sized! Right in between a slimline and A2 - this card is 3.5 x 8.5 and the lamppost fits perfectly! 


I hope you've enjoyed this quick video! Remember there are only THIRTY of these Holiday Glow Packs available, so shop quick! 

LDRS Creative Feature Day 2 | Slim Line Droplet Pocket Shaker Card

I have more wintery LDRS Creative inspiration to share today! I used the brand new Slim Line Droplet Pocket Die Set to make a Holiday shaker card!


The new Slim Line Pocket Dies are absolutely AMAZING! I love that they come in two pieces so you can use them together or each one individually! I used both of the Slim Line Droplet Pocket Dies together so that I could made a fun die cut window for a shaker card. 


I sprayed the die cut piece with ThermOWeb Silver Glitter Dust Spray to bring a little extra sparkle to my shaker window.


I stamped Winnie from the Polkadoodles Snowdrifts Winnie Stamp Set with Raven Ink, colored her, and cut her out and added her to the front of the card. I also added a sentiment from the Christmas Wishes Sentiment Stack


You can be sure I will be playing with the LDRS Creative Slim Line Pocket Dies more in the future! Keep an eye out!

Whimsy Stamps Friday Frenzy | Fairy Sweet Rainbow Christmas Card

Hi, hi! It's Friday Frenzy at Whimsy Stamps again! My last one for November - and wow that's scary! I have a non-traditional Christmas card to share today. Rainbows are never out of season, right!


I stamped the Fairy Sweet Rubber Stamp and colored her with Copics. I colored her to match the colors in the Rainbow 6x6 Paper Pack and trimmed down one of my favorite patterns to be the background. I stamped a sentiment from the You're My Jolly Stamp Set at the bottom of the image to finish the card. 


Thanks for stopping by! 

Thursday, November 26, 2020

LDRS Creative November Feature Day 1 | Winter Night Sky Ink Blending

Get ready for some wintery inspiration from LDRS Creative! I have a new video today showing an emboss resist ink blended night scene using old and new products.


I stamped the Pine Tree Forest onto a piece of white cardstock with Watermark Emboss Ink and heat embossed it with White Embossing Powder. I used some masking tape to mask off the bottom of the card and blended on a gradient of LDRS Creative Hybrid Inks. Then I moved the tape up and blended Raven Hybrid Ink onto the bottom. I flicked white and shimmer paints onto the sky for a bit of snow. 


I stamped out some images from the City Streets and City Sidewalks Stamp Sets, colored them with Copic markers, and cut them out with the coordinating City Streets and City Sidewalks Die Sets. While I had my die cutting machine out I used the smallest die in the new new A2 Stitched Layered Card Toppers Die Set to cut my ink blended panel and the second largest die to cut a piece of patterned paper from the Lovebirds 6x6 Paper Pack


I hope you enjoy this wintery scene card! Come back tomorrow for another LDRS Creative winter card! 

Monday, November 23, 2020

Pink & Main | Shimmery Slimline Thank You Card

EVERYBODY GET EXCITED! A new release from Pink & Main hits the shop tomorrow and I have a peek at some of my favorite products in the release! 


This slimline card features two new stamp sets and one new die from Pink & Main! I love that their products mix and match together so well! I started my card by die cutting the new Sunburst Slimline Die from white cardstock. This die cuts out the inner pieces with a stitched edge, but I decided not to inlay them into my design. I wanted a peek through design instead - but nothing too busy. I wanted all the focus on the foreground. But every background needs a bit of something, right? I took a black piece of cardstock and sprayed it with a glitter spray to give it a bit of a sheet, but nothing too distracting. Then I glued the Sunburst Slimline Die Cut on top. 


The Tall Flowers Stamp Set has three different tall flower clusters to choose from. I picked my favorite and stamped and clear embossed the image onto watercolor cardstock then cut it out with the coordinating die. I used my favorite shimmer watercolors to color in the image. Now I have three elements of shine on my card - the background, the heat embossing, and the shimmer watercolors! It's the little details that make me so happy! 


My sentiment comes from the new Slimline Sayings 1 Stamp Set. There are a bunch of what I call "thick and chunky" sentiments in this stamp set. This particular sentiment actually reads "many thanks", but I didn't want the "many" on my card. I stamped the sentiment and then used my scissors to bubble cut around the sentiment and simply cut off the portion of the sentiment I didn't need. 


Remember to visit the Pink & Main shop tomorrow morning when these products and more will be released! See you then! 

Sunday, November 22, 2020

i-crafter | Simple Holiday Gift Card Envelope

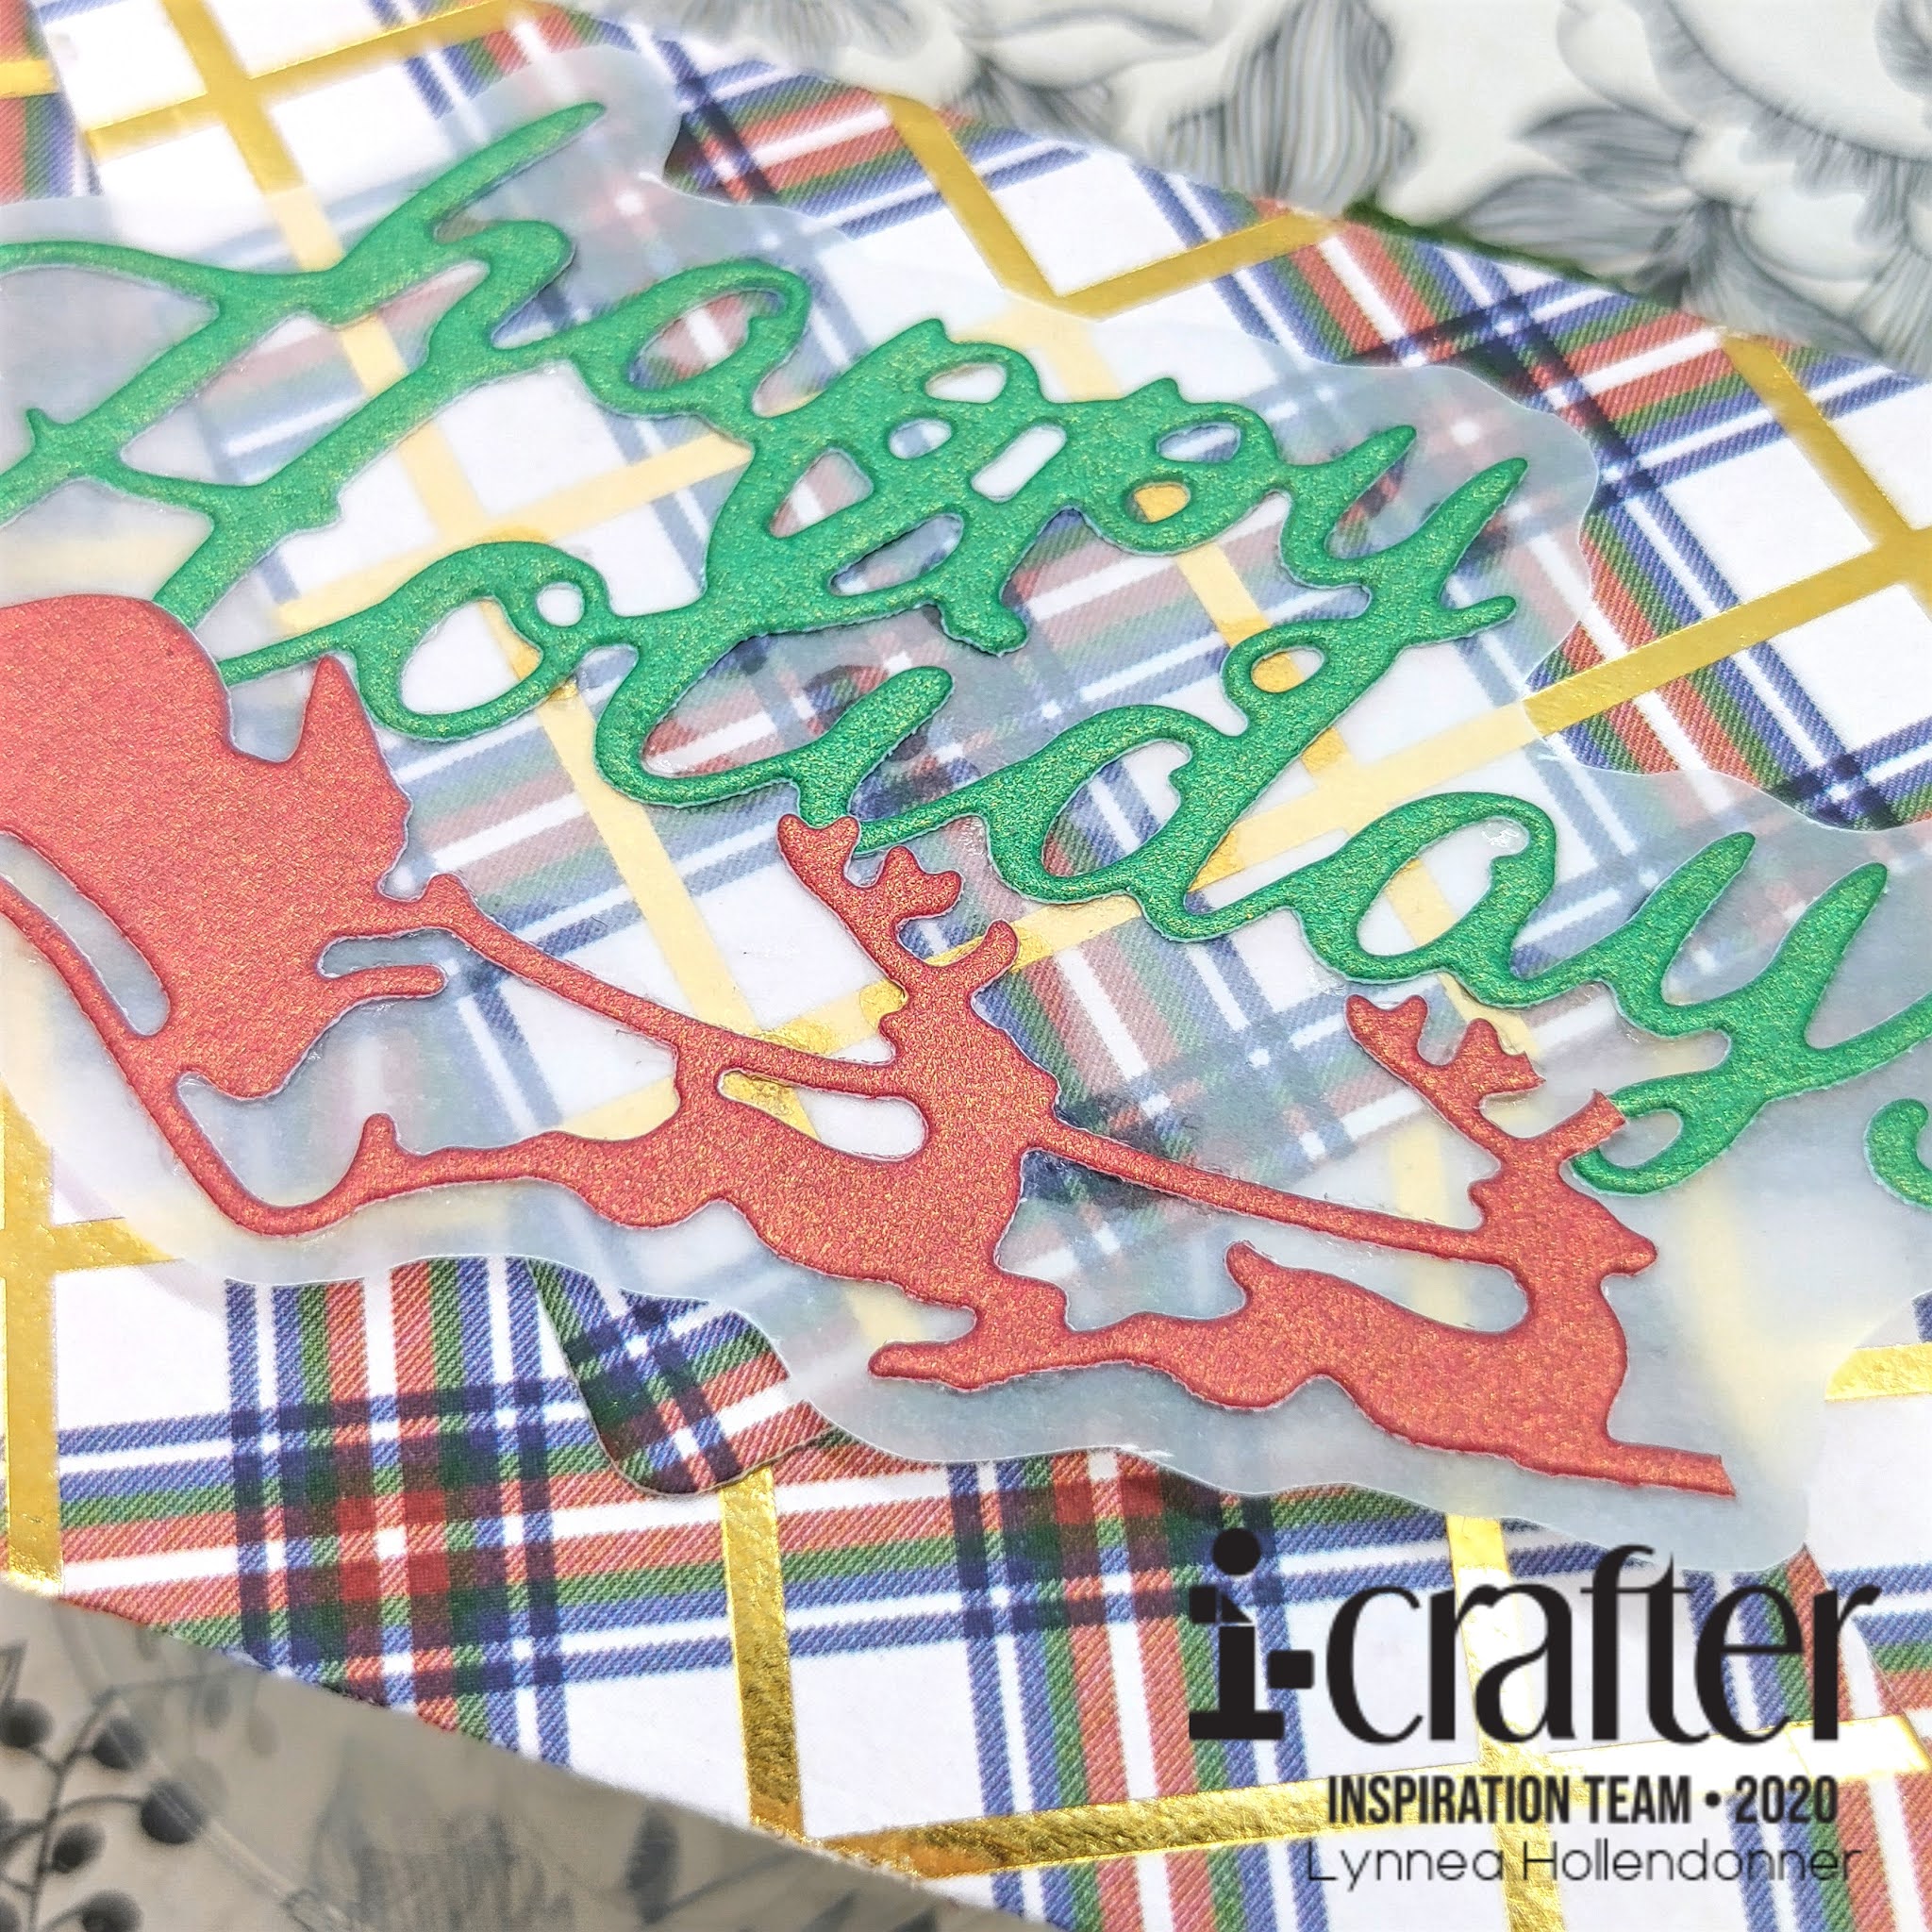
 I don't know about you, but I'm a terrible gift giver. Absolutely terrible! Gift cards are my go-to gifts during the Holidays, so I went back to some older i-crafter products to make a cute and simple gift card envelope! 


I used the Animalopes Die Set released at the beginning of this year to create my gift card envelope. The Animalopes Die Set can create a BUNCH of cute little animal envelopes - but the main die that cuts the mini envelope can be used for more than just cute critters! It's perfectly sized for gift cards or even little notes! I die cut the envelope and flap from a piece of plaid patterned paper, folded up the envelope, and glued the flaps down. It took me about a minute from start to finish! 


I wanted to keep the gift card envelope simple, but give it a punch of classic Christmas. I used the Tunnel Card Santa Add-On Die Set to cut the sentiment from green shimmer cardstock and Santa and his reindeer from red shimmer cardstock. I thought they got a bit lost against the plaid, so I glued them to a piece of vellum and used my scissors to "bubble cut" around the elements. 


You guys! I can't stress enough how SIMPLE this was to create! And I love that I can mix up my patterned paper to match the style of the gift card recipient! Thanks so much for stopping by! 

Friday, November 20, 2020

Miss Ink Stamps | HollyJolly Sneak Peek

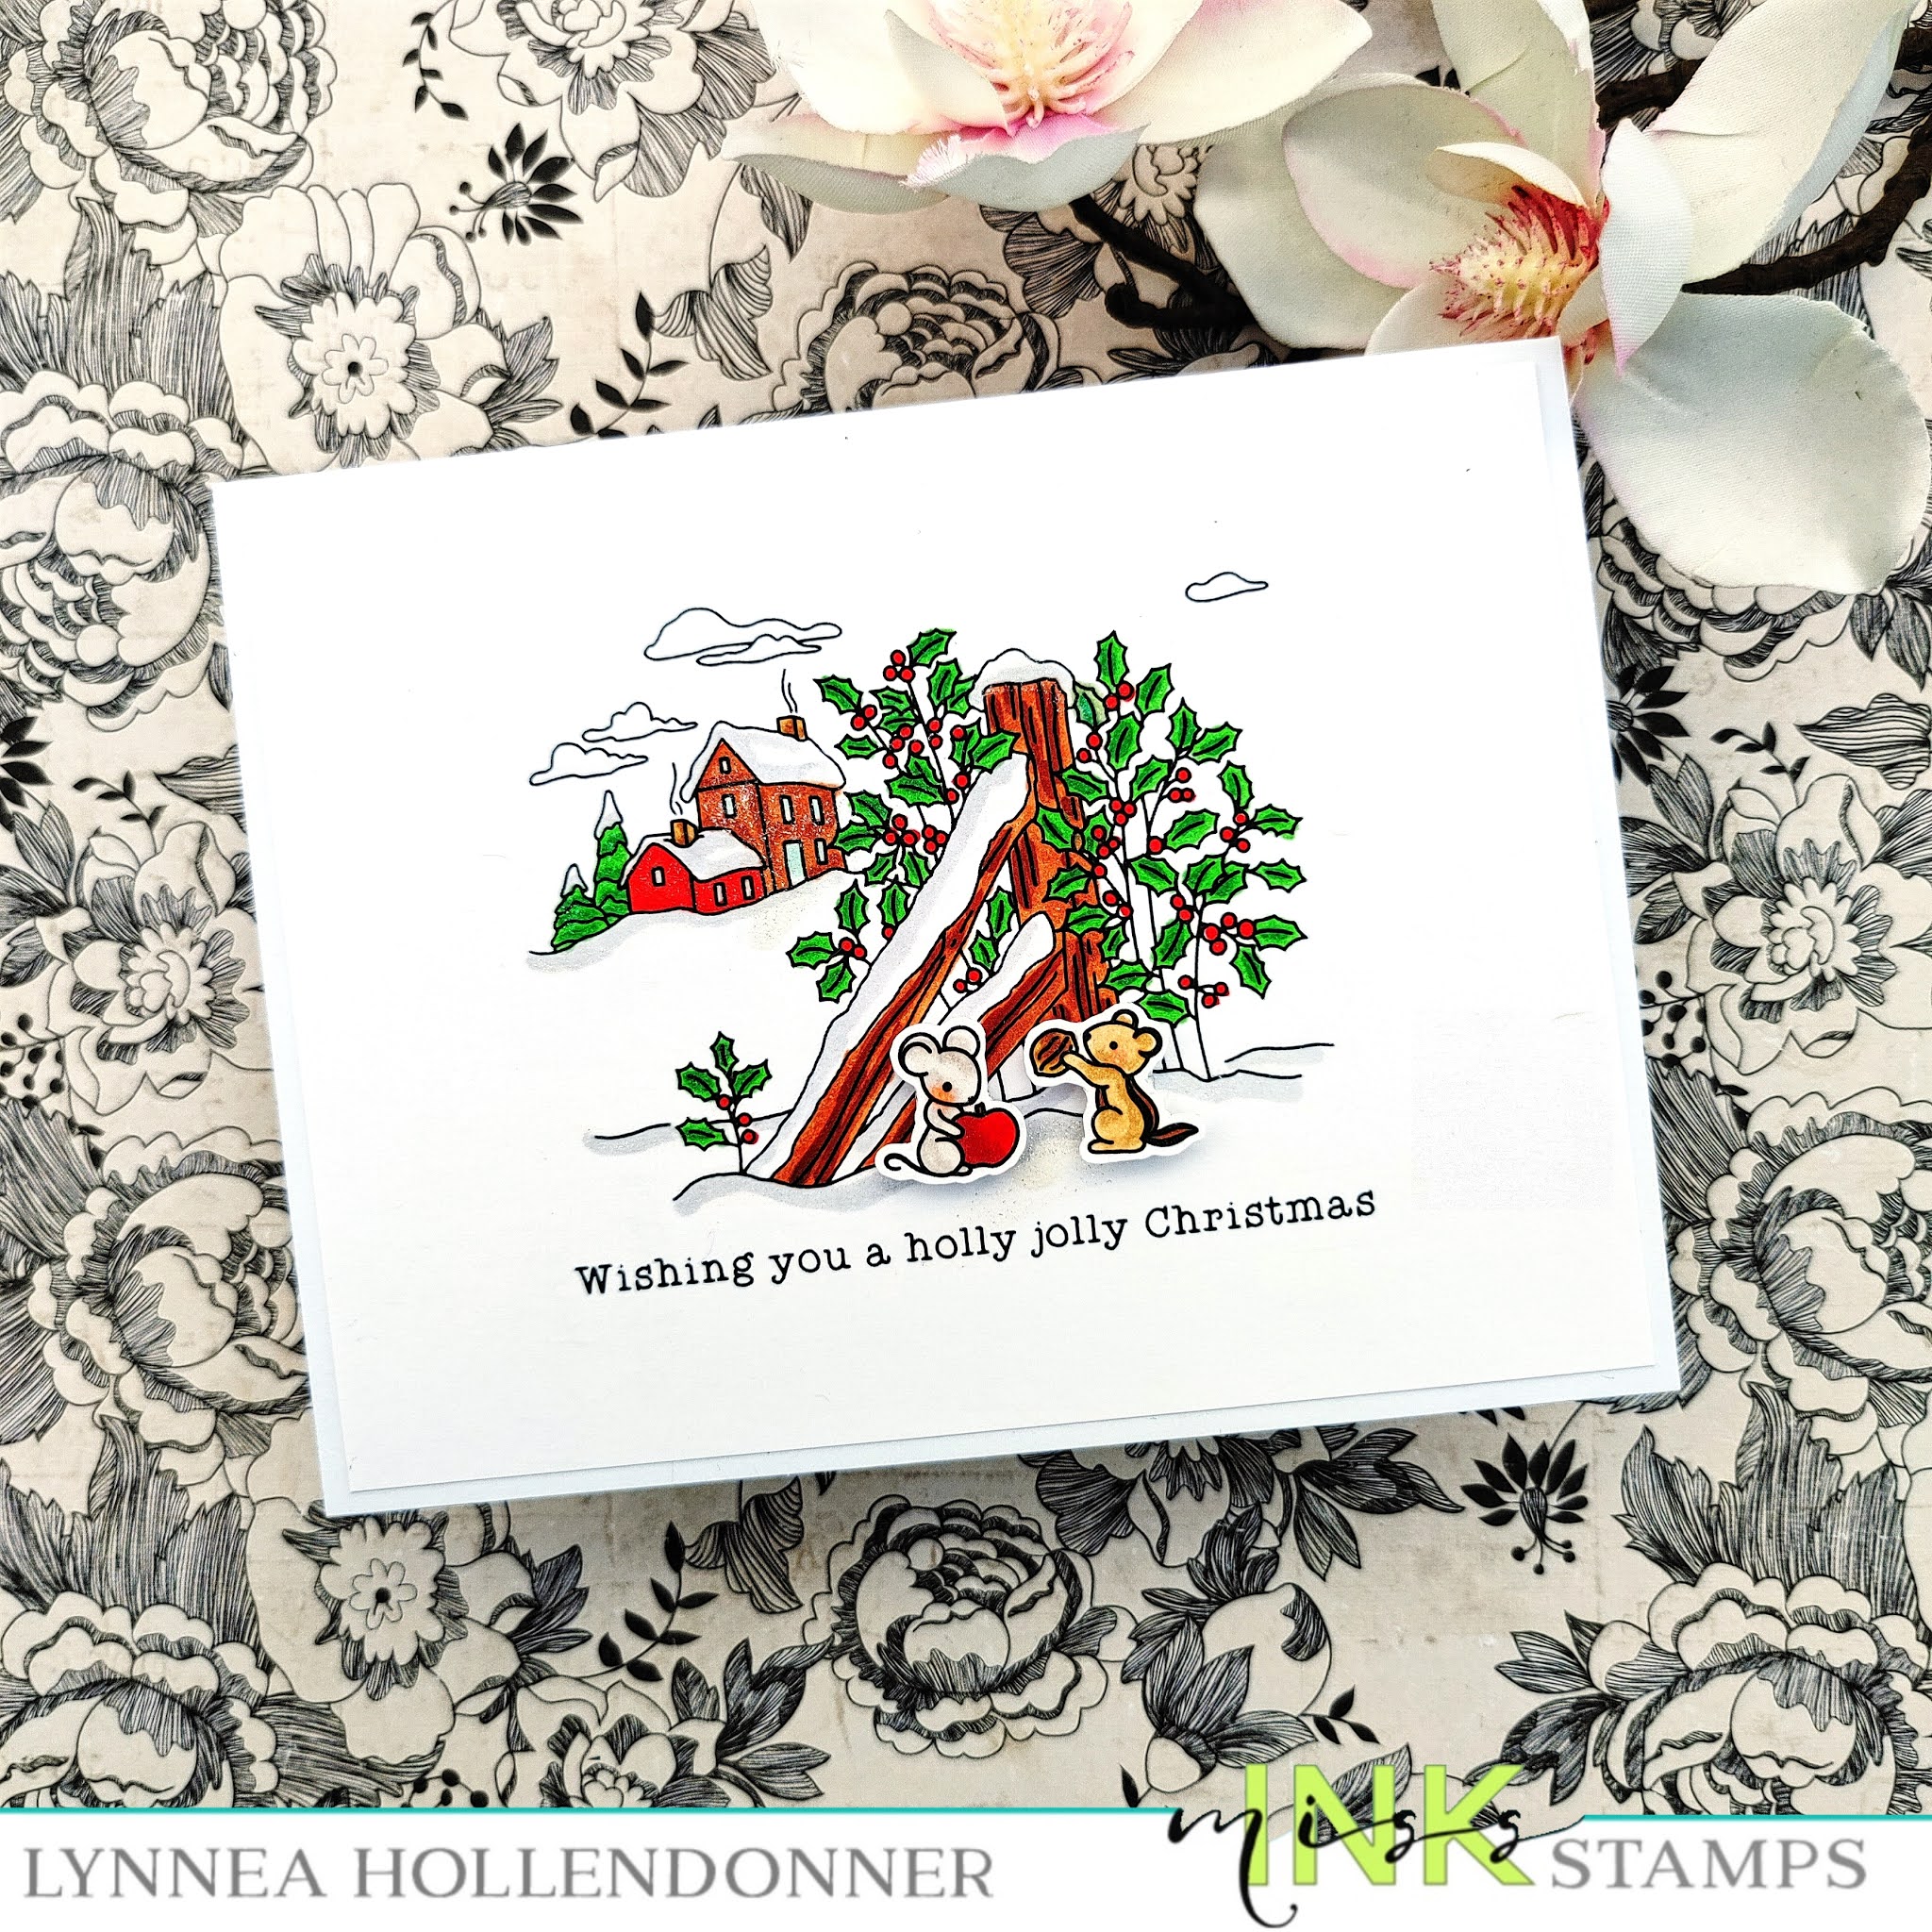
Today is the last day of sneak peeks before the Miss Ink Stamps release tomorrow! I'm sharing a Holly Jolly card that also incorporates the Little Angel Stamp Set from yesterday! 


I stamped the Holly Jolly scene in the center of a piece of white cardstock and colored it with Copics. I kept my coloring simple and traditional. I trimmed down the panel to 4x5.25" and added it to a card base. 


I wanted some cute critters for my scene and the new Little Angel Stamp Set has some ADORABLE tiny woodland mice and chipmunks! They go perfectly with the Holly Jolly Stamp Set!


The November 2020 release will be live in the Miss Ink Stamps shop tomorrow! Shop quick! 

Whimsy Stamps Friday Frenzy | Funky Frames Winter Card

Happy Friday Frenzy, everyone! I hope you've had a great week and are ready to mix it up with some old and new products from Whimsy Stamps!  


The new Funky Frames Dies are wonderful! I love that there are 3 different frames and 3 different hangers so that you can mix and match and turn the frames for a bunch of different looks! 


I used two patterned papers from the Chill 6x6 Paper Pack and the Hugs Bunny Stamp Set and made a cute little wintery frame ( or window! ) scene. 


This card is super simple to put together, but so cute! See you next Friday! 

Thursday, November 19, 2020

Miss Ink Stamps | Mountainside and Little Angel Sneak Peek

Hello! The sneak peeks for the November release from Miss Ink Stamps are in full swing! I'm showing a peek at the Mountainside Stamp Set as well as the Little Angel Stamp Set. 


I stamped the Mountainside scene and colored it with Copic Markers. I stamped a few elements from the Little Angel Stamp Set on a separate piece of paper, colored them, and cut them out with scissors. I masked off the Mountainside scene ( full details on this in my video! ) and blended on a night sky background.


I added some flicks of white paint to the sky for snow and added my Little Angel elements with foam tape. 


Come back and visit tomorrow for more sneak peeks at the November release! 

Erin Lee Creative | Graffiti Heart Stencil with Glitz Glitter Gel

Hi, there! I mixed two colors of Glitz Glitter Gel over the Erin Lee Creative Graffiti Heart Stencil and I am LOVING the result! 


I sprayed the back of the Graffiti Heart Stencil with Pixie Spray and used the grid lines to help me center it onto a piece of black cardstock. I added two colors of Glitz Glitter Gel over the top of the stencil - Poppin' Pink Neon Glitz Glitter Gel at the top and Gold Glitz Glitter Gel on the bottom half. I used my palette knife to make sure the two colors of Glitz blended together and set the panel aside to dry for about a half an hour. 


I stamped the sentiment from the Stripe Sentiments Stamp Set onto a piece of white cardstock that I cut with the Stripe Die. I love how easy it is to cut perfect sentiment strips! I decided to trim down my strip into two pieces so that I would have a stacked sentiment and added them with foam tape to the right side of my card. 


That finishes this simple, but glitzy, card! I'll see you soon!

Wednesday, November 18, 2020

Simon Hurley create. | Rainbow Tree Farm Card

I'm all about rainbows! They can be used for anything - Even Christmas trees! I used my favorite background stamp from Simon Hurley create. for this fun rainbow card! 


The Tree Farm Peel-Apart Background Stamp is my absolute favorite stamp set in the Simon Hurley create. line. Ever! I've used it in videos featuring the Peel-Apart feature, but not as a whole background. I stamped and white heat embossed the whole Tree Farm stamp onto a piece of Stark White Cardstock so that I could create an emboss resist background. 


I used a whole rainbow of Simon Hurley create. Dye Ink Pads to blend color onto my background. And I mean a whole rainbow! I used just about every color! I added splashes of water and white ink to the card for a snowy texture in the background. 


I white heat embossed a sentiment from the Posh Poinsettias Stamp Set onto a strip of black cardstock and added it to the card with foam tape as well as some clear bubble gems to finish the card. I hope you like this nontraditional Christmas card!

Tuesday, November 17, 2020

LDRS Creative | Alaskan Adventures Craft Kit - In the Doghouse Stencils and Border Die

Hi hi, everyone! I'm back with more inspiration using the BRAND NEW Alaskan Adventures Craft Kit and the Falling Snow Add-On Die! This time I'm focusing on the In the Doghouse Stencils and Border Die. As I'm creating this blog post both the Alaskan Adventures Craft Kit and the Falling Snow Add-On Die are available in the LDRS Creative shop - but hurry! This is a limited edition kit and the value is about double the cost of the kit! That's amazing! If you want to see everything included in the Alaskan Adventures Craft Kit as well as my first video creating with the craft kit - check out this video here


Let's dive in to today's card! In my first video I showed how you can use the In the Doghouse Stencils and Border Die from the Alaskan Adventures Craft Kit separately, but I wanted to show that you can use them together to EASILY add color to the little doghouses. I die cut the In the Doghouse Border Die from white cardstock and lined up one of the In the Doghouse Stencils over the top. The stencils are a set of 3 - one for the "main colors" of the houses, one for details, and one to add color to the doors. I only used two of the stencils. Since the In the Doghouse Border Die cuts out the door shapes I didn't need to use the third. I used a variety of LDRS Creative Hybrid Inks that coordinate with the patterned papers in the craft kit to quickly and easily add color to the In the Doghouse Border Die. 


I chose three different patterned papers from the Alaskan Adventures Craft Kit that paired well together - something that's easy to do! I love that the colors repeat throughout the patterned papers. I only had a small scrap of the pretty purple snowflake paper left, so I cut out little pieces and added it behind the doors of the doghouses so it would look like it's snowing outside. I added the plaid paper below the stitched line of the In the Doghouse Border Die and the paw prints as a background. 

I wanted to add a bit of subtle texture, so I cut the Falling Snow Add-On Die from white cardstock and adhered it to vellum. I fussy cut the vellum so that the Falling Snow Add-On Die would have a slight shadow and added it to the top of the card. 


I stamped the little dog with the snowboard with Raven Hybrid Ink from the Alaskan Adventures Stamp Set as well as a coordinating sentiment. Nowwww ... I know this little guy is snowboarding and not skiing, but I just love this sentiment, so I ran with it! I added them with foam tape to the bottom of the card to finish off this cute little winter card! Hope you love it! Remember to that the Alaskan Adventures Craft Kit is a limited edition kit, so don't wait! Snag yours now! See you soon! 

Monday, November 16, 2020

ThermOWeb | Glitz Glitter Gel and the Gnome for the Holidays Stamp n Stencil Craft Kit

Hi! Here's another way to add details with the Gnome for the Holidays Stamp n Stencil Craft Kit - with Glitz Glitter Gel! Everyone loves sparkly accents, right!? 


The Gnome for the Holidays Stamp n Stencil Craft Kit creates everything you need for a perfect winter scene! You die cut pieces for trees and the little gnomes and then you can add stamped or stenciled details. I die cut the triangle trees from four nontraditional colors of cardstock and die cut all the pieces for the little gnome. The Gnome for the Holidays Stencil has details for all three styles of hats as well as two types of garland to decorate the trees. I decided to go with a consistent look and just use one style of garland with colors of Glitz Glitter Gel that matched the cardstock colors. I sprayed the back of the Gnome for the Holidays Stencil with Pixie Spray and used a Stencil Pal and Grass Green, Lovely Lavender, Bubblegum, and Turquoise Sea Glitz Glitter Gel to give some glittery designs to the trees. I also used White Glitz Glitter Gel for the plaid design on the hat die cut. 


I set the Glitz Glitter Gel pieces to the side to dry and worked on the background. I used a piece of 1.5" Purple Tape and masked off the bottom portion of the card and blended on some gray ink for the ground. I moved my Purple Tape down to cover the ground and added silver watercolor spatter to the background for snow.  Once my pieces were dry I used iCraft Ultra Bond Liquid Adhesive to adhere the trees to the background as well as to piece together the little gnome. Once the gnome was assembled I added him to the card with iCraft 3D Foam Squares for dimension. 


I stamped a sentiment with gray ink onto an off white cardstock and "bubble cut" around the sentiment. This is one of my favorite ways to add sentiments to cards because I can overlay the sentiment onto my card design. I added the sentiment with iCraft 3D Foam Squares for dimension. 


That's all for my card!  I hope your Holidays are as glitzy and colorful as this card! See you soon! 

Pink & Main | Believe in the Magic

It's about time I use up some of my pretty Pink & Main patterned papers! I love them so much that I hoard them, but they're much prettier on a card than on my shelf, right?


I love this holly patterned paper from the Be Merry 6x6 Paper Pad! I've been hoarding it since last Christmas - don't tell anyone! I die cut it with the largest die in the Stitched Rectangles 1 Die Set and adhered it to an A2 card. 


I stamped and colored an angel from the Little Angels Stamp Set, I die cut it with the Little Angels Die Set using my Mini Maker Machine from The Makers Movement. Then I covered it with a bunch of glitter! I also stamped a sentiment strip from the Little Angels Stamp Set


I die cut the circle from the Wreath Base 2 Die Set four times from white cardstock and stacked them together for dimension. I didn't think my little angel was standing out quite enough, so I trimmed a circle piece of vellum to fit behind the wreath die cut. 


Thanks for joining me today! I'll see you again soon!