I have the pleasure of guest designing with the new Ghost Pack from Sum More Fun today! This pack is so punny and cute and packed with lots of fun Halloween goodies! There are only 30 packs available and once they're gone they're gone! You can purchase the stamps individually, but it's a MUCH better deal ( plus you get papers, card bases, and envelopes ) in the pack!
I share a lot of tips and tricks in the video above. There are so many fun things to do with this Ghost Pack! I love the patterned papers - and they are nice and heavyweight! Love that! The images and sentiments are hilarious!
You can even foil the black and white papers! Ahhhh!! How fun! Now what are you waiting for? Head on over and grab your Ghost Pack! Remember these are super limited edition and will not be restocked! A HUGE thank you for letting me play with this pack! It was a lot of fun!
There's a special blog hop today! Pear Blossom Press and My Favorite Things have teamed up to create light up cards! I made two simple light up scenes - one for Autumn and one for Halloween!
I made two cards and kept them both pretty simple. I wanted the adorable images and light up features to really "shine" haha!
Let's start with the Autumn themed card. I created quite possibly the simplest of scenes with just a bit of stenciling! I used the Rectangle Trio Stencil and centered it at the top of my card and blended on a few Autumn colored inks. I started at the bottom with brown, then red, orange, and just a bit of yellow.
I colored some cute images from the My Favorite ThingsHappy Campers Stamp Set and cut them with the coordinating dies and arranged them on my scene. I pokes some holes where I wanted my lights to shine through and EASILY added the EZ Lights behind my card panel to make it light up. Emphasis on the easy! All you have to do is line up where you want the lights. Watch my video above - I walk you though just how I like to line them up!
I love to use Double Thick Foam Tape from Pear Blossom Press to assemble my card. It's no fuss! No need to double up the tape and the backing comes off super easily! I added a stamped sentiment under my scene and this card is done! I chose to place the push button behind the fox so when you push on his guitar the moon, campfire, and lantern light up! You could have a special place with a "push" sentiment, but I like to just add a little note for the recipient to push for a special surprise!
I decided to go spooky with my second card! I made a little trick-or-treat scene outside of a haunted house using some new stamps and dies from My Favorite Things. I created my background with some ink blending and the Rolling Clouds Stencil. This stencil is one of my new favorites! I added a road to the bottom of my panel. It's really just a strip of black cardstock that I added some white gel pen dashed lines to! I cut a bunch of elements from the Haunted House Die Set - the house, trees, a door knob, and some boards to make my windows creepy!
All of my trick-or-treaters are from the Boo Crew Stamp Set. Aren't they cute!? I colored them with Copics and cut them out with the coordinating dies. I created this card the same way as the first - I arranged my scene and poked holes in the jack-o-lantern, moon, and the top window of the house and easily assembled the EZ Lights mechanism behind my panel.
I again assembled my card using the Double Thick Foam Tape from Pear Blossom Press. It just makes my life so easy! I have a confession - I forgot a sentiment! It's something I do ALL the time! Usually I catch it, but I didn't! That's no problem, thought! I'll add one to the inside of the card!
I hope you've enjoyed this collaboration between My Favorite Things and Pear Blossom Press! And hopefully you've learned some tips and tricks, too!
Are you here for more easy scene building inspiration from LDRS Creative? Because I have some! I created an easy bridge card using the Mermaid Treasures Stamp Set!
The fold for the bridge card base is very easy and I show you just how to do it in the video. I started with a piece of 5 1/2 x 5 3/4 inch heavy cardstock. Then I folded at 3/4" and 1 1/2" from each side on the longer side of the cardstock. Make a quick accordion fold and you have it! I created my scene background with a variety of LDRS Creative Hybrid Inks and the Under the Sea Stencil and added a couple of strips of patterned paper from the Puddle Jumper 6x6 pack to the outer edges.
I added images to my scene from the Mermaid Treasures Stamp Set and completed the bridge card by adding a sentiment strip across the bridge. And that's it! This is such an easy scene to make and the extra fun fold is simple, but makes it so much more interesting!
One of my favorite things to do is create my own backgrounds! Don't get me wrong - patterned papers are absolutely fabulous - but backgrounds are my jam!
I cut out a bunch of word dies from the Chills Word Die Set from white cardstock and glued them onto my card. I tried to keep a pattern going, but if it's a little imperfect that's okay. I added some vellum die cut with the Notched Squares Dies and some cute little candy corns from the Candy Corn Dress Up Stamp Set.
There's all kinds of Whimsy Stamps slimline inspiration to be seen today! And there are two different ways to find inspiration - a YouTube hop and an Instagram hop! Be sure to leave comments along the way because Whimsy Stamps is giving away a $25 gift certificate! Only comments left on my YouTube video will qualify, so make sure you go there!
I cut the Slimline Stars Die from some black cardstock and sprayed it with glitter spray for some sparkle. Then I created my peek through background by laying down alternating colors of colored cardstock. I used two shades of orange and two shades of purple and then adhered my glittery Slimline Stars cut out on top.
I stamped out the image from the Halloweeds Stamp Set and colored it with Copics. I kept the coloring simple and I love how it turned out! I added the image and sentiment to the card front with foam squares.
I hope you find LOTS of slimline inspiration from Whimsy Stamps today! Remember to head over to YouTube to leave a comment on my video to be entered to win a giftcard and then hop along through the rest of the hop!
There's so much scene building inspiration happening on the LDRS Creative blog today ( and tomorrow, too! ). I made a slimline mini scene with the cute little Pocket Pals Rabbits!
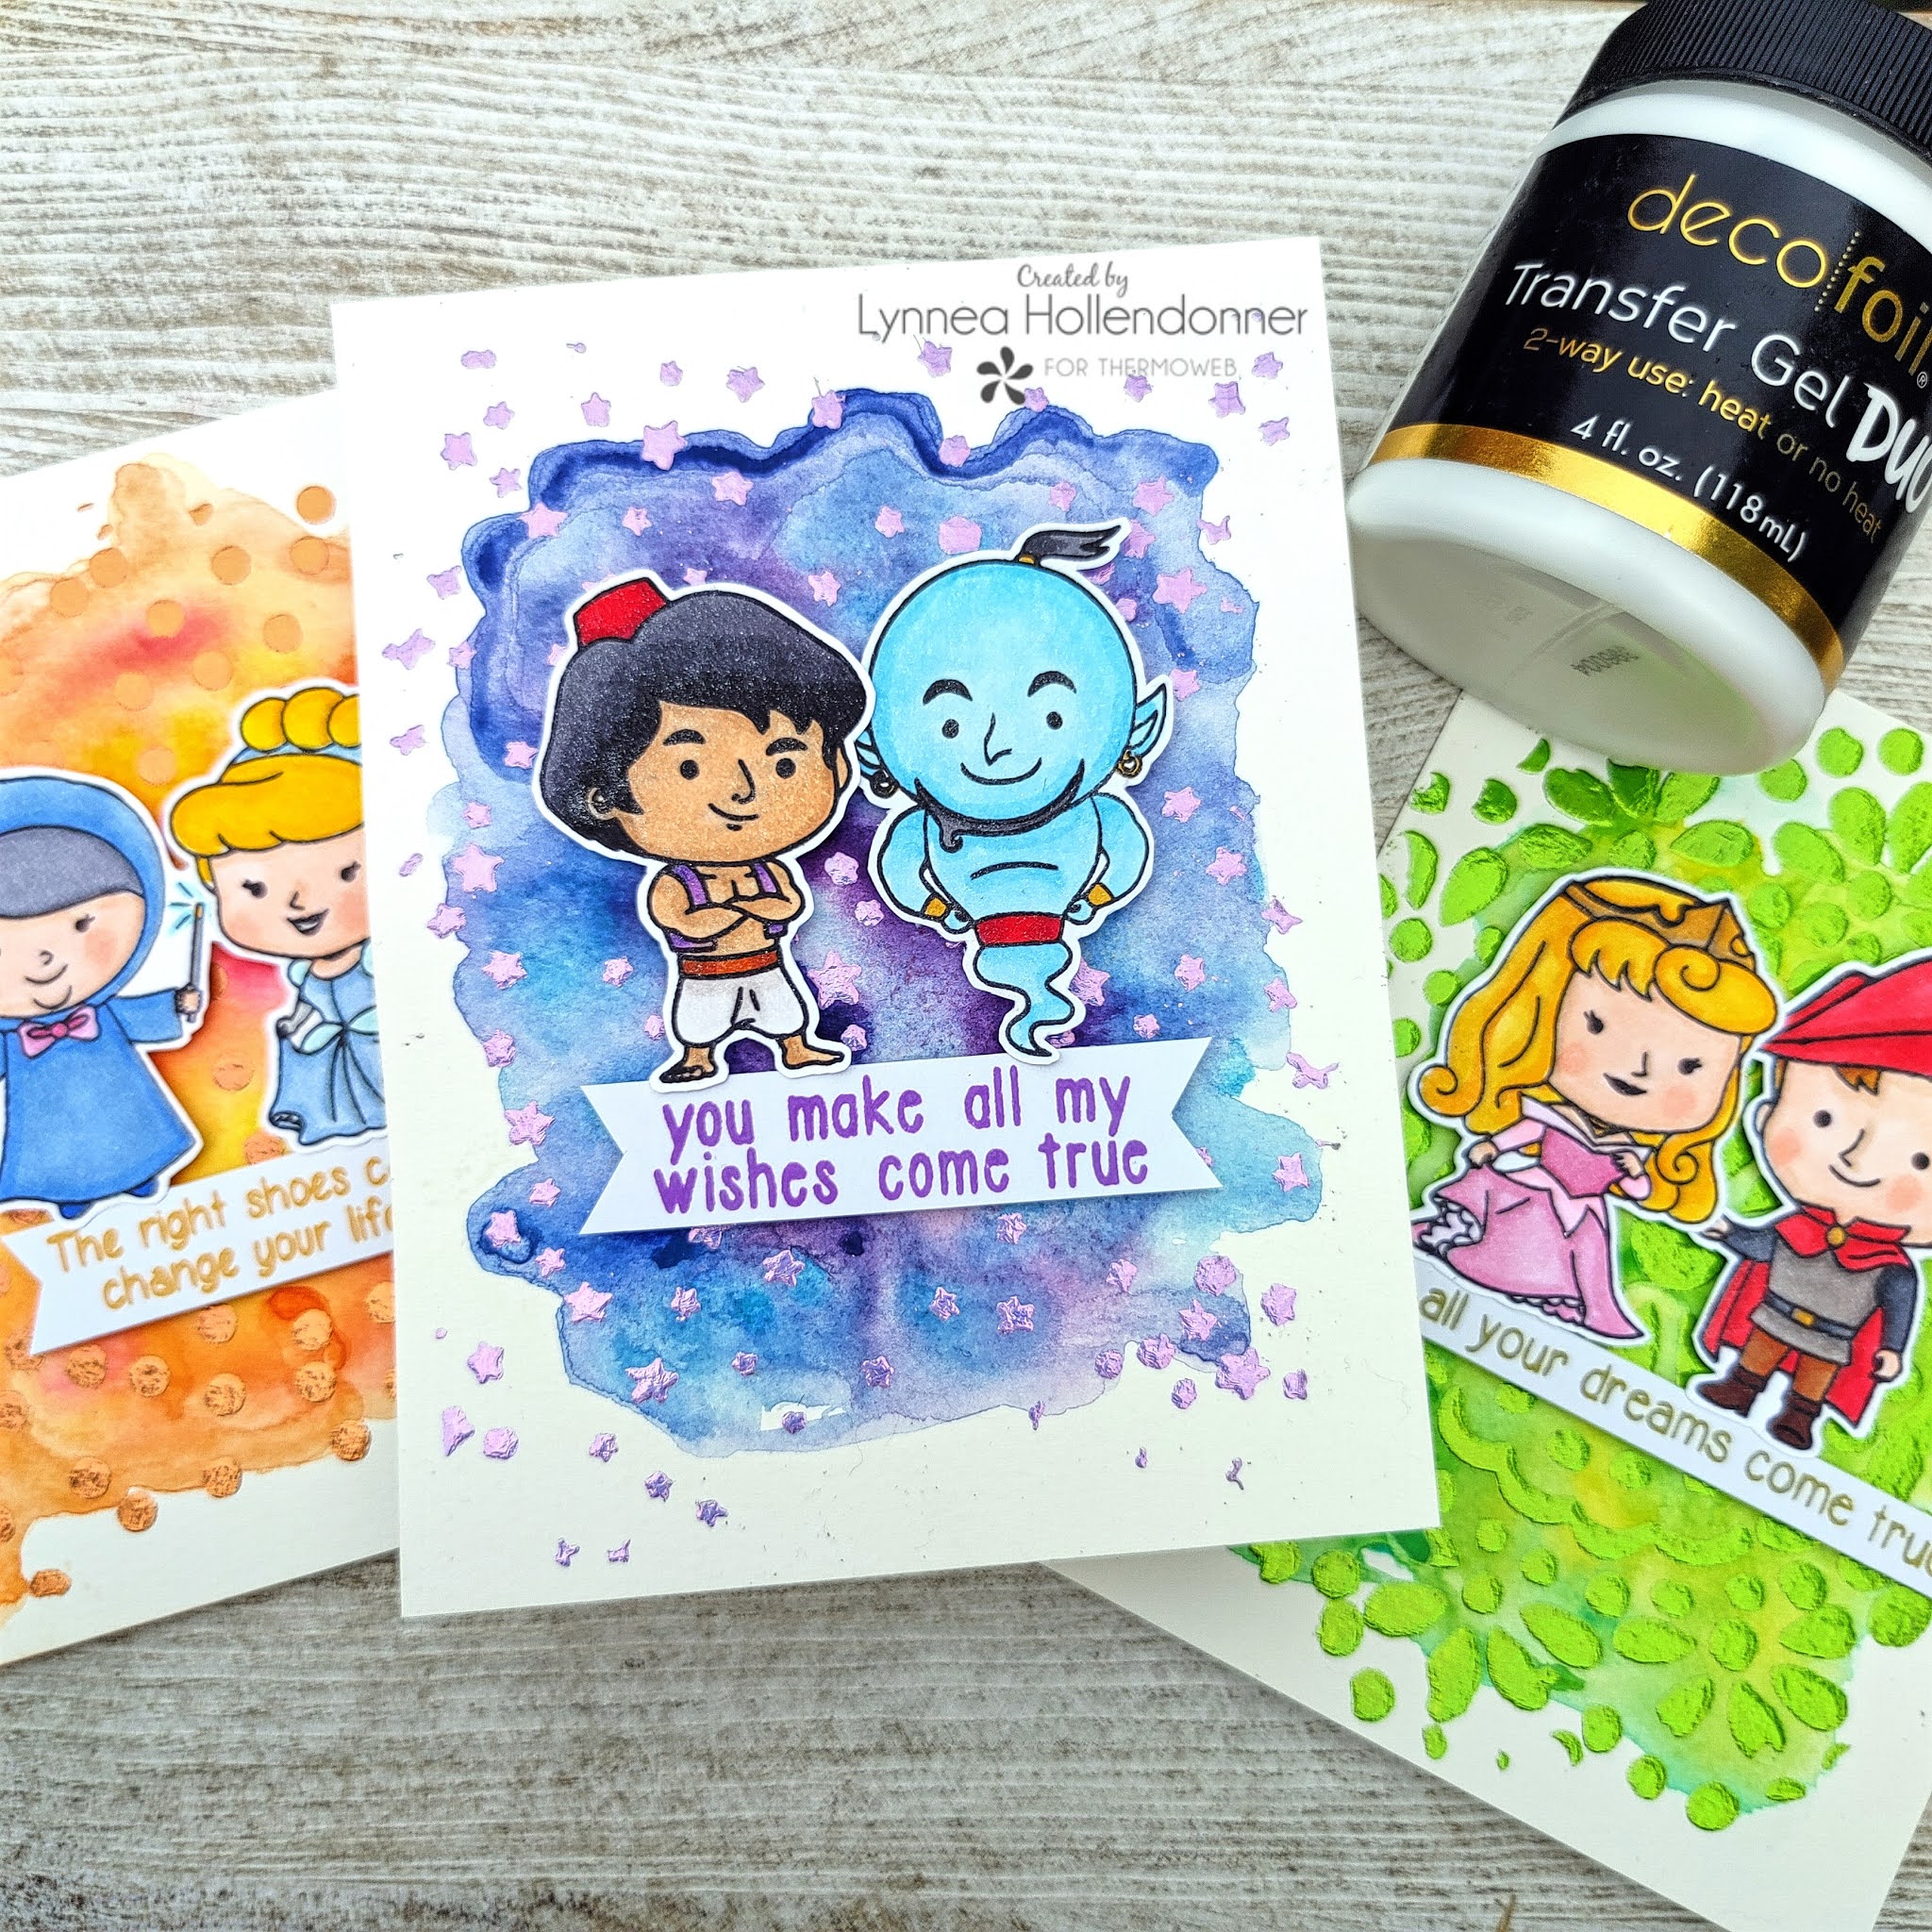
I made three cards with three different stencils and Deco Foil Transfer Gel DUO. I even color coordinated the Fairy Tale Foils to my watercolored backgrounds! These were easy to make and didn't require any heat from a laminator! Let's start!
I began by watercoloring three backgrounds that I thought would match a few colors of the Fairy Tale Deco Foil colors. My watercoloring process is simple and easy - I brushed some clean water onto my background and dropped in colors and let them blend. Each background is made up of multiple colors to give it dimension. I made three backgrounds because I had three stencils that I wanted to use - How can you possibly choose just one?! I chose the Honey Bee Stamps Twinkle, Twinkle Stencil and the Doily and Confetti Stencils from Kindred Stamps. Once my watercolored backgrounds were dry I sprayed the back of each stencil with a light application of Pixie Spray and placed a stencil onto each of my backgrounds. I used a Stencil Pal to spread a thin and even layer of Deco Foil Transfer Gel DUO over each stencil and set them aside to dry for a few hours.
You'll know the Transfer Gel DUO is dry when it is completely clear. Don't worry about it being tacky - the extra "stick" is what lets you use it with just the pressure from your die cutting machine. You can still use your laminator to apply Enamels, Foils, and Fock - but I find it VERY easy to just use my die cutting machine! I cut down a few sheets of the Fairy Tale Foils to be slightly larger than my card front and placed them pretty side UP on top of the DUO Gel. I use a piece of typing paper folded in half as a carrier sheet when putting the backgrounds through my machine. This makes it so that the cut marks from my cutting plates don't press into the foils. Another tip is to place your foil side down onto your "clean" plate. That way the cut marks don't actually come in contact with the foil! Then run the sandwich through the machine and slowly peel back the release paper - and you'll have a pretty pretty foiled background! I used three colors of Fairy Tale Foils for my backgrounds - Peach Princess, Lily Pad, and Prince Periwinkle. I thought they matched the watercolored backgrounds perfectly!
All of my images and sentiments come from some of my favorite stamp sets from Kindred Stamps! I used the Rags to Riches Stamp Set, Once Upon a Nap Stamp Set, and the Arabian Nights Stamp Set. I colored each image with Copic Markers and trimmed them out with scissors. I stamped a sentiment with a coordinating ink color to keep everything matching and added them to my cards with iCraft 3D Foam Squares. These are my favorite foam squares when I want images to really POP off the page!
It's finally my time of the year! I wait all summer to share Autumn themed cards! Even thought it's still pretty warm where I live things are getting crisp and cozy in my craft room with the new release from Pink & Main!
I am completely in LOVE with the Need to Venti Stamp Set! It reminds me of one of my favorite stamp sets from a few years back. I'm happy to see that pumpkin mug make a comeback! I stamped out two of the seasonal mugs from the Need to Venti Stamp Set and colored them with Copic Markers. Once they were colored I cut them out with the coordinating Need to Venti dies. I love how the die set cuts out the inside of the handles!
The Best Friends 6x6 Paper Pack has become one of my favorites! I used it last week for a bunch of friendship themed cards and I love that I can use it for Autumn themed cards as well! So versatile! I trimmed a piece of the plaid cardstock with the largest die from the Layered Rectangles A2 Die Set as well as a thin strip of gray and white polka dot paper and added them to my card.
I finished up the card by adding my mugs as well as a sentiment strip stamped from the Need to Venti Stamp Set onto my card with foam tape. Hope you're geared up and ready for fall just like me!
Hi! I made a quick and easy card using the Santa Tunnel Add On Die Set from i-crafter. This is meant to be a fun interactive die set, but I decided to do something more simple with the images!
I created a simple circle mask using masking paper and positioned it at the top center of my card. I used i-brush Blender Brushes to blend on some dark night sky inks. I LOVE using the i-brush blender brushes for small areas like this! They make it easy to blend ink and get a variation of color.
When my ink blending was complete I decided to add some stars to my ink blended night sky. I used some shimmer watercolor to spatter some "stars" onto the circle and peeled away the masking paper to reveal a perfect circle sky.
Now it's time to add all of those cute images! I die cut the sleigh, reindeer, and trees from the Santa Tunnel Add On Die Set from white glitter cardstock and added color to the die cut images with Copic Markers. This doesn't hurt the markers at all and it's a perfect way to add easy color!
I die cut the sentiment from the Santa Tunnel Add On Die Set from silver glitter cardstock and added everything onto my ink blended panel with liquid adhesive. I could have kept this a one layer card, but I decided I wanted a little bit of dimension. I trimmed down the panel to be 4 x 5.25 inches and added it with foam to an A2 card base. That's all!
It's officially spooky time - one of my favorite times of the year! Get geared up and ready! Whimsy Stamps has all kinds of spooktacular goodies hitting the shop!
I have all kinds of Sugar Skull goodness going on in this card! And I mixed in a bunch of previously released Whimsy things too!
I'm so happy we are moving right along into fall, but if you're not as excited as I am, I think you'll love the new Fall Critters Stamp Set! This stamp set has traditional fall critters mixed with florals - it's the best of both worlds!
I created a simple background by die cutting the new Horizon Burst Die from some white cardstock and ink blended a rainbow of inks over the top. This really made the cut and pierce lines from the Horizon Burst Die pop! I added flicks of water and gold watercolor for more texture. I stamped the fox from the Fall Critters Stamp Set and colored him with Copic Markers. I trimmed out the image and added it to my card front.
I ended up trimming my background panel to 4 1/4" wide by 4" tall. I stamped a sentiment from the Fall Critters Stamp Set at the bottom and added it to a 4 1/4" square card base with a strip of Gold Holographic Cardstock peeking out the bottom. That's it! Thanks for joining me! =
August is coming to a close ... and that means it's my time to shine! Haha! We're coming in to my FAVORITE time of the year and I'm excited to bust out the Pumpkin Patch Stamp Set from InkOn3!
I wanted to go full throttle Autumn with this card - so I started with some Autumn colored Atelier Inks - Marilyn Red, Marigold Orange, Bee Sting Yellow, and Twiggy Brown. I used Purple Tape and masked off 1/2 inch diagonal stripes and used blending brushes to add stripes of color. I love the variety of colors you can get from the Atelier Inks - particularly the Marilyn Red. I love how if you blend lightly you get a gorgeous pink, but if you really ink up your brush and add a few layers of color you get this beautiful deep red!
Once my blending was complete I decided to add some shimmer! I keep a little bit of Liquid Pixie Dust in a Small Watercolor Brush and simply painted over my ink blended stripes to add shimmer!
I adhered the Pumpkin Patch image with foam tape on top of the ink blended stripes and trimmed off the excess. I added a stamped image from the Pumpkin Patch Stamp Set to finish the card!