Wednesday, August 31, 2022

LDRS Creative | Cave Kiddos Slimline Card

I have the CUTEST slimline scene card to share with you using some LDRS Creative stamps and dies! 


I started by stamping the stone house and path from the Cave Dwellings Stamps and the kids from the Cave Kiddos Stamps with Raven Hybrid Ink. I colored them with alcohol markers and cut them out with the Cave Dwellings Coordinating Dies and the Cave Kiddos Coordinating Dies.


I cut a slimline card base that measured 3.5" x 8.5" and used the Pretty Patterns Slimline Dies to cut a decorative layer from green cardstock and a stitched layer from white cardstock. I used Alloy Hybrid Ink and stamped the Natural Granite 6x6 Stamp twice so that I could stretch it across the long white layer. I used Raven Hybrid Ink to stamp a sentiment from the Cave Kiddos Stamps near the upper right corner.


I put the slimline layers together with liquid adhesive and added all of my colored images with foam tape. And that's it! See you again soon!

Tuesday, August 30, 2022

LDRS Creative | Adding a Pop of Color with the Ginkgo Leaves Dies

I'm sharing a pretty slimline birthday card using stamps and dies from the new LDRS Creative Summer 2022 Collection


I love a black background with a bold pop of color! I started by covering a couple of pieces of cardstock with shimmer watercolors and then used the Ginkgo Leaves Die to cut out two large sprigs. 


I used the Elegant Stitched Frames Slimline Dies and cut a white card base, a gold and black layer, and then a gold, black, and white layered label shapes. I stamped a sentiment from the Essential Birthday Sentiments 4x6 Stamps onto the white label. I added shimmery white watercolor spatters to the black panel and added the Ginkgo Leaves die-cuts on top and trimmed off the excess. 


I layered all of the various pieces together with a mixture of liquid adhesive and foam tape for dimension. Thanks for joining me!

Monday, August 29, 2022

LDRS Creative | Easy Square Notecard with the Mini Foliage Dies

Ready for a card that can be color customized for any season and is easy to mass produce? I used a handful of new products on this watercolored card. Head over to the LDRS Creative Inspiration Blog for more the details!


I love the 
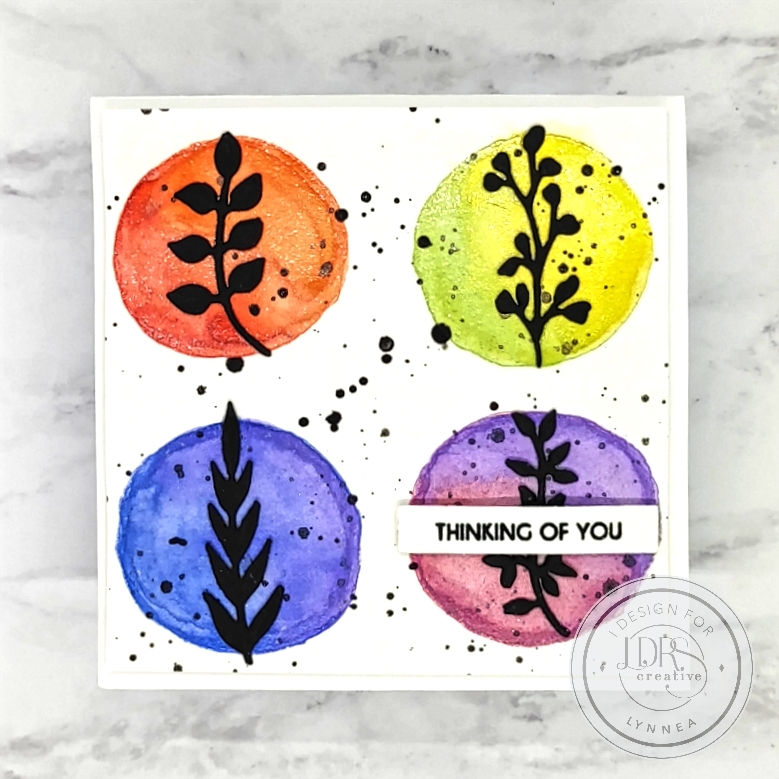
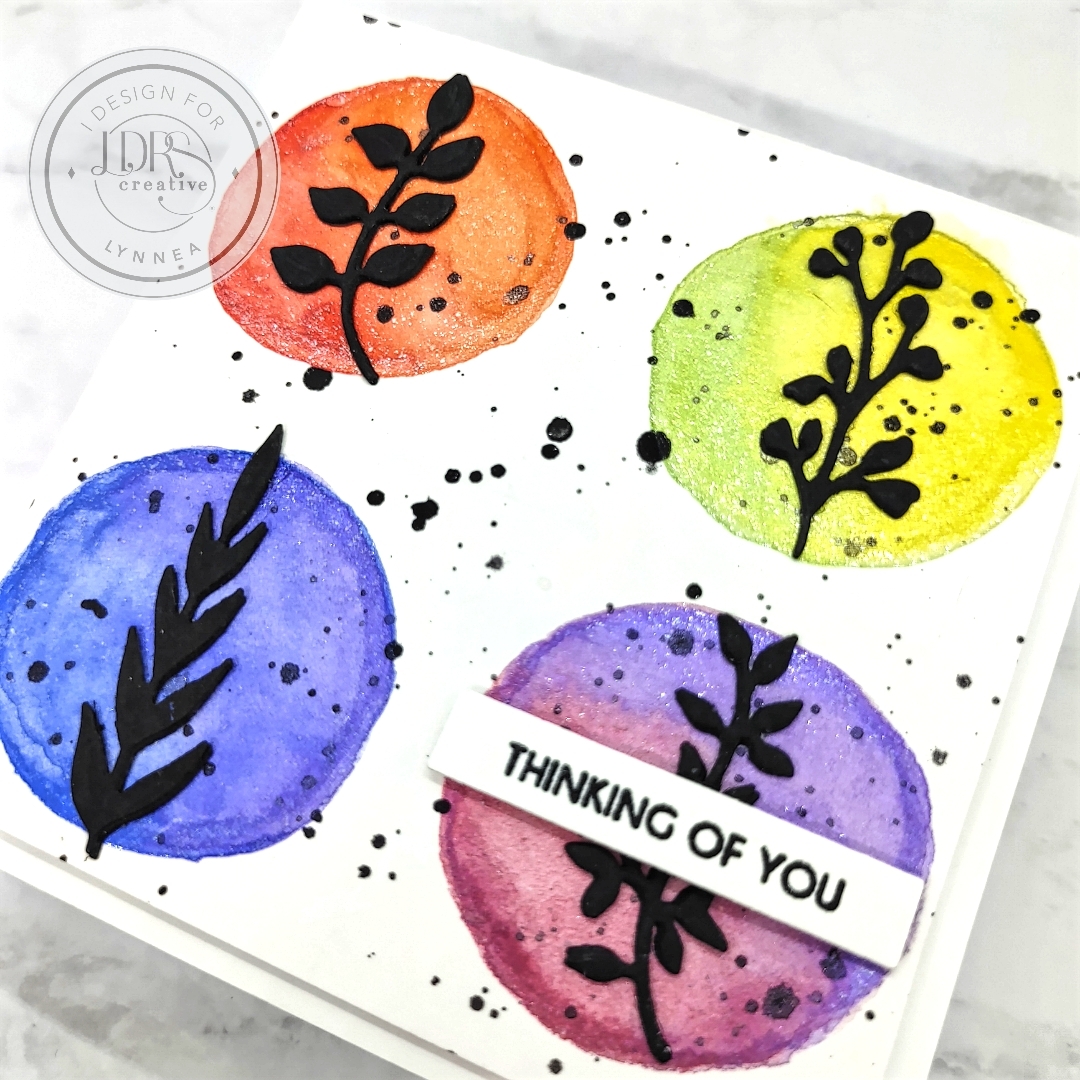
Mini Foliage Dies! You can use them to build a wreath, create a faux coverplate background, ... the list goes on! I like to use them as little silhouetted springs! I started by cutting a piece of watercolor cardstock to 4" square and used a rainbow of shimmer watercolors to create four watercolored circles. I let two colors blend together on each circle, heat set them, and added some black spatters. 


I used the Mini Foliage Dies and die cut four different sprigs from black cardstock. I cut them each multiple times and stacked three or four of them together for dimension and adhered them to the center of each circle. 


I wanted a simple sentiment that wouldn't take away from the background, so I stamped the Amazing You Sentiment Stack and cut it out with the Sentiment Stack Die II and added a single strip to the bottom right of my card. I used foam tape to add the panel onto a 4" square card. And that's it! 

Tuesday, August 23, 2022

LDRS Creative | Baby Dino Lunchbox Cards

I created a quick trio of cards that I can include in my son's lunchbox this coming school year using the Baby Dino Stamps from LDRS Creative!


Products Used -

Shop LDRS Creative - https://shrsl.com/1ladp 

Baby Dino 4x8 Stamps - https://shrsl.com/3l5e0 

Baby Dino Coordinating Dies - https://shrsl.com/3l5e1 

A2 Diagonal Stitched Layered Card Toppers - https://shrsl.com/3l5e1 

Alloy Hybrid Ink Pad - https://shrsl.com/2jpf1 

Raven Hybrid Ink Pad - https://shrsl.com/1nigv

LHcolors Shimmer Watercolors - https://www.etsy.com/shop/LHcolors

Wednesday, August 17, 2022

LDRS Creative | Colorful Birthday Bash Card

I'm sharing a fun and colorful birthday card using a handful of products from the LDRS Creative Summer 2022 Collection


I love the versatility of the Natural Granite 6x6 Stamp! I've used it to add texture to an outdoors themed card, to mimic ink spatter, and now to create faux confetti for a birthday card! I stamped the Natural Granite 6x6 Stamp onto a piece of A2 sized cardstock with Dan-D-Lion, Fandango, and Tropical Sea Hybrid Inks. I made sure the inks overlapped a bit to create a rainbow background. I used the small 'hooray' sentiment stamp from the Birthday Bash 4x6 Stamps and stamped 'hooray' all over the background.


I stamped the monkey and flamingo from the Birthday Bash 4x6 Stamps with Raven Hybrid Inks and colored them with glitter gel pens. This coloring medium is so easy to work with and adds a LOT of shimmer without any extra work. I cut them out with the Birthday Bash Coordinating Dies. I used the largest die from the Scalloped Circle Frames Dies to cut out a circle and stamped a sentiment from the Essential Birthday Sentiments 4x6 Stamps near the bottom and added the critters to the top with foam tape. 


I added the scalloped circle die-cut to the top of my card with foam tape and that's it! I'll see you soon!

Monday, August 8, 2022

LDRS Creative | Easy Doodle Borders Card

Hi, everyone! It's Lynnea and I'm sharing an easy to mass produce card featuring the LDRS Creative Doodle Borders II Stamp Set. This row of flowers is just the cutest!


This card is truly a clean and simple, 5 minute card! It's a great design to mass produce and give as a gift. School is starting soon and I plan to make a set of 10 to give to my son's teacher. Let's jump in to the making of the card. I took the flower border stamp from the Doodle Borders II Stamp Set and lined it up in my stamping platform so that I could create a border stretching across the top center of my card. I stamped the image with Raven Hybrid Ink onto an A2 card and then flipped the card 180 degrees and stamped again.


I used a few alcohol markers to color in my images - a light and dark shade of pink, aqua, and yellow - as well as a green marker for the leaves. I wanted to add a finished border, so I used a T-square ruler and a black felt tipped pen to add a single line under each of the flower borders. 

I stamped the Amazing You Sentiment Stack with Raven Hybrid Ink and cut out the sentiment strips with the Sentiment Stack Die II and added one of the sentiment strips to the center of my card. 


I finished off my card by embellishing with a few pearls. That's it! Thanks for joining me!]