Hello! I'm throwing it back to the days of tie dye and cassette tapes with some fun summer products from Pink & Main!
I temporarily adhered the new Cracked Stencil onto a piece of bright white cardstock and blended on a whole rainbow of inks using an Ergonomic Blending Brush. I made sure that the colors would overlap and blend and when I removed the Cracked Stencil I was so excited to see that it looked like tie dye! Super fun!
I used the My Jam Stamp Set for my sentiment, but I did a little surgery first! I liked the sentiment that says "like, totally" so much - but I needed it to fit with my cassette tapes. All I had to do was trim the "you rock!" sentiment in half so that I could build my own sentiment reading "you like, totally rock!" It's perfectly okay to cut apart your stamps as long as you cut in between the photopolymer and don't cut the part that actually stamps. I stamped and white heat embossed the sentiments onto black cardstock and trimmed them into strips.
I added a healthy coat of glitter to the cassettes and the sentiment strips and added everything to my stenciled background with foam tape. Thanks for joining me! Have fun shopping the new Pink & Main Summer Release!
Hi, hi! I have a fun and easy way to get more use out of your interactive die sets from i-crafter!
I love a fun interactive card, but I also love taking more complicated dies and using them in a more straight forward way. I feel like I get more for my money when I use them in unexpected ways! And I'm more likely to buy a die that can be used in more ways than one. The Hello Sunshine Wiper Die Set is PERFECT for an awesome interactive card as well as clean and simple cards!
The sunshine die and the little sentiment are some of my favorite pieces from the Hello Sunshine Wiper Die Set. I cut out the sun and clouds from yellow and white paper and the hello circle from blue cardstock and the "sunshine" from pink cardstock. I trimmed a piece of yellow cardstock to fit behind the "hello" so that I would have a bit of "sunshine" peeking through to the front!
I grabbed a piece of happy patterned paper that went well with my sunshine-y theme and added my Hello Sunshine Wiper dies to it with foam tape. Then I added all of that to a blue card that matches my hello circle die cut! That's it! Quick and easy and a great way to get more out of your interactive dies from i-crafter!
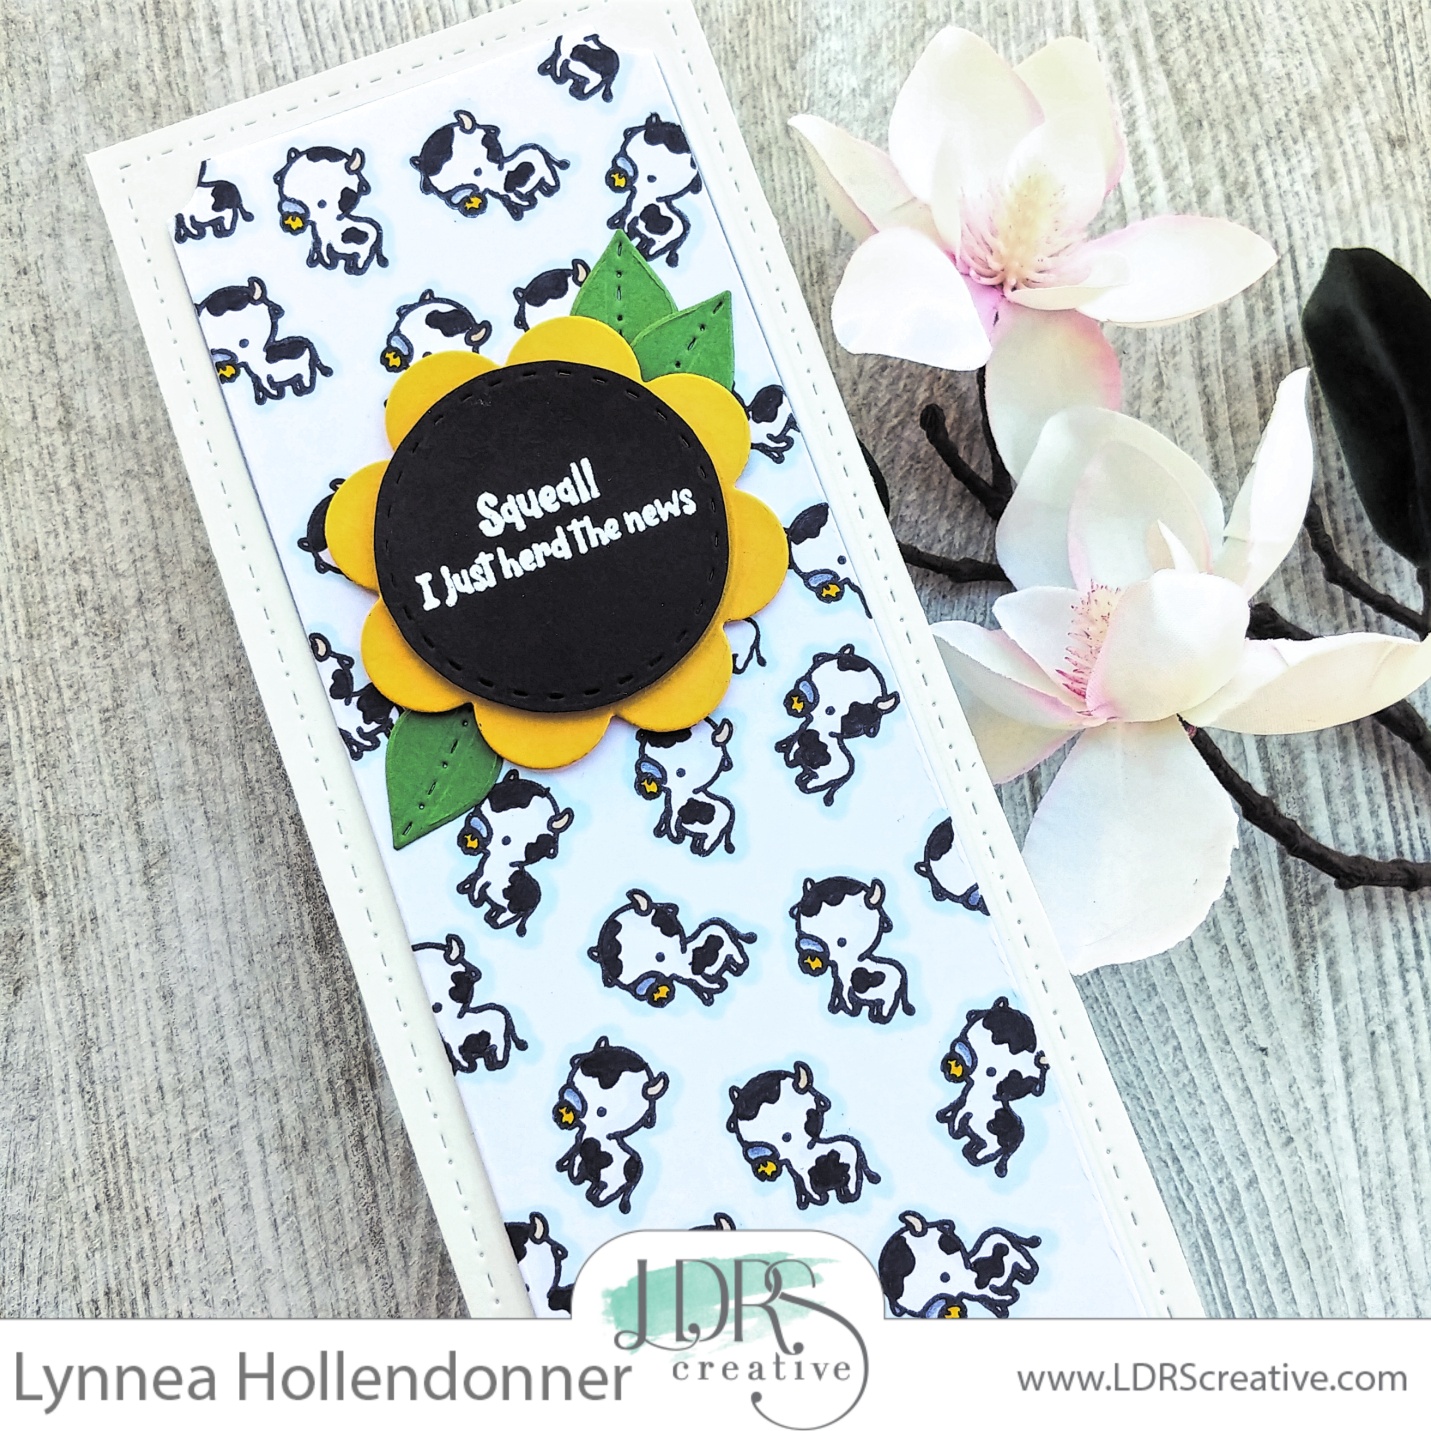
I'm obsessed with cows. How could you not love them?! I just think they're the cutest! I stamped the little cow image from the Barnyard Bunnies Stamp Set with Raven Hybrid Ink all over a piece of white cardstock. The more cows the better, right?! I colored them with Copic Markers and used a light blue marker to outline each little cow so that they would pop off the page. I used the Slimline Corner Scallop Die Set to cut out the colored background as well as a frame from a piece of off white cardstock. I adhered the frame to a slimline card and popped up the stamped background with foam tape for dimension.
The Slimline Corner Scallop Die Set is full of SO MANY extra dies that layer together! In fact there are 14 dies total! I used some colored cardstock and the extra dies in the Slimline Corner Scallop Die Set to make a sunflower for the center of my card. The only thing I love as much as cows is sunflowers!
The perfect underwater scene calls for the perfect mermaids! The Mermaid Treasures Stamp Set has three adorable mermaids, cute sentiments, and little coordinating images. I stamped out two of the mermaids with Raven Hybrid Ink and colored them with Copic Markers. I used the coordinating Mermaid Treasures Die Set to cut them out with the perfect white border.
I stamped a sentiment onto a banner strip with Raven Hybrid Ink and added my images and sentiment to the card with foam tape.
I used my MISTI because I was working on watercolor cardstock - which is textured - and I wanted to get a few layers of ink onto the cardstock. Once I was done stamping I sprayed each background with a good amount of water from a Tim Holtz Distress Sprayer. I found that the darker inks worked best with this technique. I sprayed enough water that the inks would start running, but not blur the lines of the Luau Background Stamp.
This took a bit of playing around with. My first background - the pink one - I used a bit too much water. But by the end I had gotten the technique down! I dried each of the panels with a heat gun and die cut them with a fancy oval die.
I wanted to have a bright and happy focal point for each card, so I grabbed the sunshine image from the Road Trip Stamp Set. I stamped it onto Stark White Cardstock with Slippery When Wet Ink and then deepened the center of the sun with some Traffic Cone Ink. I stamped five suns - one for each card - and trimmed them with scissors.
I intended to adhere the die cut background panels directly to the card bases, but the cards needed some more oomph. I stamped five card bases with the Painted Lines Background Stamp and Woof! Dye Ink and adhered the fancy die cuts to the center with the sunshine stamped image on top with foam tape.
I'd love to know which of these cards is your favorite! I'm quite drawn to the black stamped background as well as the purple and teal!
I'm using a couple of the newest released products from InkOn3 today to make a fun summery Koi Pond card with a bit of easy no line coloring.
This card is simple to make, but just look at those koi swimming around! They're the best! I stamped the koi images as well as the air bubbles from the Koi Pond Stamp Set onto watercolor cardstock with Fadeout No Line Ink. The fabulous thing about this ink is you can stamp it 2 or 3 times to build up the color (for people with bad eyes like me!) and the ink will still fade back to give you the no line effect! I used a Small Fine Tip Watercolor Brush to color the koi with Marigold Orange Atelier Ink. Check out the video above to see just how easy this is! The Fadeout Ink grabs the color and makes no line coloring a BREEZE!
I needed a fun background for my koi, so I used the new Pondie Stencil along with some Goddess Green Atelier Ink. These inks are so juicy and wonderful! I didn't even have to re-ink my blending foam to do the background!
Why can't meerkats be rainbow? Do I neeeeeed to color them brown? Nope! I colored a whole bunch of uniquely pigmented meerkats from Pink & Main!
The Meerkats stamp set has a whole cluster of meerkats as well as this little individual guy. I lined him up in the center of a white card panel and used my MISTI to stamp five little meerkats on a straight line as well as an adorable sentiment beneath them.
I colored them with a rainbow of Copic markers, but you could use any method of coloring! I kept their noses, hands, feet, and tummies a lighter shade of color than their bodies for definition. I didn't want them to appear like they were floating, so I used a light cool gray marker to add a quick shadow under each of the meerkats.
These bright meerkats needed some equally bright and happy embellishing, so I added some Preppy Bright Enamel Shapes in a pattern around the meerkats. And this edition of "rainbow all the things" is complete! Haha!
Hello, hello! Thank you for joining us for our fun collaboration between i-crafter and Sassy and Crafty! Each company will be giving away a $10 gift certificate to one lucky hopper. Be sure to visit each blog and comment by June 25th at 11:59 PM PST in order to enter. We hope you'll enjoy the comic inspired projects our teams have come up with. Let's see my project!
I knew I wanted to have a bit of extra pop and flare for the background, so I decided to do a full panel shaker card. I slipped my card front into a stamp pocket and filled it up with a gold shaker mix, folded over the excess plastic, and taped it down. Easy peasy full front shaker! I colored up the amazingly sassy girl from the Sassy and CraftySassy Girls - Sweet Stamp Set and trimmed her out with scissors and added her to the front of the crd with foam tape.
All that's left is to add a popping sentiment! I cut out a fun comic word bubble and "wow" sentiment using the i-crafter Comic Word Dies from blue cardstock and popped them up on the front of my card.
I hope you enjoyed this fun i-crafter and Sassy and Crafty collaboration shaker card! Remember to hop through the rest of the blogs for lots of inspiration!
I stamped all four of my cards on watercolor cardstock. I knew I would be doing a bit of watercoloring, but ended up only watercoloring two backgrounds. That's okay though - the Simon Hurley create. Dye Ink Pads blend beautifully on watercolor cardstock. The Party Hats Background Stamp has five different party hats that pull off of the background stamp so they can be stamped individually. I lined up all five of them with my MISTI and stamped them in a straight line with Versafine Onyx Black Ink and heat embossed the ink with clear powder.
I couldn't decide which style of sentiment I wanted, so I chose a script and a print from the Cake Walk Stamp Set and stamped two of each. No need to decide! Haha! That's all for my stamping. Now let's have some rainbow fun!
I wanted to do something different with the remaining two cards, but keep the colors the same so that the set would look cohesive. I used Prom Queen, Slippery When Wet, Overzealous, Clear Skies, and Crown Me ink pads and smooshed a bit of each color onto my work surface so that I could do a bit of watercoloring.
I did some messy watercoloring two ways - one with color going outside the lines and one keeping color inside the lines, but still keeping it messy. These were so simple and probably my favorite of the set! I spattered some black watercolor onto the backgrounds for texture.
This set of cards came together so quickly! Which is your favorite? I'd love to know!
I wanted to use the Petals & Wings Stamp n Stencil in a different way, so I decided to make a whole background full of dimensional butterflies! And why not throw in a rainbow of pretty, glittery Glitz Glitter Gel to top it all off!
I used the Petals & Wings Stamp n Stencil Die Set to cut out a bunch of butterflies from white cardstock. I used the negative piece of cardstock and some 1.5" Purple Tape to create a template in my stamping tool so that I could easily stamp all of the butterflies. I share this trick ( which is not my own ) in the video above. It's definitely worth a look! It makes lining up and mass producing stamped images a BREEZE! I just added the Purple Tape to the back of the negative die cut piece and then I could pop in a die cut, stamp, remove the die cut, and pop in another. I stamped a whole rainbow of the Petals & Wings butterflies with the Petals & Wings Stamp Set in no time at all!
Once all of my butterflies were stamped it's time to add the Glitz Glitter Gel! I used a rainbow of Glitz Glitter Gel to match the rainbow of stamped butterflies - Bubblegum, Sweet Mango, Gold, Holiday Pine ( this was a limited edition color, but there are other green Glitz Glitter Gels that are just as fabulous! ), Turquoise Sea, and Wild Lilac. I picked my colors of Glitz Glitter Gels based on the ink colors I used. I wanted to have colors in the same color family that were darker than the ink.
I love the Stamp n Stencil systems! It lets you pretty add details to the stamp sets! I sprayed the back of the Petals & Wings Stencil with Pixie Spray and lined up the body of the butterfly from the stencil with the stamped butterfly and added Glitz Glitter Gel. I did two of each color before wiping off my stencil with a baby wipe and adding the next color of Glitz Glitter Gel. I glitzed up all 12 butterflies and set them aside for about an hour to dry.
Once the butterflies were dry I played around with placement on my card. When I had them arranged how I wanted them to be I added each butterfly to my card using Gina K Designs White Foam Squares. These are my favorite foam squares when I want just a bit of lift and dimension! I stamped and white heat embossed a sentiment from the Petals & Wings Stamp Set onto black cardstock and cut it out with a stitched circle die and added it to the card with a double layer of Gina K Designs White Foam Squares. I trimmed off the excess butterflies hanging off the card and added some black gems.
I hope this glitzy summery card makes you happy and inspires you to use repeated die cuts across your card! See you soon!
Hello, everyone! I'm keeping it playful today with a bold black stenciled background and some gorgeous florals from the Sunny Meadow Stamp Set from LDRS Creative. Sit back and enjoy!
This card is so simple to make, but really packs a punch with the fun black polka dot background and bright popped up florals on top. The Sunny Meadow Stamp Set is one of my favorites for happy cards. The flowers are so pretty and there are lots of cute coordinating images to go along with them! The flower I chose has three layers to stamp and the coordinating Sunny Meadow Die Set makes the petals pop off the page!
I stamped three flowers with three combos of ink. I started by using Soft Kisses, Banana Cream Pie, and Bali Blue for the first layer of the flowers. Then I lined up the second layer and stamped with Fandango, Dan-D-Lion, and Marina Madness. The third layer is the darkest and I stamped with Tickled Pink, Tangerine Dreams, and Tropical Sea. Once all the stamping was done it's time to break out the super fun Sunny Meadow Die Set. I first die cut each flower with the die that pops up the petals and then with the outline die so that I had three die cut flowers with an extra pop of wow!
I made a contrasting background using the Playful Patterns Stencil and Raven Hybrid Ink. I love this stencil so much! There are three different patterns to use and all you have to do is just shift the stencil to the side and keep inking until the panel is fully inked. If you've never blended with the Raven Hybrid Ink, you definitely should! It's so crisp and beautiful! And a bit of Extreme Clean Stamp Cleaner takes the ink right off the stencil when you're done!
I adhered the flowers to the card with liquid adhesive - careful to only add adhesive to the "flat" portions of the flower - not the parts that would be popped up. I finished off the card by stamping a sentiment from the Sunny Meadow Stamp Set onto a strip of cardstock and popped it up with foam. Thanks for joining me!
Hi! Today I did some "double masking" and created a cute little rainbow striped card with the Ears to You Stamp Set.
The "double masking" that I did is actually really easy to do! I lined up a white card front with the etched lines on the Mask It Hexagon Stencil. It's so easy to do because there are lines right on the stencil and if you line up the card front with the guide lines the opening for the hexagon will be right in the upper center of the card. Instead of ink blending I first took a black pen and outlined the hexagon shape so that I would have a crisp black outline.
Here's where the "double masking" comes in. I removed the Mask It Hexagon Stencil and used two pieces of masking tape to mask off a skinny line at the edge of the hexagon. I replaced the Mask It Hexagon Stencil and blended on some light pink ink with an Ergonomic Blending Brush. I moved the masking tape down a bit and replaced the Mask It Hexagon Stencil and blended on some darker pink ink. I just repeated this "double masking" process over and over until the whole hexagon was full of skinny rainbow stripes.
I messed up at some point and my last few stripes went a little wonky and you can definitely tell with my last stripe - the orange one on the very right of the hexagon. The bottom of the stripe is a lot wider than the top and I needed a way to cover up my mistake. The Ears to You Stamp Set has this adorable little elephant and I thought he would work perfectly! I stamped him and a little leaf and colored them with Copics and cut them out with the coordinating Ears to You Die Set.