Saturday, December 29, 2018

Scrapping For Less December 2018 Card Kit Reveal

Hi! It's time to reveal the December kit from Scrapping for Less! The theme this month is Animals in the Arctic! And this kit is FULL of so many cute, chilly critters! I love winter! It's my second favorite season (behind autumn) so it's like this kit was made for me! I made a card with each collection in the kit and a bonus card using the extra goodies in the Banana Split level kit! Scroll all the way to the bottom to watch the video! I also made an unboxing video. I know some people don't like to see the whole unboxing process, so I did the video separately! I'll show the unboxing video first and then the process video second!


December’s kit is all about Arctic Animals…Now if you are anything like me, you hate the cold weather, snow, and anything that would mean being cold. However, snow and these cute little critters in this kit are all about fun! So grab your warm beverage, sit back, and hop along with us to see these adorable critters and all the inspiration our designers have to share. Check out the Flavor of the Month page to place your order if you haven’t subscribed. Also, don’t forget to check the A La Carte items (items that are leftover (full packs and such) from putting the kits together, and other items that we have on the website that may coordinate with this kit. Make sure you also put your name in for that Rafflecopter prize!


Here's everything you'll get in the Double Dip level kit - four collections of goodies and cardstock to match! Enough to make a bunch of cards! But scroll down! You can upgrade and get an extra collection! 


You can get a bonus pack of supplies with the Banana Split level kit. The bonus kit includes a stencil, a die, a stamp set, and a glitter marker! Definitely worth the upgrade! Scroll all the way to the bottom of this post to watch my video! I made a bonus card with the extra goodies in the Banana Split kit!


SFL goes above and beyond and gives you four sketches to play with! I used one sketch for each card I made in the video below!


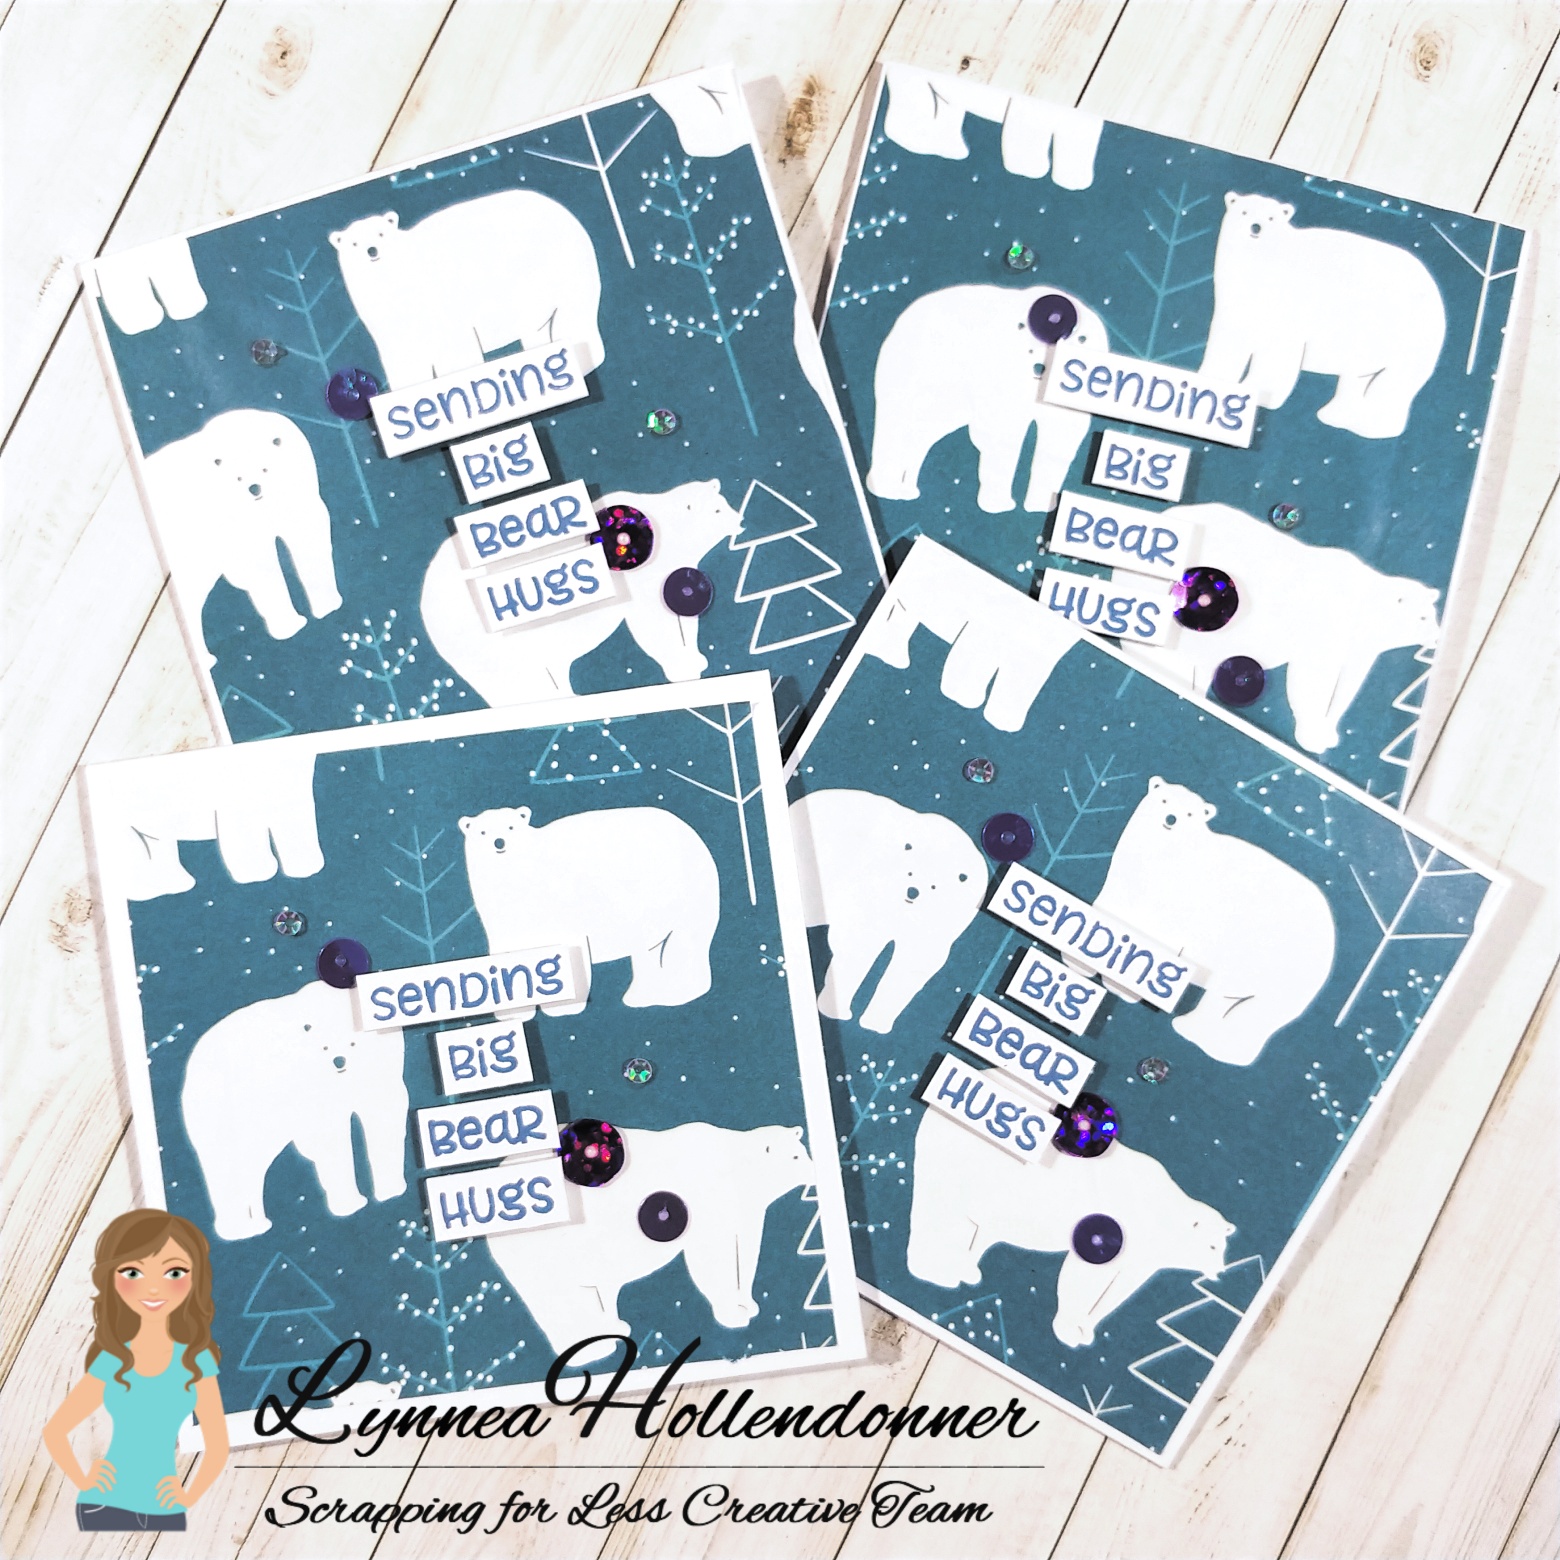
Let's dive in! I went right in order with both the collections and the sketches! So here is my first card using the first collection with the first sketch! I used one of my FAVORITE papers in the whole kit as my background. I colored the little bear from the Bear Hugs stamp set by Sunny Studio with liquid watercolors as well as some liquid glitter. Check out the video to see all the shimmer! I stamped and white heat embossed the snowflakes from the stamp set onto a vellum die cut circle and added some white cardstock as a snow bank and popped up the bear on top. I added some banner sentiments to the left side. This is a loose interpretation of the first sketch, but I think it fits nonetheless!


This card uses the second collection and the second sketch! ( you'll start to see a pattern here! Haha! ) Can I admit something? I'm absolutely TERRIBLE with sketches! Gasp! I have a very difficult time looking at something and making it my own. You'll see with my third and fourth cards that they are pretty much EXACTLY what is pictured in the sketch. I've just never been a sketch person - I just go with what I love. So working with sketches has really stretched my creative abilities and I hope you don't mind me tweaking the sketches a bit to better suit what's in my head!

Anyway! I used a piece of patterned paper for the background of this card once again. This paper pattern rivals for my favorite, too! I love how the little hearts form the argyle pattern! I die cut a piece of watercolor cardstock and stamped the penguin from Stamping Bella's Penguin with a Mug. Such a cute image! I used my Staedtler Felt Tipped markers to color in the little image and used the sketch to build the rest of my card. Everything is from collection 2 except for the ribbon. I stole that from collection 1!


Here's my third card! I used the third collection and third sketch! Here's where you can see that I copied the sketch exactly. If you look closely the sketch even has measurements for the papers! I used some simple masking with a Post-It note to stamp out my little scene. This is one of my favorite stamp sets from the kit! The stamp set is called Winter Pals and is an exclusive Pink & Main stamp set! So cute! And the papers are absolutely wonderful, too! I used a bunch of the patterned papers as well as some of the purple cardstock from the kit. And that little snowflake?! That's a die!! It's the cutest little snowflake die! I'm OBSESSED with snowflakes, so I was SO excited to see this little guy included in the kit! I plan to die cut some fun foam and use it to stamp a background! I grabbed my sentiment from the Arctic Sentiments stamp set by Scrapping for Less. You can find this stamp set in the Banana Split level kit!


This card is almost exactly like the sketch as well, I just changed the shape of the focal point! I used collection four with the fourth sketch! I love stripes! Everyone pokes fun at me because my son's whole wardrobe is stripes and plaid! I can't help it! I just HAD to use these patterned papers together! I used a stacked die set from Pink & Main to cut the die cut shapes. One of the reasons I love stacked die cuts is because you can get multiple sizes of the same shape. I put that to good use for this card and die cut the shape once and then lined up the next largest die and die cut again! I popped up the smaller of the die cuts with a double layer of fun foam for lots of dimension and added a snowflake sticker from Jolee included in the kit and added my sentiment! Check out my videos below: 


Here is my unboxing video for the December 2018 FOTM card kit!


Here's my 4 cards 1 kit video with a bonus card! 


Thanks for watching! Be sure to check out the rest of the blogs in the hop for more inspiration! 

Scrapping For Less Blog

Lynnea - you are here!

Christine

Crystal

Luci

Katie

LeeAnn

Courtney

Jenn


Thursday, December 27, 2018

Scrapping For Less December 2018 Card Kit Sneak Peek

Hi, everyone! I am SO excited for the December card kit from Scrapping for Less! I'm in LOVE with it! Probably my favorite so far! I have a little sneak to share with you today! The full reveal is Saturday the 29th at midnight EST! Make sure you come back for the reveal and blog hop!


All products used are from collection one. Those sequins are AMAZING! I made a set of 4 mini cards. They measure 3.5 inches square. The only extras I used are some cardstock for my card bases, adhesive, and some Faded Jeans Distress Oxide ink! You guys are really going to fall in love with this kit! I can't wait to show you more of my cards! I'll see you on Saturday the 29th for the reveal!


Wednesday, December 26, 2018

Stenciling with Gold Heat Embossing

Hello! I have a card and video using some Kindred Stamps products! I'm using the Up For An Adventure stamp set and Skinny Plaid Stencil again, but this time for a cleaner, more classic look! Remember to scroll to the bottom for my video!


I grabbed a panel of white cardstock and centered the Skinny Plaid stencil towards the bottom and pressed my Versamark ink pad through the stencil and embossed it with gold powder. I needed something to finish off the edge, so I pressed my Versamark ink onto some scrap cardstock and added gold embossing powder and trimmed off about a quarter of an inch strip to adhere to the top of my gold stenciling. I also gold heat embossed a sentiment from the You're a Scream stamp set. I'm seriously lacking in my birthday cards, so I'm making it a goal to make more!


I stamped the house image from Up For An Adventure and colored it with my Staedtler watercolor markers. I cut it out and popped it up on my embossed panel with foam tape. I trimmed down the edges of the focal panel and added some clear Spectrum Noir shimmer to the edges of my card for some extra sparkle! Watch my process video below!


Thanks for stopping by!


Tuesday, December 25, 2018

A Black and Gold Birthday

Hey, everyone! I know you've seen the December box from The Hedgehog Hollow, right!! It's full of products from Pretty Pink Posh! The box has a New Years theme, but I'm all about stretching my crafty goodies, so I made a birthday card! All I added was a "birthday" sentiment from a stamp set in the September 2018 box!


I love the gold, black, and silver color palette, so I decided to keep it even though it usually lends itself to New Years celebrations. I stamped the party hats and streamers from the Happy New Year stamp set onto watercolor cardstock. I used my regular Gansai Tambi colors as well as the Starry Colors palette to color all of the images and used the coordinating dies (included in the box) to cut them out.


I masked off the Happy New Year sentiment from the stamp set to just stamp the "happy" with black ink directly onto my card base and then stamped the birthday sentiment from the September box onto black cardstock and embossed it with white powder. I used foam tape behind all of my images and the birthday strip and adhered them onto the card around the "happy".


This card definitely needed a little pizzaz, so I reached for the sequin mix from Pretty Pink Posh, which is the subscriber bonus this month. I LOVE how shiny they are! And the different sizes are just amazing! This is probably one of my favorite cards I've made in a while! I hope you like it, too!


Monday, December 24, 2018

Bear Hugs and Eskimo Kisses

Hello, everyone! Can you believe it's Christmas Eve already?! December has absolutely FLOWN by! I grabbed some of my favorite winter stamps from Pink & Main and created two quick and easy cards perfect for this cold, snowy season!


I made both of these cards out of one stamped and embossed panel - one of my favorite techniques! I started by inking up a panel of white cardstock with some Tattered Rose Distress Oxide ink. Then I heat set the panel really well with my heat gun.


I'm OBSESSED with snowflakes! I LOVE them! I especially love the Flurries stamp set! There are snowflakes of all shapes and sizes! I use it all the time, so I knew I wanted to use it for these cards! I stamped them all over my inked card panel with Versamark ink and heat embossed them with white powder. Then I stamped them again and heat embossed with Pearl embossing powder. I love the two toned look of the background! The white totally pops and the pearl powder picks up and darkens the background color with just the perfect amount of pearly shine! You could definitely reverse the process and stamp and emboss first then ink for an ink resist, but I always find that my embossing gets discolored. Maybe I'm doing it wrong! Haha!!


I took the panel and chopped it in half (ish) on a diagonal with my paper trimmer. What an easy way to create two cards! I added some fun foam behind each of the cut panels for some dimension and adhered them onto A2 cards. I thought the edge looked a bit unfinished, so I trimmed a strip of white cardstock to about a quarter of an inch and glued it to the edge of the popped up panel.


My cutie images and sentiments are from the Eskimo Kisses stamp set. I stamped them onto watercolor cardstock and colored them with my Gansai Tambi watercolors. I used the coordinating dies to cut them out and some foam tape to pop them up. I stamped the matching sentiments on a diagonal with some black ink.


I used a Spectrum Noir clear shimmer brush pen to add some sparkle to the images and also to the finishing strip of white cardstock. I wish you could see it! There's so much shimmer and shine in real life! Thanks for joining me!


Wednesday, December 19, 2018

Inked Masking and Stenciling

Hi, everyone! I have a video for Kindred Stamps today using their Up For An Adventure stamp set and Skinny Plaid stencil! I am OBSESSED with two things lately - rainbows and stencils! I just love rainbows! I always have an always will! And stencils are an absolute favorite as well! I love all the different things you can do with them! For today's video I used washi tape for masking with ink blending and stenciling! Check it out!


Isn't this card the cutest! You can watch the video at the end of this post to see just how I made this card! To start, I picked 3 widths of washi tape - a skinny, a regular, and one that was slightly wider than regular washi tape. I covered up my card front with strips of washi tape and used my grid mat to help me get them straight. Wherever I put the washi tape will be masked off and remain white. Any parts in between the tape where the card front peeks through will get inked and stenciled. If I do this card again I would omit the biggest washi tape. I don't like the wide areas of white that are showing. I wanted various widths of white space to break up the design, but some of the areas are just too wide to my eye!

Annnyyyway - after my panel was all masked I grabbed a rainbow of Distress Oxide inks to do my ink blending. Here are the colors I used:

Worn Lipstick
Candied Apple
Carved Pumpkin
Fossilized Amber
Cracked Pistachio
Twisted Citron
Mermaid Lagoon
Wilted Violet

I blended on my inks in rainbow order using more washi tape to mask off my card so that I only inked up one stripe at a time. Once I added all my ink I heat set it very well. I wanted to do some heat embossing over the top, so my ink needed to be completely dry before moving on. 


Once my ink was dry I laid the Skinny Plaid stencil over top of my inked panel. I kept all the strips of washi tape in place because I only wanted my stenciling to appear over top of my inking. Once my stencil was in place I smooshed my Versamark ink pad over the stencil. I kept the washi tape in place and used some fine detail white embossing powder. Then came the big reveal! I (finally! haha) removed the washi tape and my striped pattern with heat embossed stenciling was soooo cool! I love it! 


I wanted to take advantage of the large strips of white space on my card and stamp my sentiment in between the inking. I am always in serious shortage of birthday cards, so I grabbed a birthday sentiment from the You're a Scream stamp set and stamped it with Versafine Onyx Black ink. I wanted to use the sentiment from Up For An Adventure that says "better blow up some balloons", but it didn't really work with my card layout. The sentiment is stacked vertically, but that's no problem! I just cut it down so that I had 4 separate sections to work with. It is TOTALLY OKAY to cut your photo-polymer stamps as long as you don't cut through the parts that actually stamp the ink. It's a great way to get more out of your stamps! I stamped the sentiment the way I wanted it to be and it looks awesome! I colored up images from Up For An Adventure with Copic markers and added clear shimmer with my Spectrum Noir sparkle pen and some Glossy Accents for shine! 


Thank you so much! See you next time! 

Tuesday, December 18, 2018

Masked Plaid Background

Hey, everyone! I'm so excited about the December box from The Hedgehog Hollow! It's full of goodies from Pretty Pink Posh! I just can't get enough of the script die! I keep using it! And the stamp set is perfect for New Years and other celebrations! I have plans for using the champagne glasses for an anniversary card! Let's get in to my card! And there's a video, too! You'll want to watch because it's difficult to explain how I made the background!


I knew I wanted to use the cute champagne glasses from the Happy New Year stamp set from Pretty Pink Posh, so I stamped them onto some Bristol smooth cardstock and colored them with my real brush markers. I added some Spectrum Noir sparkle pen to the champagne part and cut them out with the coordinating dies. By the way, how AWESOME is it that there are coordinating dies in this box!! I used them to die cut some sticky backed fun foam so I could add some perfectly shaped and even dimension to the glasses!


My background is made with a whole lot of washi tape and two colors of Nuvo Embellishment Mousse - Indian Gold and Black Ash. I started by masking off half inch strips onto some white cardstock and used a blending tool and foam to "blend" on the gold mousse. I waited about 5 minutes for it to dry and then masked off quarter inch strips going vertically for the black mousse. I thought it needed more black (even though it probably didn't! haha!!), so I framed up the gold mousse with horizontal stripes of the black. It ended up looking more "checkerboard-ish" than plaid, but I liked it anyway! And the mousse gives SO much shimmer and shine! It's gorgeous in real life!


When I think of New Years cards I always think of shiny and shimmery with a black, gold, and silver color palette. The silver mirror cardstock in the kit die cuts like a DREAM, so I used the Pretty Pink Posh New Year Script die from the mirror cardstock once and three additional times from regular white cardstock. I stacked up the three layers of white cardstock and glued the silver mirror die cut on top. This way the dimension matches the dimension with the champagne glasses and I didn't have to cut teeny tiny pieces of foam tape!

Check out the video below for the full process!


Thanks for watching! 

Monday, December 17, 2018

Let's Go On a Safari Ride

Hi!! I have another of my favorite Pink & Main stamp sets to share with you! It's the Wild Thing stamp set from their November release. I'm a sucker for cute critters and these are some of my favorites! The little giraffe is adorable and I LOVE that there's an ostrich!


I started this card by masking off an inch at the bottom of my card with masking tape. I grabbed my absolute FAVORITE stencil from Pink & Main - the Clouds stencil. This stencil has a different cloudy border on all four sides as well as puffy clouds cut out of the center of the stencil. There are so many things you can do with this stencil, but I love it for making a puffy cloudy sky! I used some Tumbled Glass Distress Ink to create some clouds all the way down to the masking tape. Then I removed the tape and moved it up so that I could ink up the bottom portion of the card. I used Pumice Stone Distress Ink to create a little road for my images to sit on.


I stamped out a bunch of images from the Wild Thing stamp set and colored them with my Copic markers. I added quite a bit of Wink of Stella to my images - because all safari animals should sparkle! - and die cut them with the coordinating dies. I tend to go overboard with the amount of foam tape I use to pop up my images. I cut down tiny little pieces to make sure that there is tape behind every little bit of my die cuts because I don't want them to squish and get mangled in the mail. Instead of cutting down pieces of foam tape I decided to die cut some fun foam with the Wild Thing dies. This gives me perfectly shaped foam tape for each of my images! And it was so quick and easy!


You can see here that I used brown fun foam. It doesn't show unless you're looking at it from the side. Even then it doesn't bother me because you can see regular foam tape from the side as well! Thanks for joining me for this card!


Sunday, December 16, 2018

Sunny Studio Christmas Tags

Hi, everyone! I have a set of six quick and simple Christmas tags using products from Sunny Studio to dress up your holiday gift packaging! And you can find all of the products I used today at the Scrapping for Less store! I have a process video for this project, so be sure to scroll down to the bottom of the post to watch!


I used the Sunny Studio Snow Kissed stamp set for these tags. These penguins are the CUTEST! There are three penguins in the set, so I stamped each one twice so that I could make six tags. I used my Staedtler felt tipped markers to color these images. I knew I was going to use some papers from the Sunny Studio Holiday Cheer paper pad, so I chose colors for my images that would coordinate with the papers. Watch the video below to get a peek into my coloring process. When I color multiple images that are similar (like 6 penguins) I color all of the similar areas all at once. For example, all of the black of the penguin bodies, then all the orange in their mouths, then the whites of their faces and bellies, etc. Once the coloring was done I fussy cut them out with my scissors.


I die cut the three pieces of Holiday Cheer papers with a tag die twice so that I would have six tags total. I couldn't find the exact tag die that I used, but click here to purchase a similar die. You could really use any shape for this project - circles, fancy tags, etc. You could even just trim the papers into rectangles! I knew I wanted to add a sentiment and some snowflakes to the tags, but I didn't think it would show up well if I stamped directly onto the patterned paper. No problem! I quickly die cut six more tags from vellum!


I stamped three of my tags with one sentiment and the other three with another from the Snow Kissed stamp set with Versamark ink. My plan was to mix and match the papers and the sentiments so that I had one tag of each design of paper for each sentiment. I hope that makes sense! Haha! You can see it better in the photos and video! I used my MISTI for my stamping, so all six tags were stamped and embossed super quickly!


I used foam squares behind my cute penguin images and adhered them onto the vellum tags above the embossed sentiments. I love how the snowflakes peek out from behind the penguins! To finish off the tags I threaded some tulle through the notch at the top and tied a bow around it with some baker's twine!


Thanks so much for watching! 

Tuesday, December 11, 2018

Kindred Stamps December Release - Crazy About You

Hey, everyone! I have a video for the December release from Kindred Stamps! This release is CRAZY awesome! I hope you'll head over and check it out! I used the Swirl Stencil along with the new Crazy About You stamp set! And I have a video, too! Scroll to the bottom to watch! The entire Kindred Stamps December release will be available Friday, December 14th at 8am PST/11am EST. Be sure to check out the Kindred Stamps blog on Friday for the full product release as well as the complete line up of all the Kindred Stamps Design Team projects from release week! If you visit and comment on all of the designers' blogs this week, you could win $15 in Kindred Stamps shop credit! So join the Fan Club and release event, show the design team some love, and get ready to empty those wallets this Friday!


These characters are SOOOOO crazy awesome! I love them to death! I started with the Swirl Stencil and a couple panels of watercolor cardstock. I knew I wanted to add some water splashes and I find that inks blend better on watercolor cardstock. I taped the panels to the back of the stencil and blended the inks darker in the middle and lighter towards the outside. It was pretty straight forward for the green one - I taped the stencil right in the middle of the cardstock and blended on some Lucky Clover and Twisted Citron Distress Oxide inks. I kept the stencil in place and flicked on some water. I wanted to keep the drops in the ink blended areas. Some of the droplets seeped under the stencil, but it didn't bother me. I love how it turned out!


My second panel involved a little more work, but not too much! I taped off half of the stencil so that I could do two colors of inks! I used Salty Ocean and Tumbled Glass Distress Oxide inks for the blue and Fired Brick and Candied Apple for the reds. The spatters bled under the stencil more on this panel, but I think I like the look!


I stamped out the images and sentiments from the Crazy About You stamp set onto white cardstock with Copic friendly ink and colored in the characters. You can see the markers I used below! I've started snapping a quick photo of the markers I'll be using and I plan to add the image to my blog post. Let me know if you like this method of sharing my marker colors or if you prefer I list them individually!


I popped up the sentiment and images with foam tape and that finished off my two cards! Watch the video below! And make sure you head over to the Kindred Stamps store to check out the rest of the release!


Thanks for watching! 

New Year Fireworks Cards

Hi! I always like to stay ahead of the times when I make cards, so the December box from The Hedgehog Hollow is just perfect! Everything inside is themed for the new year! Yay!! If you want to purchase a subscription there are several ways to subscribe! You could do a month to month rolling subscription to The Hedgehog Hollow starting with the December 2018 box or a three month subscription starting with the December box. There are also a few different boxes available for individual purchase so be sure to visit The Hedgehog Hollow shop!


I LOVE the products in this box! And the sponsor this month is the AMAZING Pretty Pink Posh! There are a bunch of not yet released products from Pretty Pink Posh in this box, so you get first dibs as a subscriber to the box! Love that! I took two cards made from kraft cardstock and positioned the Fireworks stencil from The Hedgehog Hollow in the center. I used some white pigment ink on one and some Black Ash Nuvo Embellishment Mousse on the second. 


The box has some awesome silver mirror cardstock inside and I decided to use the Happy New Year script die and die cut my sentiment from it. I love the shine! And it really pops against the white in real life! 


I had planned to use the silver mirror paper on the second background, but the Nuvo Mousse leaves so much shimmer and shine that it seemed to clash. A white die cut was actually just what I needed! I used some of the exclusive Pretty Pink Posh sequins to finish off both of the cards! 

This box also includes a stamp set and for the first time there are coordinating dies! I can't wait to show you what I made with them! See you next time!